
A Complete Guide to Basement Injection Waterproofing for Homeowners
If you’ve noticed moisture or water damage in your basement, you’re not alone. Many homeowners face similar challenges, and understanding basement injection waterproofing can be the key to resolving these issues. This method effectively seals cracks and prevents leaks, protecting your home from costly damage. Ready to learn about the various materials and techniques available? There’s much to explore that could make your basement a dry, healthy space.
Key Takeaways
- Basement injection waterproofing effectively seals cracks and voids, preventing water seepage and protecting your home’s foundation.
- Choose from various injection materials like polyurethane foam, epoxy resin, or acrylic grout based on your specific basement needs.
- Regularly inspect your basement for signs of moisture such as stains, mold, or musty odors to determine the necessity of waterproofing.
- The injection process involves identifying problem areas, selecting appropriate techniques, and applying sealing materials to create a durable waterproof barrier.
- Proper waterproofing enhances property value, improves indoor air quality, and reduces future repair costs associated with water damage.
Understanding Basement Injection Waterproofing
When it comes to keeping your basement dry, understanding basement injection waterproofing can make all the difference.
This technique targets basement moisture by injecting specialized materials into cracks and voids in your foundation. By doing so, you create a barrier that prevents water from seeping in.
You’ll discover that this method is effective in managing water-related issues and can complement other waterproofing techniques you might consider.
It’s essential to identify the source of moisture first, ensuring that the injection process addresses the root cause, not just the symptoms.
With the right approach, you can reclaim your basement as a usable space.
Types of Injection Materials
Once you’ve identified the source of moisture in your basement, selecting the right injection materials is key to an effective waterproofing solution.
Here are three popular options to take into account:
- Polyurethane Foam: This expands upon application, filling cracks and gaps, creating a waterproof barrier.
- Epoxy Resin: Known for its strength, epoxy resin bonds well to concrete, providing a durable solution against water intrusion.
- Acrylic Grout: This flexible option is ideal for dynamic cracks, allowing movement while preventing leaks.
Choosing the right material guarantees your basement stays dry and protected for years to come.
The Benefits of Basement Injection Waterproofing
When you choose basement injection waterproofing, you’re not just protecting your home from water damage; you’re also boosting its overall value.
This method helps improve indoor air quality by preventing mold and mildew growth, making your space healthier.
Let’s explore how these benefits can transform your basement into a safe, valuable, and comfortable area.
Prevents Water Damage
As moisture seeps into your basement, it can lead to significant water damage that affects not just the structural integrity of your home but also your health.
Basement injection waterproofing is an effective method to combat this issue. Here are three key prevention strategies:
- Seal Cracks: Filling in cracks prevents water from infiltrating your basement, protecting your foundation.
- Redirect Water: Ensuring proper drainage around your home keeps moisture away from your basement.
- Control Humidity: Maintaining lower humidity levels averts mold growth and keeps your indoor air quality high.
Enhances Property Value
Investing in basement injection waterproofing can greatly enhance your property value. By preventing water damage, you not only protect your home but also boost its overall property appeal.
Prospective buyers are attracted to homes with dry, usable basements, increasing your resale potential. A waterproofed basement signifies a well-maintained property, giving you a competitive edge in the market.
Additionally, it reduces the risk of costly repairs down the line, making your home more appealing to buyers. Ultimately, ensuring your basement is waterproofed creates a lasting impression that can considerably elevate both your property’s value and marketability.
Improves Indoor Air Quality
A waterproofed basement does more than just enhance property value; it also greatly improves indoor air quality.
By investing in basement injection waterproofing, you can enjoy several key benefits:
- Mold Prevention: Eliminating moisture stops mold growth, protecting your family’s health.
- Enhanced Air Filtration: A sealed basement reduces allergens and pollutants, ensuring cleaner air circulation throughout your home.
- Humidity Control: Maintaining ideal humidity levels prevents musty odors, creating a more comfortable living environment.
With these improvements, you’ll breathe easier, knowing your home is a healthier place for you and your loved ones.
Assessing Your Basement’s Waterproofing Needs
How can you determine if your basement needs waterproofing? Start with a thorough basement inspection.
Look for visible signs of moisture, such as water stains, mold, or musty odors.
Next, conduct a moisture assessment by checking the humidity levels and using a moisture meter on walls and floors.
If you notice persistent dampness or flooding, it’s vital to address these issues before they worsen.
Don’t forget to evaluate seasonal changes; heavy rain or melting snow can exacerbate problems.
Taking these steps will help you identify whether your basement requires immediate waterproofing solutions.
The Basement Injection Process
When it comes to basement waterproofing, understanding the injection process is essential for effectively sealing leaks and preventing future moisture problems.
The process generally involves three key steps:
The injection process for basement waterproofing includes identifying leaks, selecting techniques, and applying sealing methods.
- Identifying Problem Areas: Locate the cracks or leaks where water is entering.
- Choosing Injection Techniques: Select appropriate methods, such as polyurethane foam or epoxy injections, based on the severity of the issue.
- Applying Sealing Methods: Inject the chosen material into the cracks to create a waterproof barrier.
DIY vs. Professional Services
After mastering the basement injection process, you might wonder whether to tackle the job yourself or hire professionals.
DIY techniques can save you money and give you hands-on experience, but they require time, effort, and some technical know-how. If you’re confident in your skills, a DIY approach may work for you.
However, consider the professional advantages: experts bring specialized tools, knowledge, and experience that can guarantee a more effective and lasting solution. They can quickly diagnose issues and navigate any complications, often providing warranties for their work.
Weigh your options carefully to choose the best route for your basement waterproofing needs.
Maintenance Tips for a Dry Basement
To keep your basement dry and free from moisture, it’s vital to implement regular maintenance practices.
Effective basement maintenance helps with moisture control and prevents future issues.
Here are three essential tips:
- Inspect Gutters and Downspouts: Confirm they’re clear of debris, directing water away from your foundation.
- Check for Cracks: Regularly examine walls and floors for any cracks and seal them promptly to prevent water intrusion.
- Monitor Humidity Levels: Use a dehumidifier to maintain humidity below 60%, reducing the risk of mold growth.
Conclusion
In summary, basement injection waterproofing is a smart investment for protecting your home from moisture damage. By understanding the various injection materials and processes, you can make informed choices that suit your specific needs. Whether you choose to tackle the project yourself or hire a professional, maintaining a dry basement is essential for your home’s value and your family’s health. Stay proactive, and you’ll enjoy a safer, more comfortable living environment for years to come.
What Are the Signs of Inadequate Waterproofing Methods in Your Basement?
If you notice visible water stains on your basement walls or floors, it could signal inadequate waterproofing methods. Mold and mildew growth often follows excessive moisture, while musty odors can indicate deeper issues. Peeling paint and cracks in the foundation further suggest water intrusion and compromised structural integrity. Understanding these signs is essential for maintaining a safe environment. However, what steps should you take to address these problems effectively?
Key Takeaways
- Visible water stains on walls and floors indicate potential waterproofing issues and may signal groundwater infiltration or improper drainage.
- Mold and mildew growth suggests excess moisture and inadequate waterproofing, requiring immediate attention to leaks and ventilation.
- Musty odors in the air often point to moisture problems linked to mold, stagnant water, or poor ventilation, affecting indoor air quality.
- Peeling or bubbling paint indicates moisture intrusion, disrupting paint adhesion and suggesting underlying waterproofing failures.
- Cracked or damaged foundations can compromise structural integrity and may signal inadequate waterproofing, necessitating regular inspections for safety.
Visible Water Stains on Walls and Floors
Visible water stains on walls and floors often signal a serious problem with your basement’s waterproofing. Identifying water stain patterns can help you pinpoint moisture sources.
Visible water stains indicate potential waterproofing issues in your basement; recognizing their patterns is crucial for identifying moisture sources.
For instance, horizontal lines might indicate groundwater infiltration, while dark patches near windows could suggest condensation issues. You should inspect areas where plumbing pipes run, as leaks often manifest as localized stains.
Additionally, check for stains following heavy rainfall, which could indicate improper drainage. By understanding these patterns, you can take proactive measures to address the underlying issues, improving your basement’s waterproofing and preventing further damage.
Don’t ignore these signs; they warrant immediate attention.
Mold and Mildew Growth
When you notice mold and mildew growth in your basement, it’s often a clear indication of inadequate waterproofing and excessive moisture levels.
To effectively implement mold prevention and mildew control, consider these steps:
- Identify and repair leaks: Check pipes, walls, and floors for any water intrusion.
- Improve ventilation: Use exhaust fans or dehumidifiers to reduce humidity.
- Seal cracks: Fill any gaps in walls or foundations to prevent moisture entry.
- Use mold-resistant materials: Opt for paints and finishes designed to inhibit mold growth.
Addressing these issues promptly will help maintain a dry, healthy basement environment.
Musty Odors in the Air
Musty odors in your basement often signal underlying moisture issues, typically stemming from mold or mildew growth.
Ignoring these odors can lead to health complications, including respiratory problems and allergic reactions.
To effectively address this issue, you’ll need to identify the source of the dampness and implement appropriate mitigation strategies.
Source of Odor
If you notice a persistent, unpleasant odor in your basement, it could signal underlying issues related to inadequate waterproofing.
Identifying the odor sources is essential for effective odor elimination. Here are common culprits:
- Mold and Mildew: Thriving in damp areas, they release musty smells.
- Stagnant Water: Accumulations can lead to decay and odors.
- Poor Ventilation: Lack of airflow worsens mustiness.
- Deteriorating Materials: Wet wood or insulation can emit foul scents.
Addressing these issues promptly helps maintain a healthy environment and prevents further complications.
Health Implications
Persistent musty odors in your basement can indicate more than just discomfort; they pose potential health risks. These odors often result from mold and mildew, which can lead to respiratory issues. Prolonged exposure can aggravate allergies and asthma, impacting your overall well-being. Understanding the specific health implications is essential for maintaining a safe living environment.
| Health Risk | Description | Symptoms |
|---|---|---|
| Mold Exposure | Allergens affecting respiratory function | Coughing, wheezing |
| Mildew Presence | Irritation and inflammation in airways | Sneezing, fatigue |
| Chemical Fumes | Volatile organic compounds from decay | Headaches, nausea |
| Poor Air Quality | Accumulated pollutants in the air | Dizziness, irritation |
Mitigation Strategies
To effectively combat musty odors in your basement, implementing a series of targeted mitigation strategies is crucial.
Consider the following steps:
- Improve Drainage Solutions: Confirm gutters and downspouts direct water away from your foundation.
- Install Sump Pumps: These devices help remove excess groundwater, reducing humidity levels.
- Seal Cracks: Use waterproof sealants on walls and floors to prevent moisture ingress.
- Ventilation: Increase airflow by installing vents or using dehumidifiers to keep humidity in check.
Peeling or Bubbling Paint
One of the most telling signs of inadequate waterproofing in your basement is the presence of peeling or bubbling paint on the walls. This issue often indicates poor paint adhesion due to moisture invasion, which can lead to further damage if not addressed. When water seeps into the walls, it disrupts the bond between the paint and the surface, causing unsightly imperfections.
| Cause | Effect |
|---|---|
| Moisture Invasion | Peeling Paint |
| Poor Paint Adhesion | Bubbling Paint |
| High Humidity | Compromised Walls |
Act quickly to prevent further issues!
Cracked or Damaged Foundation
The presence of peeling or bubbling paint can often signal deeper issues with your basement’s structure, particularly concerning the foundation.
Cracks or damage to your foundation can compromise its structural integrity. It’s important to conduct a thorough foundation inspection if you notice:
- Horizontal or vertical cracks wider than 1/8 inch.
- Crumbling or flaking concrete.
- Water pooling in your basement.
- Doors and windows that stick or won’t close properly.
Addressing these signs promptly can prevent significant damage.
Regular foundation inspections can help guarantee your home remains safe and structurally sound, protecting your investment in the long run.
Excessive Humidity Levels
When you notice excessive humidity levels in your basement, it often indicates inadequate waterproofing and can lead to a host of problems, including mold growth and structural damage.
Effective humidity control is essential; you should monitor moisture levels regularly. Installing ventilation systems can help circulate air and reduce humidity, promoting a healthier environment.
Additionally, make certain that any existing vents are unobstructed and functioning properly. If humidity remains high despite these measures, consider consulting a professional to assess your waterproofing methods.
Addressing these issues promptly can prevent costly repairs and maintain the integrity of your basement.
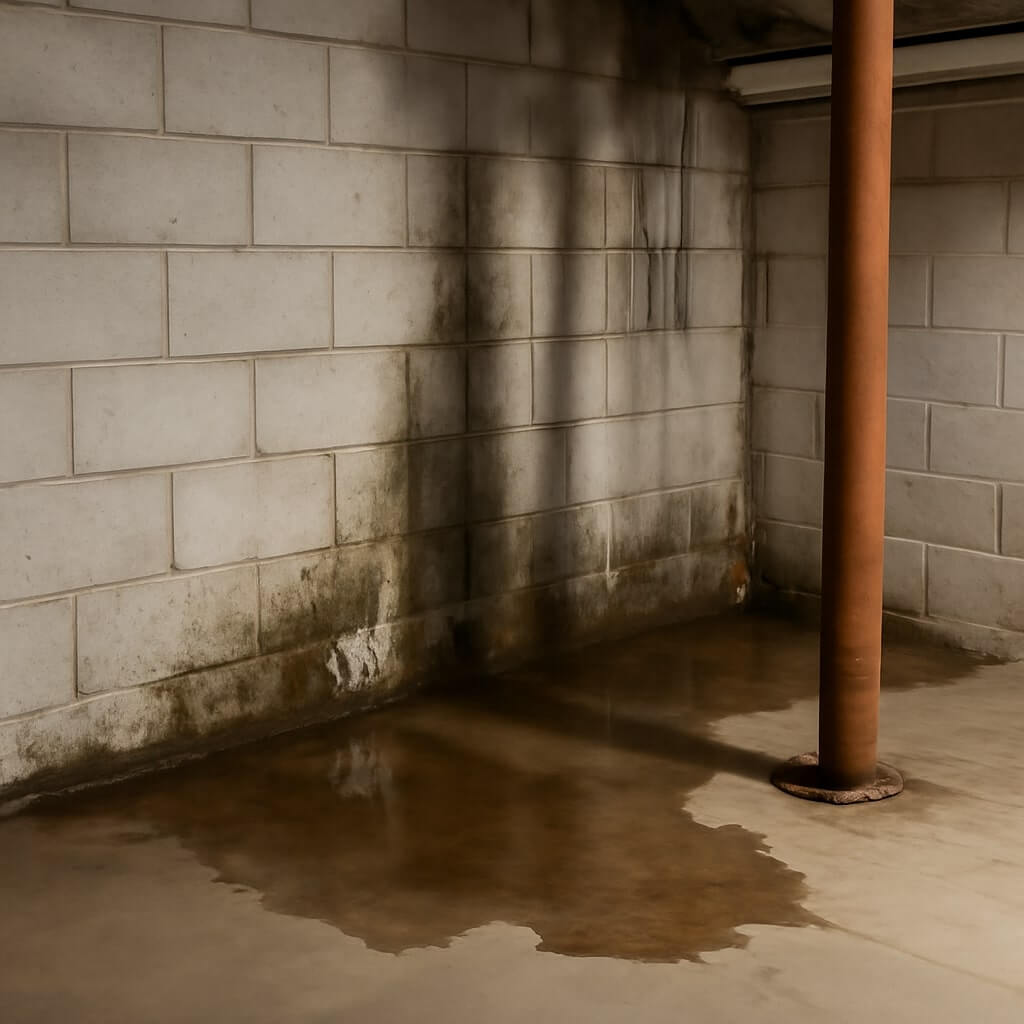
Water Accumulation in Corners
Water accumulation in corners can be a clear indicator of inadequate waterproofing in your basement. This issue often arises due to ineffective corner drainage or failing moisture barriers.
To address this problem, consider the following steps:
- Inspect the corner drainage system for blockages or damage.
- Check the integrity of moisture barriers; any tears could lead to leaks.
- Confirm proper grading around your home to direct water away from the foundation.
- Consider installing additional sump pumps to manage excess water effectively.
Taking these measures will help prevent further water accumulation and protect your basement from damage.
Insect and Pest Infestations
Inadequate waterproofing can lead to insect and pest infestations in your basement, as damp environments create ideal breeding grounds for unwanted critters.
You may notice an uptick in pests like termites, cockroaches, and rodents, all thriving in moisture-rich conditions.
Implementing effective pest control measures becomes essential to combat these infestations.
To guarantee insect prevention, regularly inspect your basement for cracks, leaks, or standing water.
Seal any entry points and maintain proper ventilation to reduce humidity.
Conclusion
Inadequate waterproofing can lead to serious issues in your basement, from visible water stains to mold growth and structural damage. If you notice any of these signs—like musty odors or peeling paint—it’s essential to address them promptly. Ignoring these problems can escalate into costly repairs and health risks. By taking action now, you can safeguard your basement environment and guarantee long-term stability. Regular inspections and maintenance are key to effective waterproofing and a healthy living space.
How to Effectively Waterproof a Finished Basement – A Complete Guide
Waterproofing a finished basement is essential for preventing moisture issues and protecting your investment. First, you’ll want to assess the current condition of your space, looking for signs of dampness or structural damage. Identifying the sources of potential water intrusion is next. Once you understand the problem, you can choose the right waterproofing methods and implement effective drainage solutions. Ready to learn how to keep your basement dry for the long haul?
Key Takeaways
- Assess the current condition of your basement by checking for moisture levels, signs of mold, and structural integrity.
- Identify sources of water intrusion, including leaky pipes, foundation cracks, and drainage issues around your home.
- Choose appropriate waterproofing methods, such as interior sealants or exterior barriers, based on the severity of water problems.
- Implement effective drainage solutions like sump pumps and French drains to redirect water away from the foundation.
- Maintain a dry basement long-term by regularly inspecting systems, cleaning drains, and using dehumidifiers to control humidity levels.
Assessing Your Basement’s Current Condition
Before diving into waterproofing solutions, it’s essential to assess your basement’s current condition. Start by measuring moisture levels using a hygrometer; this helps you understand the environment. Pay close attention to any signs of dampness or mold.
Next, evaluate the structural integrity of walls and floors. Look for cracks or signs of water damage, as these can compromise your basement’s safety. Document your findings to identify areas needing attention.
Identifying Common Sources of Water Intrusion
Once you’ve assessed your basement’s condition, the next step is pinpointing common sources of water intrusion. Start by checking for leaky pipes, as these can cause significant moisture problems. Then, examine the foundation for cracks, which can allow water to seep in during heavy rains.
| Source | Description |
|---|---|
| Leaky Pipes | Pipes that are damaged or poorly sealed. |
| Foundation Cracks | Visible gaps in the foundation walls. |
| Poor Drainage | Ineffective grading around your home. |
Identifying these issues early helps you take the right steps to prevent further water damage.
Choosing the Right Waterproofing Methods
As you consider how to effectively waterproof your basement, it’s crucial to evaluate the various methods available to suit your specific situation.
For interior sealing, applying waterproof paint or sealants can help block moisture from penetrating walls and floors. This method is particularly useful for minor issues.
On the other hand, if you’re dealing with more significant water problems, installing exterior barriers, like drainage membranes or coatings, can redirect water away from your foundation.
For serious water issues, consider adding exterior barriers to effectively redirect water away from your foundation.
Each method has its strengths, so assess your basement’s needs carefully to choose the right approach for a dry, comfortable environment.
Implementing Drainage Solutions
To guarantee your basement remains dry and free from water damage, implementing effective drainage solutions is essential.
Start by installing a sump pump, which will actively remove excess water from your basement. Make sure it’s connected to a proper drainage system to prevent water buildup.
Additionally, consider adding French drains, which redirect water away from your foundation. These drains consist of gravel-filled trenches that capture and channel water efficiently.
Maintaining a Dry Basement Long-Term
Implementing drainage solutions like sump pumps and French drains lays the groundwork for a dry basement, but ongoing maintenance is key to ensuring it stays that way long-term. Regularly inspect your systems and perform preventive maintenance to catch issues early. Check humidity levels with a hygrometer, and use dehumidifiers to control moisture.
| Action | Frequency |
|---|---|
| Inspect sump pump | Monthly |
| Clean French drains | Biannually |
| Test humidity levels | Monthly |
| Change air filters | Quarterly |
Conclusion
By following these steps, you can effectively waterproof your finished basement and protect it from moisture damage. Start with a thorough assessment, identify potential water intrusion sources, and choose the right waterproofing methods tailored to your needs. Implement reliable drainage solutions and commit to regular maintenance to keep your basement dry in the long run. With consistent effort, you’ll create a safe, comfortable space that adds value to your home and enhances its livability.
7 Essential Steps for DIY Waterproofing Basement Walls Inside
If you’ve noticed dampness or mold in your basement, it’s time to take action. Waterproofing your basement walls isn’t just a task; it’s a necessity for maintaining a dry and safe environment. By following these seven essential steps, you can effectively tackle moisture issues and protect your home. But first, let’s assess the condition of your basement walls and identify any underlying problems that need to be addressed.
Key Takeaways
- Assess the basement walls for cracks, moisture, and material type to determine necessary waterproofing methods.
- Clean the walls thoroughly to remove dust, dirt, and mold using a stiff brush and bleach solution.
- Repair any identified cracks with appropriate materials such as caulk, epoxy, or hydraulic cement based on severity.
- Apply a suitable waterproofing sealant evenly across the walls, ensuring complete coverage and avoiding pooling.
- Consider installing a drainage system, like an interior French drain or sump pump, to manage water flow effectively.
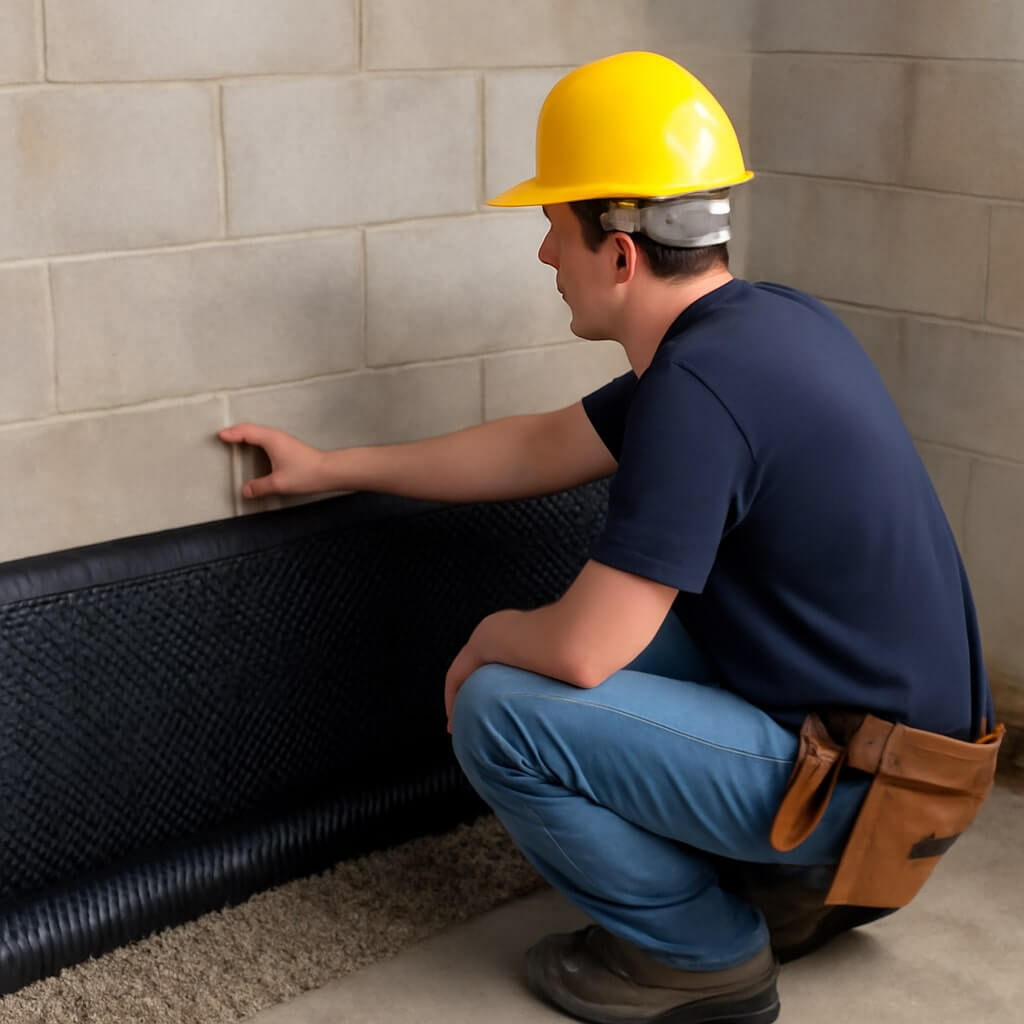
Assess the Condition of Your Basement Walls
Before diving into waterproofing your basement, it’s essential to assess the condition of your basement walls.
Start by checking for any visible cracks or damage in the wall materials. Look for signs of moisture sources, such as water stains or damp spots. These indicators can help you identify potential problem areas.
Pay attention to the type of materials used in your walls; concrete and masonry are more resilient than wood. If you find significant issues, consider consulting a professional before proceeding.
Understanding your walls’ condition will guide you in selecting the right waterproofing methods for effective results.
Clean the Walls Thoroughly
To guarantee effective waterproofing, start by cleaning your basement walls thoroughly. Remove dust, dirt, and any debris using a stiff brush and vacuum.
Start your waterproofing project right by thoroughly cleaning your basement walls to ensure a successful outcome.
For mold prevention, mix a solution of water and bleach, applying it to areas with visible mold. Scrub these spots and rinse well to make certain the surface is free from contaminants.
If your walls are painted, consider stripping old paint to enhance surface preparation. This step is essential for proper adhesion of waterproofing products.
Finally, let the walls dry completely before proceeding with the next steps. A clean surface will help guarantee a successful waterproofing project.
Repair Any Cracks or Damage
Once you’ve cleaned the walls, it’s crucial to address any cracks or damage that could compromise your waterproofing efforts. Start by performing crack identification; look for visible gaps or fissures. Next, conduct a damage assessment to determine the severity. Here’s a quick guide to help you:
| Crack Type | Repair Method |
|---|---|
| Hairline Cracks | Caulk or Sealant |
| Small Cracks | Epoxy Injection |
| Large Cracks | Hydraulic Cement |
| Structural Damage | Consult a Professional |
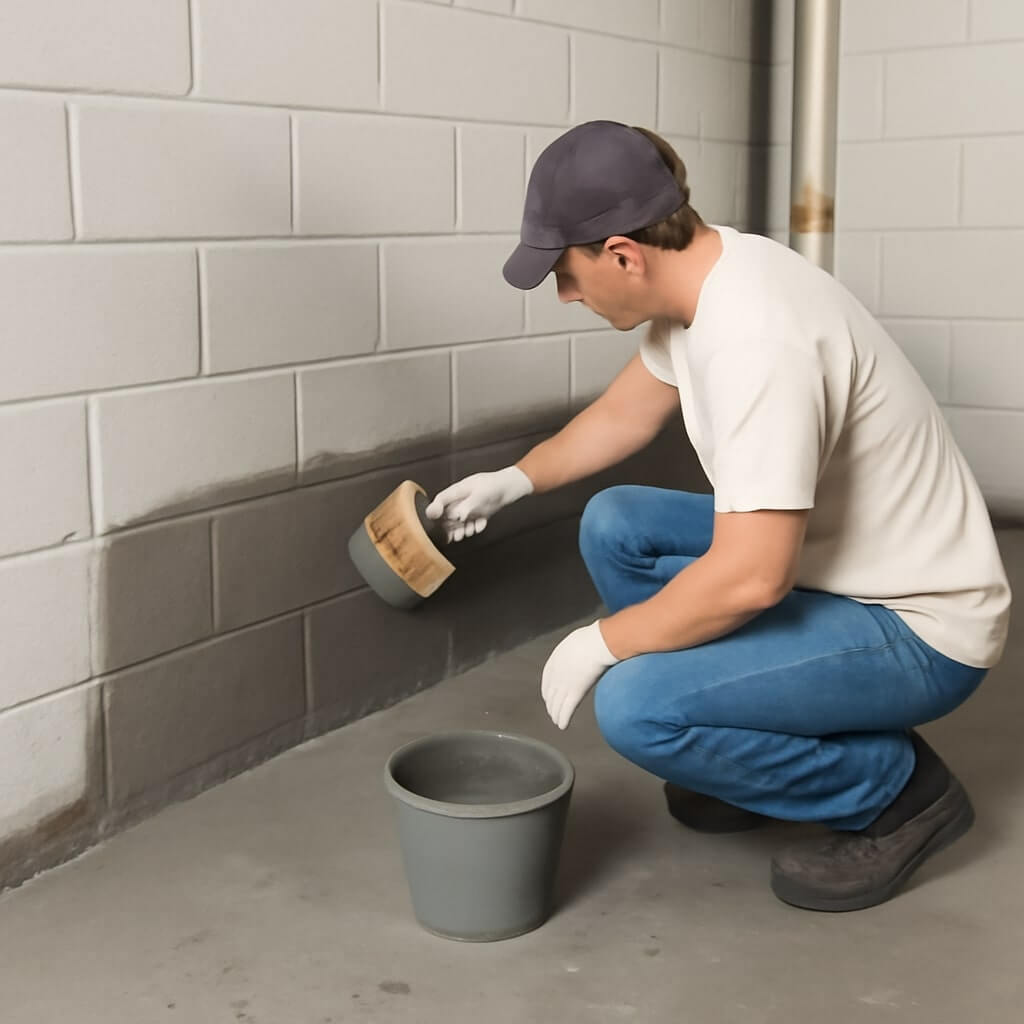
Apply Waterproofing Sealant
Now that you’ve repaired any cracks, it’s time to apply waterproofing sealant to protect your basement.
First, you need to choose the right sealant for your specific needs, then make sure you’re using proper application techniques for the best results.
Don’t overlook the importance of allowing adequate curing time to maximize the sealant’s effectiveness.
Choose the Right Sealant
Choosing the right sealant is crucial for effective waterproofing of your basement walls.
Start by considering the sealant types available, like liquid rubber, epoxy, or acrylic. Liquid rubber offers flexibility, while epoxy provides a strong bond for more severe moisture issues. Acrylic is easy to apply and great for minor dampness.
Next, think about application methods; some sealants require brushes, while others can be sprayed on. Make certain to read the manufacturer’s instructions for ideal results.
Proper Application Techniques
To guarantee your waterproofing sealant is applied effectively, start by preparing the surface of your basement walls. Clean the walls thoroughly, removing any dirt, dust, or old paint.
Once the surface is prepped, choose a suitable application technique—either a brush, roller, or sprayer, depending on your sealant type. Apply the sealant evenly, ensuring complete coverage and avoiding pooling.
Work in sections to maintain wet edges, which helps with adhesion. Finally, pay attention to corners and joints, applying extra sealant where needed for maximum protection.
With proper surface preparation and application techniques, your basement will be well on its way to becoming waterproof.
Curing Time Importance
Although you may be enthusiastic to finish your basement waterproofing project, understanding the importance of curing time is essential for achieving a long-lasting seal.
Curing methods can greatly affect how well your waterproofing sealant performs. Make certain to follow the manufacturer’s instructions for ideal conditions, like temperature and humidity, to guarantee proper curing.
Rushing this step can lead to poor adhesion and eventual failure of the seal. Allow enough time for the sealant to cure fully, typically 24 to 72 hours, depending on the product.
Patience here will save you from future headaches and costly repairs.
Install a Drainage System
To effectively waterproof your basement, installing a drainage system is essential.
First, you’ll need to choose the right type of drainage, such as a French drain or a sump pump, based on your specific needs.
Then, guarantee proper grading around your home to direct water away from the foundation and prevent potential flooding.
Choose Drainage Type
When it comes to waterproofing your basement, selecting the right drainage system is essential for preventing water damage. You have several drainage options, each with unique drainage benefits. Here’s a quick overview to help you decide:
| Drainage Type | Benefits |
|---|---|
| Interior French Drain | Effective for indoor water flow |
| Exterior French Drain | Prevents water from reaching walls |
| Sump Pump | Removes water accumulation |
| Grated Drains | Directs water away from foundation |
| Surface Drainage | Handles surface runoff effectively |
Choose wisely to guarantee your basement stays dry and protected!
Implement Proper Grading
Implementing proper grading around your home is essential for effective water management and basement waterproofing. By directing water away from your foundation, you reduce the risk of moisture seeping into your basement.
Here are some grading techniques to take into account:
- Verify the ground slopes away from your home (at least 6 inches over 10 feet)
- Examine soil composition; clay holds water, while sand drains well
- Install a French drain if necessary
- Create swales or ditches to divert water
- Regularly maintain landscaping to prevent erosion
Use a Dehumidifier
A dehumidifier can be a game-changer for maintaining a dry basement environment. It effectively reduces moisture levels, preventing mold and mildew growth. Understanding the dehumidifier benefits helps you make informed choices for humidity control.
| Benefit | Description | Impact |
|---|---|---|
| Mold Prevention | Reduces moisture, inhibiting mold growth | Healthier air quality |
| Odor Elimination | Removes damp odors caused by excess moisture | Fresher basement smell |
| Structural Integrity | Prevents water damage to walls and foundation | Prolongs lifespan of home |
| Comfort | Creates a more comfortable living space | Enhanced overall comfort |
| Energy Efficiency | Helps HVAC systems work more effectively | Lowers energy bills |
Maintain Regular Inspections and Repairs
Maintaining regular inspections and repairs of your basement walls is essential for preventing long-term water damage.
Regular inspections and repairs of your basement walls are crucial to prevent costly long-term water damage.
You should conduct inspections at least every six months. During each inspection, focus on a thorough damage assessment to catch issues early.
- Check for cracks in the walls
- Look for signs of mold or mildew
- Inspect for water stains or discoloration
- Assess gutter and downspout drainage
- Confirm your waterproofing measures are intact
Conclusion
By following these essential steps, you’ll effectively waterproof your basement walls and protect your home from moisture damage. Start with a thorough assessment and cleaning, then make necessary repairs and apply a quality sealant. Don’t forget to install a drainage system to manage water flow. Using a dehumidifier can further enhance your efforts, and regular inspections will help keep everything in check. With these strategies, you can enjoy a dry, healthy basement for years to come.

7 Proven SEO Practices for Basement Waterproofing Companies
If you’re looking to boost your basement waterproofing business’s online presence, understanding effective SEO practices is essential. By optimizing your website for local search and creating content that addresses customer pain points, you can greatly enhance your visibility. But there’s more to it than just keywords and content. Exploring how to leverage social media and build quality backlinks is equally important. Let’s examine these strategies and what they can mean for your business growth.
Key Takeaways
- Optimize your website for local search by incorporating relevant keywords and maintaining consistent NAP across platforms.
- Create high-quality content that addresses common basement waterproofing issues and showcases successful case studies.
- Utilize keyword research tools to identify and strategically integrate high-traffic keywords like “basement leaks” into your content.
- Leverage social media to share educational content, customer testimonials, and engage with your audience through interactive posts.
- Monitor SEO performance metrics regularly to adjust strategies based on traffic sources, engagement, and audience feedback.
Optimize Your Website for Local Search
To effectively attract local customers, you need to optimize your website for local search. Start by implementing local keyword optimization throughout your site’s content, focusing on terms relevant to basement waterproofing in your area.
Confirm your Google My Business profile is complete and accurate, as this boosts your visibility in local search results. Use consistent NAP (Name, Address, Phone) information across all platforms to enhance credibility.
Encourage customer reviews on your Google My Business page to improve rankings and trustworthiness. By strategically aligning your website with local search criteria, you’ll draw more potential clients directly to your services.
Create High-Quality, Informative Content
Creating high-quality, informative content is key to establishing your authority in the basement waterproofing niche.
Focus on addressing common problems your customers face, as this builds trust and encourages engagement.
Don’t forget to incorporate engaging visuals; they can enhance understanding and keep visitors on your site longer.
Focus on Problem-Solving
A focus on problem-solving is essential for basement waterproofing companies looking to establish authority in a competitive market. By addressing customer pain points directly, you can create content that resonates and builds trust.
Identify common issues like leaks, moisture, and structural damage, and outline effective solution strategies. Use case studies or testimonials to showcase successful interventions. This approach not only informs potential clients but also positions you as a knowledgeable resource.
When you provide practical, actionable advice, you enhance your credibility and make it easier for customers to choose your services over competitors. Prioritize clear, valuable content that solves real problems.
Use Engaging Visuals
How can basement waterproofing companies effectively capture their audience’s attention? By harnessing the power of visual storytelling, you can make complex information more digestible.
Create stunning infographic designs that illustrate key statistics and processes related to waterproofing. This not only engages viewers but also enhances their understanding of your services.
Use visuals strategically on your website and social media to guide potential customers through their decision-making journey. Remember, high-quality visuals can greatly increase user retention and improve SEO rankings.
Stand out from competitors by integrating compelling visuals that resonate with your audience and clearly convey your expertise.
Utilize Keyword Research Effectively
While many basement waterproofing companies overlook it, effective keyword research is essential for driving targeted traffic to your website. By utilizing keyword tools, you can identify terms that align with your audience’s search intent. This guarantees you attract potential customers actively seeking your services.
| Keyword | Search Volume | Difficulty |
|---|---|---|
| Basement leaks | 2,400 | Medium |
| Waterproofing solutions | 1,900 | High |
| Foundation repair | 1,500 | Medium |
Analyze these keywords and integrate them strategically into your content to enhance visibility and engagement.
Leverage Social Media for Engagement
To effectively engage potential customers, leveraging social media is essential for basement waterproofing companies. By crafting targeted social media campaigns, you can showcase your expertise and connect with your audience.
Use platforms like Facebook and Instagram to share before-and-after photos, customer testimonials, and educational content about basement waterproofing. Encourage audience engagement by asking questions, running polls, or hosting live Q&A sessions.
Consistent interaction not only builds trust but also fosters a community around your brand. Remember, the more you engage, the more likely potential customers will remember your services when they need basement waterproofing solutions.
Build Quality Backlinks
Building quality backlinks is essential for enhancing your basement waterproofing company’s online visibility. Effective link building boosts your site’s authority and search rankings. Focus on outreach strategies to connect with relevant sites, industry blogs, and local businesses. Collaborate on content or guest posts to create valuable links.
| Strategy | Description | Benefits |
|---|---|---|
| Guest Blogging | Write articles for reputable sites | Increases visibility and trust |
| Resource Pages | Get listed on industry resource pages | Direct traffic to your site |
| Local Partnerships | Collaborate with local businesses | Strengthens community ties |
Make these efforts a priority!
Implement Technical SEO Best Practices
Implementing technical SEO best practices is essential for your basement waterproofing company’s online performance, as it guarantees search engines can effectively crawl and index your website.
Prioritize site speed, making sure your pages load quickly to enhance user experience and reduce bounce rates. Utilize tools like Google PageSpeed Insights to identify areas for improvement.
Additionally, focus on mobile optimization; with more users accessing websites via mobile devices, a responsive design is vital. Confirm that your content adapts seamlessly to various screen sizes, making it easy for potential customers to navigate and find the information they need.
These practices will boost your visibility and credibility online.
Monitor and Analyze Your SEO Performance
To optimize your SEO efforts, you need to track key metrics that reveal your website’s performance.
Analyzing this data allows you to adjust your strategies effectively, ensuring you stay ahead of the competition.
Regularly monitoring these metrics will empower you to make informed decisions that enhance your online visibility.
Track Key Metrics
While developing an effective SEO strategy, tracking key metrics is essential for understanding your performance and identifying areas for improvement.
Focus on key performance indicators like organic traffic, bounce rates, and conversion rates. Analyzing these metrics helps you uncover valuable insights about your audience’s behavior.
Pay attention to traffic sources to determine which channels are driving the most visitors to your site. This data not only informs your current strategies but also highlights potential growth areas.
Adjust Strategies Accordingly
As you monitor and analyze your SEO performance, you’ll discover that flexibility is key to staying ahead in the competitive basement waterproofing market.
By keeping a close eye on market trends, you can adapt your strategies to meet evolving demands. Regularly review audience feedback to understand their needs and preferences better.
This insight allows you to fine-tune your content and keywords, ensuring they resonate with potential customers. Don’t hesitate to pivot your approach based on data; effective SEO is a dynamic process.
Staying agile won’t only enhance your visibility but also solidify your reputation in the industry.
Conclusion
By implementing these seven proven SEO practices, you’ll not only boost your basement waterproofing company’s online visibility but also establish a strong connection with potential clients. Focus on local search optimization, create valuable content, and leverage social media to engage your audience. Don’t overlook technical SEO and the importance of quality backlinks. Finally, consistently monitor your SEO performance to adapt and thrive in a competitive market. Elevate your strategy and watch your business grow!
Common Mistakes to Avoid in New Build Basement Waterproofing?
When you’re constructing a new build basement, it’s essential to recognize the common mistakes that can jeopardize your waterproofing efforts. Neglecting proper drainage solutions or using subpar materials can lead to significant issues down the line. Additionally, skipping necessary surface preparation or overlooking construction joints may compromise your basement’s integrity. Understanding these pitfalls is vital for ensuring a dry, safe environment. What specific steps can you take to avoid these costly errors?
Key Takeaways
- Neglecting proper site drainage can lead to water infiltration; ensure yard grading directs water away from the foundation.
- Using inadequate waterproofing materials compromises basement protection; choose durable, compatible products to withstand moisture and hydrostatic pressure.
- Skipping thorough surface preparation can cause significant issues; assess and repair substrates before applying waterproofing materials.
- Overlooking cracks and construction joints allows moisture penetration; use high-quality sealing products to fill gaps thoroughly.
- Ignoring ventilation and humidity control can result in mold growth; install ventilation systems and monitor humidity levels between 30-50%.
Neglecting Site Drainage Solutions
When you overlook site drainage solutions, you greatly increase the risk of water infiltration in your basement. Proper site grading is essential; it directs water away from your foundation.
Verify the slope of your yard promotes effective runoff, preventing water accumulation near the base. Additionally, install drainage channels to capture and redirect excess water. These channels help manage surface water and reduce hydrostatic pressure against your walls.
Without these measures, you risk costly damage and mold growth. Prioritizing site drainage solutions during construction provides long-term protection, keeping your basement dry and safe from water-related issues.
Using Inadequate Waterproofing Materials
Choosing inadequate waterproofing materials can undermine your efforts to keep your basement dry and protected. It’s essential to select materials with high durability to withstand moisture and potential hydrostatic pressure.
Additionally, verify product compatibility with your existing building elements; mismatched materials can lead to failures and leaks. For instance, using a membrane that doesn’t adhere properly to concrete can create vulnerabilities.
Always consider the long-term performance of your chosen materials, as subpar options may deteriorate quickly. Invest in quality products designed for basement applications to provide reliable protection and peace of mind against water intrusion.
Skipping Proper Surface Preparation
Although you might be keen to start waterproofing your basement, skipping proper surface preparation can lead to significant problems down the line.
To guarantee a successful waterproofing process, follow these essential steps:
- Conduct a thorough substrate assessment to identify any weaknesses.
- Use effective surface cleaning techniques to remove dirt and debris.
- Repair any existing damage before applying waterproofing materials.
- Allow the surface to dry completely to prevent trapping moisture.
Overlooking Construction Joints and Cracks
While you might focus on applying waterproofing materials to walls and floors, overlooking construction joints and cracks can undermine your efforts.
During construction inspections, pay close attention to these areas, as they’re potential weak points for water infiltration. Cracks can develop due to settling, and if left unsealed, they’ll allow moisture to penetrate.
Use high-quality crack sealing products specifically designed for your basement environment. Make certain you fill these gaps thoroughly before applying any waterproofing treatments.
Failing to Address Groundwater Pressure
Ignoring groundwater pressure can lead to significant basement issues, as hydrostatic pressure builds up against your foundation walls.
Implementing a proper drainage system is essential to redirect this pressure, while selecting the right waterproofing materials will enhance your protection against moisture intrusion.
Addressing these factors proactively can save you from costly repairs down the line.
Understanding Hydrostatic Pressure
Hydrostatic pressure is a critical factor in basement waterproofing that many homeowners overlook, leading to significant water intrusion issues.
To effectively manage hydrostatic pressure, consider these key points:
- Soil Saturation: Understand how saturated soil increases hydrostatic pressure against your foundation.
- Water Table Levels: Monitor changes in the water table that could elevate pressure.
- Pressure Relief: Implement pressure relief systems to divert water away from your basement.
- Regular Inspections: Schedule inspections to identify potential pressure issues early.
Addressing hydrostatic pressure proactively can save you from costly repairs and protect your home’s integrity.
Proper Drainage Systems
Effective management of hydrostatic pressure naturally leads to the need for proper drainage systems. You must implement a thoughtful drainage design that effectively channels water away from your basement.
Utilize perforated drainpipes and gravel trenches to create efficient pathways for groundwater. Proper installation techniques are essential; make certain pipes are sloped adequately to facilitate flow. Incorporate sump pumps where necessary for additional water removal.
Additionally, maintain a clear drainage path by regularly checking for clogs or blockages. By addressing groundwater pressure proactively, you’ll protect your basement from potential flooding and structural damage, guaranteeing long-term durability.
Waterproofing Material Selection
When selecting waterproofing materials, it’s crucial to evaluate the specific challenges posed by groundwater pressure, as failing to do so can lead to inadequate protection and costly repairs.
Consider the following key aspects:
- Membrane Types: Choose between liquid-applied and sheet membranes based on your foundation’s needs.
- Sealant Options: Select high-quality sealants that can withstand hydrostatic pressure and resist mold growth.
- Application Method: Confirm proper installation techniques to maximize effectiveness.
- Long-term Durability: Opt for materials that offer longevity and require minimal maintenance over time.
Ignoring Ventilation and Humidity Control
Although many homeowners focus solely on sealing cracks and applying waterproof coatings, neglecting ventilation and humidity control can lead to persistent moisture issues in your basement.
Effective humidity management is essential; without it, damp air can linger, fostering mold growth and structural damage.
Installing proper ventilation systems helps to circulate air and reduce humidity levels.
Consider using dehumidifiers to maintain ideal moisture levels, especially in warmer months.
Regularly monitor humidity levels, aiming for 30-50% relative humidity.
Conclusion
To guarantee your new build basement remains dry and free from moisture issues, it is crucial to avoid these common mistakes. Prioritize effective site drainage, invest in high-quality waterproofing materials, and prepare surfaces thoroughly. Don’t overlook construction joints and cracks, and address groundwater pressure proactively. Finally, maintain proper ventilation and humidity control to safeguard your space. By taking these precautions, you’ll protect your investment and create a healthy, moisture-free environment in your basement.
How to Navigate Homeowners Insurance for Basement Waterproofing Claims
Steering homeowners insurance for basement waterproofing claims can be complex. You need to understand your policy’s specifics, including what types of water damage are covered and any exclusions that may apply. It’s essential to meticulously document any damage and repairs while communicating effectively with your insurance adjuster. As you consider these factors, you’ll uncover key strategies that can help you avoid common pitfalls and maximize your claim. What comes next could greatly impact your financial outcome.
Key Takeaways
- Understand your policy’s terms, including coverage limits, deductibles, and exclusions related to basement waterproofing claims.
- Document all water damage thoroughly, including photographs and repair estimates, to support your claim effectively.
- Communicate clearly and professionally with your insurance adjuster, presenting organized documentation for a smoother claims process.
- Identify and address moisture issues early to prevent extensive damage and strengthen your claim’s validity.
- Submit your claim promptly and follow up regularly to monitor its progress and avoid delays.
Understanding Homeowners Insurance Policies
When you explore homeowners insurance policies, it’s important to understand the nuances that can affect your coverage, especially regarding basement waterproofing claims.
Familiarizing yourself with policy terminology is essential; terms like “exclusions” and “endorsements” can greatly alter your understanding.
Review your coverage limits carefully, as they dictate the maximum amount your insurer will pay for damages.
Some policies may cover specific waterproofing measures while others might not, so clarifying these details with your agent is crucial.
Understanding these aspects helps you navigate potential claims efficiently and guarantees you’re adequately protected against water damage in your basement.
Types of Water Damage Covered by Insurance
When evaluating water damage claims, it’s essential to understand the differences between sudden and gradual damage.
You’ll also want to differentiate between flood damage and water backup, as these scenarios often have varying coverage under your policy.
Additionally, be aware of specific exclusions that might affect your claim, as not all types of water damage may be covered by your homeowners insurance.
Sudden vs. Gradual Damage
While understanding the distinction between sudden and gradual damage is essential for homeowners, it directly impacts the types of water damage that your insurance policy may cover.
Sudden leaks, like a burst pipe, typically fall under most homeowners’ insurance policies, as they represent unexpected events. In contrast, gradual seepage, such as water infiltrating through cracks over time, often isn’t covered due to its slow nature and the expectation of preventative measures.
Knowing this difference helps you assess your coverage and take proactive steps, ensuring that you’re protected against sudden incidents while also addressing long-term maintenance concerns.
Flood vs. Water Backup
Understanding the difference between flood damage and water backup is vital for homeowners seeking clarity on their insurance coverage.
Flood damage typically arises from external sources, like heavy rains or rising rivers, requiring flood insurance for protection.
In contrast, water backup refers to issues originating within your home’s plumbing system, such as overflowing toilets or backed-up drains.
Standard homeowners insurance often covers water backup, but it’s important to confirm this with your policy.
Knowing these distinctions can help you navigate potential claims more effectively and guarantee you have the right type of coverage for your specific situation.
Policy Exclusions to Consider
After clarifying the differences between flood damage and water backup, it’s important to examine the specific policy exclusions that can impact your coverage for water damage.
Many homeowners insurance policies have policy limitations that exclude certain types of water damage, such as damage caused by gradual leaks or neglect.
Additionally, coverage gaps may arise if your policy doesn’t explicitly include basement waterproofing claims. Understanding these exclusions is essential, as they can leave you vulnerable to significant out-of-pocket expenses.
Always review your policy details thoroughly to guarantee you’re aware of any limitations that could affect your claims.
Assessing the Need for Basement Waterproofing
Many homeowners overlook the importance of evaluating their basement’s waterproofing needs until faced with costly water damage. To assess your basement moisture levels, consider the following factors:
| Signs of Moisture | Waterproofing Options |
|---|---|
| Damp walls | Interior drainage systems |
| Musty odors | Exterior waterproofing |
| Mold growth | Sump pump installation |
| Water stains | Sealants and coatings |
Identifying these signs early can save you from extensive repairs. Explore various waterproofing options tailored to your basement’s unique challenges, ensuring a dry, safe environment that protects your home’s value and integrity.
Documenting Damage and Repairs
When you experience water damage in your basement, accurately evaluating the extent of that damage is vital for your insurance claim.
You’ll need to document all repairs thoroughly, including keeping records of materials and labor costs.
Additionally, capturing before-and-after photos can provide compelling evidence of the work done and help support your claim.
Assessing Water Damage
While evaluating water damage in your basement, it’s crucial to thoroughly document both the extent of the damage and any repairs made. Start with a water damage assessment, noting visible signs like mold or peeling paint. Use moisture testing to determine affected areas.
| Damage Type | Emotional Impact |
|---|---|
| Mold Growth | Fear of health risks |
| Structural Damage | Anxiety about costs |
| Odor Issues | Frustration |
Repair Documentation Essentials
To effectively support your homeowners insurance claim, it’s essential to document all repairs and damage meticulously.
Start by creating a clear timeline of repairs, noting when each issue was identified and when work commenced. Obtain detailed contractor estimates that outline the scope of work, materials used, and associated costs.
This documentation not only provides evidence of the damage but also substantiates your claim’s legitimacy. Keep all correspondence with contractors and insurance representatives organized, as it can be critical for follow-up discussions.
Before-and-After Photos
Before-and-after photos serve as powerful visual evidence in your homeowners insurance claim for basement waterproofing. These images effectively illustrate the extent of damage and the improvements made through waterproofing efforts.
When documenting before and after transformations, make certain you capture clear, well-lit images from multiple angles. This detailed visual evidence not only strengthens your claim but also provides a compelling narrative of the repairs.
Additionally, organize these photos chronologically to make it easier for the insurance adjuster to follow your home’s journey from water damage to a dry, secure basement. Proper documentation can greatly influence the outcome of your claim.
Understanding Your Policy Limits and Deductibles
Understanding your policy limits and deductibles is essential for effectively managing claims related to basement waterproofing. Knowing these factors helps you gauge what your insurance will cover.
Understanding your policy limits and deductibles is crucial for effectively handling basement waterproofing claims.
- Claim limits: This is the maximum amount your policy will pay for basement waterproofing claims.
- Deductibles: You’ll need to pay this amount out-of-pocket before your insurer covers damages.
- Policy exclusions: Familiarize yourself with what’s not covered, as this can impact your claim.
The Claims Process: Step-by-Step
When you’re faced with basement water damage, documenting the extent of the damage is essential for a successful claim.
Take detailed photos and notes to support your case before submitting your claim to your insurance provider.
This thorough preparation can greatly influence the outcome of your claim process.
Documenting Damage Thoroughly
To guarantee a smooth claims process for basement waterproofing, it’s crucial to document any damage thoroughly. Start by conducting a detailed damage assessment, ensuring you capture every affected area.
Take clear photographs from multiple angles, noting the extent of the damage. Gather repair estimates from licensed contractors to support your claim.
- Record dates of damage and repairs
- List all affected items and their condition
- Keep copies of all correspondence with your insurance company
This thorough documentation will strengthen your case, making it easier to navigate the claims process and secure the necessary funds for repairs.
Submitting Your Claim
Submitting your claim for basement waterproofing damage begins with organizing your documentation and preparing the necessary forms.
Start by completing your insurer’s claim submission form, guaranteeing all details are accurate. Attach your thorough damage documentation, including photographs and repair estimates.
Submit your claim promptly to avoid delays in the claim timeline. Keep a copy of everything for your records.
After submission, follow up with your insurance adjuster to monitor the process and address any questions they may have. Staying proactive can help expedite your claim and guarantee you receive the coverage you need for the waterproofing repairs.
Common Pitfalls to Avoid When Filing a Claim
Filing a homeowners insurance claim for basement waterproofing can be a complex process, and several common pitfalls can hinder your success.
To increase your chances of approval, keep these points in mind:
- Ignoring Policy Details: Not understanding your coverage can lead to claim denial reasons that could’ve been avoided.
- Delaying Submission: Adhering to filing timeline tips is essential; delays can jeopardize your claim.
- Inadequate Documentation: Failing to provide sufficient evidence of damage may weaken your case.
Working With Insurance Adjusters
While maneuvering through the complexities of homeowners insurance claims for basement waterproofing, effectively working with insurance adjusters can greatly impact the outcome.
Prioritize clear adjuster communication; it’s key to understanding the specifics of your policy and the claim process. Be prepared to present thorough documentation, including estimates from contractors and photographs of damages.
During claim negotiation, remain professional and assertive, advocating for your needs while being receptive to the adjuster’s feedback. Building rapport can facilitate smoother discussions, ultimately leading to a more favorable resolution.
Preventative Measures to Consider for Future Claims
To minimize the risk of future basement waterproofing claims, homeowners should proactively implement a range of preventative measures.
Homeowners can reduce future basement waterproofing claims by actively adopting preventative measures.
By taking these actions, you can reduce the likelihood of water damage and bolster your insurance standing.
- Regularly inspect and maintain gutters and downspouts to guarantee proper drainage.
- Install a sump pump with a battery backup to manage excess water.
- Use water-resistant materials in basement renovations to mitigate damage.
These preventative measures not only protect your home but also strengthen your case should you face future claims, ultimately saving you time and money in the long run.
Resources for Homeowners Seeking Assistance
How can homeowners effectively navigate the complexities of waterproofing claims? Accessing reliable homeowner resources and insurance guidance is essential. Consider the following table to streamline your search for assistance:
| Resource Type | Description | Contact Information |
|---|---|---|
| Insurance Agents | Experts in policy interpretation | [Your Insurance Company] |
| Local Contractors | Waterproofing specialists | [Local Contractor Contacts] |
| Consumer Advocacy Groups | Help with claims disputes | [Advocacy Group Contacts] |
| Online Forums | Peer support and advice | [Forum Links] |
| State Insurance Department | Regulatory guidance | [State Department Contact] |
Utilizing these resources can enhance your understanding and improve your chances of a successful claim.
Conclusion
Steering homeowners insurance for basement waterproofing claims can be complex, but understanding your policy is vital. By clearly documenting damage and communicating effectively with your insurance adjuster, you can enhance your chances of a successful claim. Remember to assess your coverage limits and avoid common pitfalls to streamline the process. Additionally, taking preventative measures can safeguard against future issues. By being proactive and informed, you can protect your home and manage your insurance claims more effectively.
Signs You Need Basement Waterproofing in Warren MI
If you live in Warren, MI, it’s important to recognize the signs that your basement may need waterproofing. Musty odors, visible water stains, and cracks in walls can indicate underlying moisture issues. Increased humidity levels and puddles on the floor are also red flags. Ignoring these signs can lead to serious damage. Let’s explore these indicators further to guarantee your basement stays dry and safe.
Key Takeaways
- Musty odors in the basement indicate lingering moisture, suggesting the need for waterproofing to improve air quality.
- Visible water stains on walls and floors signal moisture seepage, requiring immediate waterproofing attention to prevent further damage.
- Cracks in walls and floors may allow water intrusion, necessitating a professional assessment for potential waterproofing solutions.
- Increased humidity levels can lead to mold growth, highlighting the importance of waterproofing measures to regulate moisture.
- Puddles or water accumulation in the basement indicate serious waterproofing issues that must be addressed to avoid mold and structural damage.
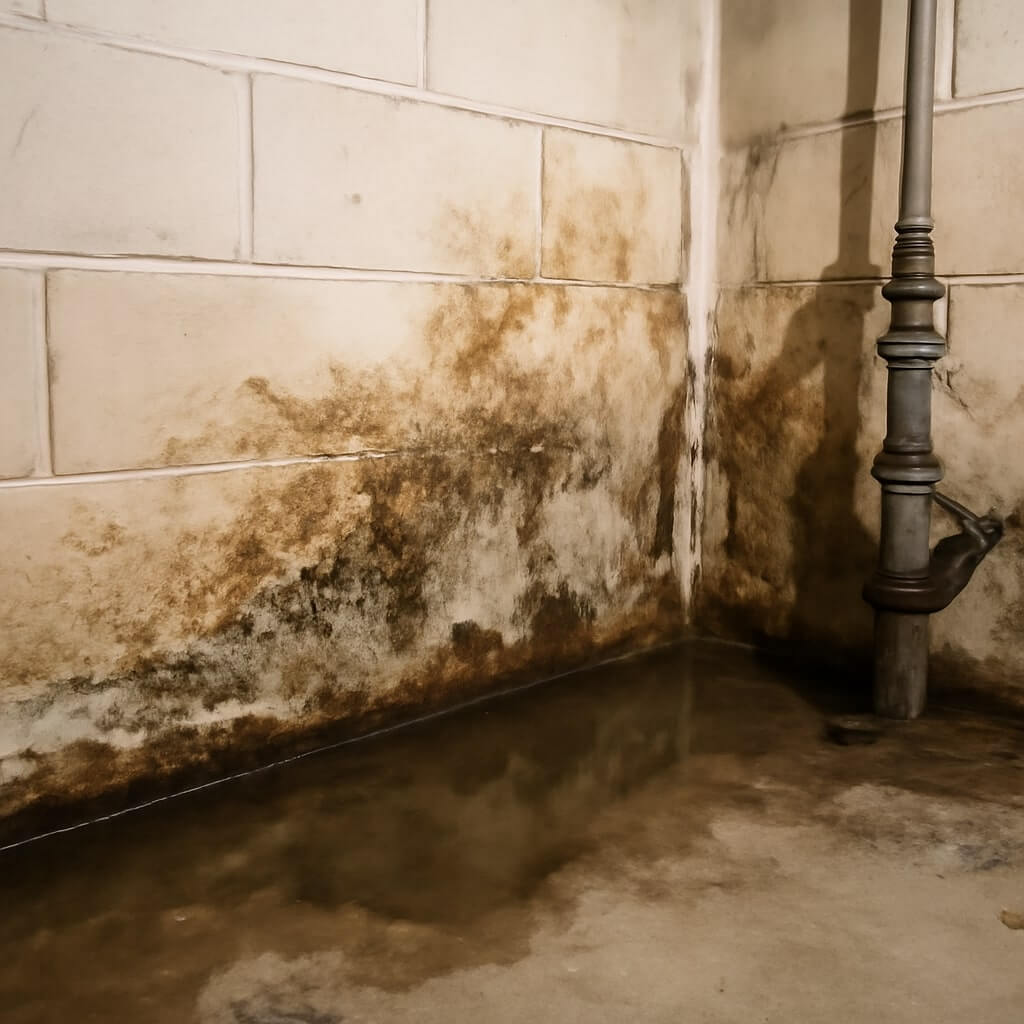
Musty Odors and Mold Growth
If you notice musty odors or see mold growth in your basement, it’s a clear sign that moisture is lingering where it shouldn’t be. This excess moisture can severely impact your air quality, leading to health issues for you and your family.
To combat this, focus on mold prevention strategies, such as ensuring proper ventilation and using dehumidifiers. Regularly inspect your basement for leaks and seal any cracks in walls or floors.
Visible Water Stains or Damage
Visible water stains or damage on your basement walls and floors are undeniable signs of moisture problems that need immediate attention.
These stains indicate that water is seeping through, which can lead to mold growth and structural issues. To protect your home, consider implementing effective waterproofing techniques, such as installing drainage systems or applying sealants.
Regular basement maintenance is vital; check for leaks and guarantee proper ventilation to prevent future damage.
Don’t ignore these telltale signs—addressing them promptly can save you significant repair costs and keep your basement dry and safe for years to come.
Cracks in Walls and Floors
Cracks in walls and floors are serious indicators of potential water intrusion and structural instability in your basement. When you notice these cracks, it’s essential to assess their size and location.
Small, hairline cracks may seem harmless, but larger fissures could signal significant structural concerns that compromise wall integrity. Over time, water can seep through these cracks, leading to worsening damage and costly repairs.
Don’t wait until it’s too late; address these issues promptly. Consider consulting a waterproofing professional to evaluate the situation and recommend solutions that will restore your basement’s strength and protect your home from further damage.
Increased Humidity Levels
Moisture issues often manifest as increased humidity levels in your basement, signaling potential water intrusion.
When you notice dampness in the air, it’s essential to address humidity control immediately. High humidity can lead to mold growth and structural damage over time.
Addressing humidity control promptly is crucial to prevent mold growth and structural damage in your home.
Installing moisture barriers can help prevent excess moisture from entering your basement, creating a healthier environment.
Consider using dehumidifiers or ventilation systems to regulate humidity levels effectively.
Regularly monitoring these levels guarantees your basement remains dry and safe.
Don’t ignore the signs; taking action now can save you from costly repairs in the future.
Puddles or Water Accumulation
When you notice puddles or water accumulation in your basement, it’s a clear sign that you might’ve a serious waterproofing issue.
Stagnant water can lead to mold growth and damage your basement insulation, making the space uncomfortable and unhealthy.
Check your water drainage system—clogged gutters or downspouts can redirect water into your basement.
Verify that the grading around your home directs water away from the foundation.
If these measures don’t resolve the issue, consider professional waterproofing solutions.
Addressing puddles promptly can save you from costly repairs and protect your home’s integrity.
Don’t ignore the signs!
Conclusion
If you notice any of these signs in your basement, don’t wait to act. Addressing musty odors, water stains, and cracks promptly can save you from costly repairs and health issues down the line. Regular inspections and effective waterproofing techniques are essential to keep your basement dry and safe. By taking these steps, you’ll protect your home’s foundation and create a healthier living environment for you and your family in Warren, MI.
7 Experts for Basement Waterproofing in Shakopee MN
If you’re facing moisture issues in your basement, it’s essential to find the right experts to tackle the problem. Shakopee, MN, offers seven reputable companies that specialize in basement waterproofing. From effective drainage systems to thorough foundation assessments, these professionals can help protect your home from water damage. Let’s explore what each of these companies brings to the table and how they can enhance your property’s safety and value.
Key Takeaways
- Waterproofing Solutions Inc offers tailored waterproofing materials and expert assessments to ensure long-lasting moisture protection in basements.
- Shakopee Basement Repair Experts specialize in foundation stability and moisture control, enhancing home value through effective crack repair solutions.
- All-Weather Waterproofing installs robust drainage systems and moisture barriers, improving air quality and humidity levels in basements.
- Reliable Basement Services provide regular inspections and moisture control methods, prioritizing basement maintenance for homeowner peace of mind.
- A+ Waterproofing & Foundation Repair conducts thorough inspections and offers tailored solutions to keep basements dry and safe from water damage.
Waterproofing Solutions Inc
When it comes to basement waterproofing in Shakopee, MN, Waterproofing Solutions Inc stands out as a top choice.
They use high-quality waterproofing materials tailored to your specific needs, ensuring your basement remains dry and protected.
Their expertise in basement drainage systems guarantees effective solutions that prevent water accumulation and damage.
With proven expertise in basement drainage systems, they provide effective solutions to prevent water accumulation and damage.
By choosing them, you’re investing in long-lasting protection against moisture issues.
Their team conducts thorough assessments to determine the best approach, offering peace of mind for homeowners.
With their commitment to excellence, you can trust that your basement will stay dry and safe for years to come.
Shakopee Basement Repair Experts
If you’re facing issues with your basement in Shakopee, MN, enlisting the help of basement repair experts can make all the difference.
These professionals specialize in ensuring your home’s foundation stability, addressing cracks, and preventing further damage. They understand the importance of moisture control, implementing effective solutions to keep your basement dry and healthy.
By evaluating the unique challenges your space presents, they can recommend tailored repair methods that fit your needs.
Don’t let basement problems linger—reaching out to experienced experts will safeguard your home and enhance its overall value.
Take action and protect your investment today!
All-Weather Waterproofing
When it comes to all-weather waterproofing, you need thorough solutions that stand up to the elements.
Expert installation techniques guarantee that your basement remains dry and protected, no matter the weather.
Let’s explore how these approaches can safeguard your home effectively.
Comprehensive Waterproofing Solutions
While many homeowners in Shakopee, MN, overlook the importance of waterproofing, thorough solutions for all-weather protection can make a significant difference in preserving your basement’s integrity.
Extensive waterproofing involves installing effective drainage systems to redirect water away from your home, preventing flooding and damage. Additionally, implementing moisture barriers can protect your walls and floors from dampness, ensuring a dry and healthy environment.
Expert Installation Techniques
To guarantee your basement remains dry and protected, employing expert installation techniques for all-weather waterproofing is essential.
Professionals use advanced methods that guarantee a robust barrier against moisture. They assess your property’s unique needs, utilizing innovative technologies like vapor barriers and sump pumps.
These techniques not only prevent leaks but also improve air quality and reduce humidity levels.
When you choose skilled installers, you’re investing in a long-lasting solution that safeguards your home.
Don’t underestimate the difference that expert installation can make in maintaining a dry, healthy basement, ultimately enhancing your property’s value and comfort.
Reliable Basement Services
Reliable basement services are essential for homeowners in Shakopee, MN, looking to protect their investment and guarantee a safe living environment.
Essential basement services ensure Shakopee homeowners safeguard their investment and maintain a safe living space.
You want to make sure your basement remains dry and functional by implementing effective moisture control methods. Regular inspections and proper drainage systems can make a significant difference.
Don’t forget about basement maintenance tips, like sealing cracks and addressing any signs of water damage promptly.
By prioritizing these services, you’ll not only enhance your home’s value but also enjoy peace of mind knowing your basement is safe.
Trust the experts to help you achieve a dry, healthy living space.
A+ Waterproofing & Foundation Repair
When it comes to maintaining a dry basement, A+ Waterproofing & Foundation Repair stands out as a top choice for homeowners in Shakopee, MN.
Their team knows that a thorough foundation inspection is essential in identifying potential issues early. They offer tailored solutions to guarantee effective moisture control, preventing water damage and mold growth.
With years of experience, A+ combines expertise and quality service, giving you peace of mind.
You’ll appreciate their commitment to customer satisfaction and the reliable results they deliver.
Trust A+ Waterproofing to keep your basement dry and your home safe from water-related problems.
DryZone Waterproofing
If you’re looking for a dependable solution to basement moisture issues in Shakopee, MN, DryZone Waterproofing is an excellent option. With its innovative techniques, you’ll enjoy numerous DryZone advantages, from preventing mold growth to improving air quality. DryZone applications cater to various needs, ensuring your basement remains dry and safe.
| DryZone Advantages | Benefits |
|---|---|
| Mold Prevention | Healthier living space |
| Increased Home Value | Better resale potential |
| Enhanced Comfort | Warmer, drier basement |
| Energy Efficiency | Lower utility bills |
| Peace of Mind | Worry-free environment |
Choose DryZone for lasting protection!
Premier Basement Solutions
For homeowners in Shakopee, MN, finding effective basement waterproofing solutions can feel overwhelming. That’s where Premier Basement Solutions comes in.
They specialize in advanced basement drainage systems designed to channel water away and keep your space dry. With their expertise in moisture control, you can rest easy knowing your home is protected from water damage.
Their team assesses your unique needs and customizes solutions, ensuring you get the best results. Don’t let excess moisture ruin your home—trust Premier Basement Solutions to provide reliable, long-lasting waterproofing that keeps your basement safe and dry for years to come.
Conclusion
In Shakopee, MN, keeping your basement dry and secure is essential for your home’s integrity. With expert companies like Waterproofing Solutions Inc and Shakopee Basement Repair Experts at your service, you can find tailored solutions that fit your needs. Each of these seven professionals offers reliable techniques to prevent water damage and enhance your property’s value. Don’t wait until it’s too late—reach out to one of these experts today and protect your investment!

Common Basement Waterproofing Issues in Roanoke VA: 7 Solutions
If you live in Roanoke, VA, you might notice common basement waterproofing issues like water stains, musty smells, and mold. These problems can lead to serious damage if left unchecked. Fortunately, there are effective solutions to tackle these challenges and protect your home. By addressing drainage, sealing cracks, and implementing maintenance strategies, you can create a healthier environment. Let’s explore the essential steps you can take to safeguard your basement.
Key Takeaways
- Inspect for water stains and musty odors, as they indicate potential moisture issues needing immediate attention.
- Ensure effective drainage by cleaning gutters and grading land to divert water away from the foundation.
- Consider installing a sump pump to manage excess water and prevent flooding in your basement.
- Seal cracks and gaps promptly using high-quality materials to protect against water intrusion.
- Implement vapor barriers and maintain landscaping to further reduce moisture accumulation around the home.
Identifying Signs of Water Intrusion
When you walk into your basement, you mightn’t immediately notice the subtle signs of water intrusion.
Look closely for water stains on the walls or floor; they can indicate past leaks. Pay attention to any musty odors, too—they often signal moisture buildup, which can lead to mold growth.
Check corners and around windows for damp spots, as these areas are common trouble spots. If you spot any of these signs, it’s essential to address them quickly.
Ignoring these issues can lead to more significant problems down the road, including structural damage and health risks. Stay vigilant!
Understanding the Importance of Proper Drainage
Proper drainage is essential for keeping your basement dry and preventing water intrusion. Effective drainage systems direct water flow away from your home, reducing the risk of flooding and mold growth.
If your basement struggles with moisture, it’s vital to evaluate existing drainage solutions. Make sure gutters are clean, downspouts extend away from the foundation, and grading slopes away from your home.
Installing a Sump Pump for Effective Water Management
When it comes to managing water in your basement, installing a sump pump is a smart choice.
You’ll want to understand the different types available, the installation process, and how to maintain your pump for long-lasting efficiency.
Let’s explore these key points to guarantee your basement stays dry and protected.
Sump Pump Types Explained
Understanding the different types of sump pumps is essential for effective water management in your basement, especially if you want to prevent flooding and water damage.
There are two main sump pump types: submersible and pedestal. Submersible pumps sit in the sump pit and can handle larger volumes of water, while pedestal pumps are above the pit and are easier to access for maintenance.
Both types offer significant sump pump benefits, such as reducing humidity and protecting your home’s foundation. Choosing the right pump depends on your specific needs, including the amount of water you typically encounter in your basement.
Installation Process Overview
Before diving into the installation process, it’s crucial to prepare your basement to guarantee effective water management with your new sump pump.
Start by selecting appropriate waterproofing materials, like a sump basin and pump. Next, choose installation techniques that suit your basement’s layout.
You’ll need to create a hole for the sump basin, making sure it sits below the water table. Install the pump and connect the discharge pipe to direct water away from your foundation.
Finally, seal any gaps with waterproofing materials to prevent leakage. Following these steps will help ensure your sump pump operates efficiently and protects your basement effectively.
Maintenance Tips for Longevity
To guarantee your sump pump lasts and effectively manages water, regular maintenance is essential.
Start by checking the pump’s power source and confirming it’s plugged in properly. Clean the inlet screen and test the float switch monthly to prevent blockages.
Inspect your drainage systems for clogs and debris, as these can hinder moisture control. Additionally, consider installing a backup battery to maintain functionality during power outages.
Finally, schedule an annual professional inspection to catch any potential issues early.
Sealing Cracks and Gaps in Basement Walls
When you notice cracks and gaps in your basement walls, addressing them promptly can prevent more serious water damage down the line.
Start with crack sealing using a high-quality epoxy or polyurethane sealant, which can effectively bond and expand to fill voids. For larger gaps, consider gap filling with foam or caulk designed for masonry.
Confirm the surfaces are clean and dry before application to maximize adhesion. Regularly inspect your basement for new cracks or gaps, as early detection is key.
Utilizing Vapor Barriers to Prevent Moisture Accumulation
Vapor barriers are essential for preventing moisture accumulation in your basement, protecting your home from mold and structural damage.
Understanding the installation process is key to ensuring they function effectively, and regular maintenance is vital for long-term results.
Let’s explore the importance of vapor barriers, how to install them, and tips for keeping them in top condition.
Importance of Vapor Barriers
While many homeowners overlook the importance of vapor barriers, they play an essential role in preventing moisture accumulation in basements.
By using quality vapor barrier materials, you can create a reliable shield against humidity and water vapor that can lead to mold and structural damage.
Proper vapor barrier installation not only protects your home but also enhances its overall energy efficiency.
It’s imperative to guarantee that the barriers are fitted correctly to avoid gaps where moisture can seep through.
Investing in vapor barriers is a proactive measure that can save you from costly repairs down the line.
Don’t neglect this essential component!
Installation Process Overview
To effectively prevent moisture accumulation in your basement, understanding the installation process of vapor barriers is essential.
Start by selecting high-quality waterproofing materials, like polyethylene sheeting. Make certain the area is clean and dry before installation.
Use proper installation techniques by overlapping seams and securing edges with tape or adhesive. It’s vital to extend the barrier from the foundation wall to the floor, creating a continuous protective layer.
Once installed, check for any gaps where moisture might seep through. This proactive approach will help maintain a dry basement, safeguarding your home from potential water damage.
Maintenance and Inspection Tips
Maintaining and inspecting your vapor barriers regularly guarantees they continue to effectively prevent moisture accumulation in your basement.
Check for tears or gaps in the barriers, as these can allow basement humidity to rise. If you notice any damage, promptly repair or replace the waterproofing materials to maintain effectiveness.
Additionally, monitor the humidity levels in your basement using a hygrometer; aim to keep levels below 60%. Confirm proper ventilation to reduce moisture build-up.
Regular inspections will help you catch potential problems early, ultimately protecting your basement from water damage and maintaining a dry, healthy environment.
Landscaping Solutions to Divert Water Away From Your Home
Effective landscaping can be a game-changer when it comes to diverting water away from your home. By employing smart landscaping techniques, you can create a more favorable drainage system.
Start by grading your yard to slope away from your foundation, ensuring that water flows outward. Use native plants and shrubs with deep roots to absorb excess moisture.
Grade your yard to slope away from the foundation and choose native plants with deep roots to effectively absorb excess moisture.
Consider installing rain gardens or French drains to manage runoff effectively. Additionally, placing decorative rocks or gravel paths can help channel water away from vulnerable areas.
These simple steps can greatly reduce water accumulation and protect your basement from flooding.
Regular Maintenance and Inspections for Long-Term Protection
Landscaping strategies can considerably reduce water accumulation around your home, but ongoing maintenance and inspections are key to ensuring long-term protection from basement flooding.
Implementing preventive measures like cleaning gutters, checking drainage systems, and sealing cracks can go a long way.
Regular inspections should occur at least twice a year—once in spring and once in fall—to identify potential issues early. During these inspections, look for signs of moisture or damage.
Staying proactive with maintenance not only safeguards your basement but also extends the life of your home’s foundation.
Invest time now, and avoid costly repairs later.
Conclusion
By addressing common basement waterproofing issues in Roanoke, VA, you can protect your home from moisture-related problems. Implementing solutions like proper drainage, sump pumps, and sealing cracks will create a healthier living environment. Don’t forget to maintain landscaping and conduct regular inspections to catch any issues early. By taking these proactive steps, you’ll safeguard your basement and guarantee it remains a dry, comfortable space for years to come.