
10 Essential Additions to Enhance Log Homes
If you’re looking to transform your log home into a cozy, modern haven, there are key additions that can elevate its charm and functionality. From the warmth of a fireplace to the efficiency of double-glazed windows, each enhancement plays an essential role. Imagine creating inviting outdoor spaces or integrating smart technology for everyday convenience. These upgrades not only enhance comfort but also reflect your personal style, setting the stage for a truly unique living experience.
Key Takeaways
- Install cozy fireplaces or wood stoves to create a warm retreat and enhance gathering spaces in log homes.
- Upgrade to double glazed windows for improved energy efficiency and reduced heating costs throughout the year.
- Incorporate smart home technology for automated lighting and advanced security solutions to elevate convenience and safety.
- Choose rustic furniture and decor that reflects personal style while adding comfort and charm to living areas.
- Design functional storage solutions and stylish entryways to maintain organization and create welcoming first impressions.
Cozy Fireplaces and Wood Stoves
A cozy fireplace or wood stove can transform your log home into a warm and inviting retreat, especially on chilly evenings.
To guarantee a safe and enjoyable experience, prioritize wood stove safety by using seasoned firewood and installing carbon monoxide detectors. Regular fireplace maintenance is essential for peak performance; clean the chimney at least once a year to prevent creosote buildup.
You’ll not only enhance the aesthetic appeal but also improve air quality. Consider elegant stonework or rustic mantels to complement your log home’s charm, creating a perfect gathering spot for friends and family while enjoying the crackling warmth of the fire.
Outdoor Living Spaces
When you think about enhancing your log home, consider creating inviting outdoor living spaces that truly extend your home’s warmth and charm.
Picture a cozy fire pit area for evening gatherings, a functional outdoor kitchen for al fresco dining, and a spacious deck that invites relaxation and enjoyment of nature.
These elements not only elevate your lifestyle but also seamlessly blend with the rustic beauty of your log home.
Cozy Fire Pit Area
Creating a cozy fire pit area elevates your log home’s outdoor living space, inviting friends and family to gather around the warmth of a crackling fire.
Consider various fire pit designs, such as stone or metal options, to match your home’s aesthetic. Surround the fire pit with comfortable seating arrangements, like rustic benches or cushioned chairs, ensuring everyone has a perfect view of the flames.
Add cozy blankets and soft lighting to enhance the atmosphere. This inviting setup not only fosters connection but also creates a perfect spot for storytelling, roasting marshmallows, and enjoying the beauty of nature together.
Functional Outdoor Kitchen
Transforming your outdoor space with a functional outdoor kitchen not only enhances your log home’s appeal but also elevates your culinary experiences.
Imagine grilling fresh vegetables and meats using high-quality outdoor appliances, all while enjoying the beauty of nature. A well-designed kitchen allows for seamless meal preparation, featuring ample counter space, a sink, and storage for utensils and ingredients.
Incorporating a stylish dining area nearby encourages al fresco dining, creating memorable moments with family and friends. With the right setup, your outdoor kitchen becomes a hub of activity, blending comfort and functionality for unforgettable gatherings under the open sky.
Inviting Deck Space
After enjoying delicious meals in your outdoor kitchen, the next step is to enhance your log home’s exterior with inviting deck space.
Choose comfortable deck furniture that complements your log home’s rustic charm, inviting relaxation and conversation. Opt for weather-resistant materials like teak or aluminum to guarantee durability.
Incorporate cozy outdoor lighting, such as string lights or lanterns, to create a warm ambiance during evening gatherings.
A well-designed deck can serve as an extension of your living space, perfect for entertaining friends or enjoying tranquil moments surrounded by nature.
You’ll find that these additions truly elevate your outdoor experience.
Energy-Efficient Windows
When choosing energy-efficient windows for your log home, you’ll want to explore various types that optimize both aesthetics and performance.
These windows not only enhance your home’s beauty but also greatly reduce energy costs and improve comfort.
Consider installation tips to guarantee you maximize their benefits and create a cozy, sustainable living space.
Types of Energy-Efficient Windows
Choosing the right windows for your log home can greatly impact its energy efficiency and overall comfort.
Double glazed windows are a popular choice, featuring two panes of glass that create an insulating barrier, reducing heat loss. They help maintain a stable indoor temperature, keeping your home cozy year-round.
Additionally, consider windows with low E coatings, which reflect heat back into your home during winter and block harmful UV rays in summer.
This combination not only enhances your log home’s aesthetic appeal but also contributes to significant energy savings, making your living space more enjoyable while being environmentally conscious.
Benefits of Energy Efficiency
Energy efficiency isn’t just a trend; it’s an essential aspect of sustainable living that can greatly enhance your log home’s comfort and lower your utility bills.
By choosing energy-efficient windows made from eco-friendly materials, you’ll enjoy significant energy savings while maintaining your home’s aesthetic appeal. These windows minimize heat transfer, keeping your space warm in winter and cool in summer.
Additionally, they reduce reliance on heating and cooling systems, further lowering your energy costs. Investing in energy-efficient windows not only benefits your wallet but also contributes to a healthier planet, making your log home a model of sustainability and comfort.
Installation Considerations and Tips
While selecting the right energy-efficient windows is essential, proper installation is equally important to maximize their benefits.
To maintain your log home’s structural integrity, use appropriate installation techniques that accommodate the unique characteristics of log construction. Guarantee a tight seal around the frame to prevent air leaks and moisture intrusion.
Utilize shims for leveling, and consider flashing to divert water away. Always check for alignment and adjust as necessary.
It’s also wise to consult professionals if you’re unsure. By focusing on these details, you’ll enhance the performance of your windows and guarantee lasting comfort in your log home.
Upgraded Insulation
Upgraded insulation can transform the comfort and efficiency of your log home, ensuring that it remains cozy in winter and cool in summer.
By incorporating energy-saving materials such as spray foam or rigid foam boards, you can markedly enhance your home’s thermal performance.
Incorporating energy-efficient materials like spray foam or rigid foam boards dramatically improves your home’s thermal performance.
These materials prevent heat loss in colder months and reduce heat gain during warmer months.
Not only will you enjoy a more consistent indoor temperature, but you’ll also see a reduction in energy costs.
Investing in high-quality insulation is essential for maximizing both comfort and sustainability, making your log home a true sanctuary throughout the seasons.
Smart Home Technology
Incorporating smart home technology into your log home transforms it into a modern sanctuary.
Automated lighting systems allow you to create the perfect ambiance with just a tap, while advanced security monitoring solutions keep your space safe and sound.
Embracing these innovations not only enhances convenience but also elevates your log home’s charm and functionality.
Automated Lighting Systems
As you embrace the charm of log homes, integrating automated lighting systems can elevate both functionality and ambiance.
Smart controls allow you to customize your lighting experience, adjusting brightness and color to suit your mood. Imagine entering a warmly lit space that welcomes you, all set with a simple command or schedule.
Not only do these systems enhance your home’s aesthetic, but they also contribute to energy savings by ensuring lights are only on when needed.
With automated lighting, you’ll enjoy convenience and efficiency, making your log home a truly modern sanctuary while preserving its rustic charm.
Security Monitoring Solutions
While the rustic beauty of log homes evokes a sense of tranquility, ensuring your safety is paramount, and that’s where security monitoring solutions come into play.
Investing in advanced surveillance cameras allows you to keep an eye on your property, whether you’re inside or away. These cameras blend seamlessly with your home’s aesthetics while providing real-time alerts.
Pair them with reliable alarm systems that notify you of any unauthorized entry, enhancing your peace of mind.
With smart home technology, you can monitor your log home remotely, ensuring you feel secure and connected, no matter where life takes you.
Rustic Furniture and Decor
When you embrace rustic furniture and decor in your log home, you create a warm and inviting atmosphere that reflects the beauty of nature. Handcrafted tables, made from reclaimed wood, serve as stunning centerpieces, while woven textiles add comfort and color. Pairing these elements can elevate your space remarkably.
| Furniture Type | Description | Suggested Materials |
|---|---|---|
| Handcrafted Tables | Unique designs for every room | Reclaimed wood, metal |
| Woven Textiles | Cozy blankets and vibrant rugs | Cotton, wool, jute |
| Accent Chairs | Comfortable seating options | Leather, wood |
| Wall Decor | Nature-inspired art pieces | Canvas, wood, metal |
| Lighting Fixtures | Rustic chandeliers and lamps | Antler, iron, wood |
Enhanced Lighting Solutions
To truly illuminate the charm of your log home, consider incorporating enhanced lighting solutions that blend functionality with aesthetic appeal.
Start by layering ambient lighting to create a warm, inviting atmosphere. Soft overhead fixtures or strategically placed wall sconces can set the mood for relaxation.
Layering ambient lighting creates a warm, inviting atmosphere, perfect for relaxing in your log home.
For specific tasks, like reading or cooking, incorporate task lighting with adjustable fixtures or under-cabinet lights, ensuring you have the right brightness where you need it most.
Combining these elements not only enhances the beauty of your space but also makes everyday activities more enjoyable.
Embrace these solutions to transform your log home into a well-lit haven.
Functional Storage Solutions
With a beautifully lit log home as your backdrop, functional storage solutions become the next step in enhancing your living space.
Consider incorporating creative shelving that showcases your decor while providing essential storage. Floating shelves can add depth and character without overwhelming your home’s natural beauty.
Additionally, opt for multifunctional furniture, like ottomans with hidden compartments or coffee tables that double as storage units. These pieces not only keep your space organized but also contribute to a cozy, inviting atmosphere.
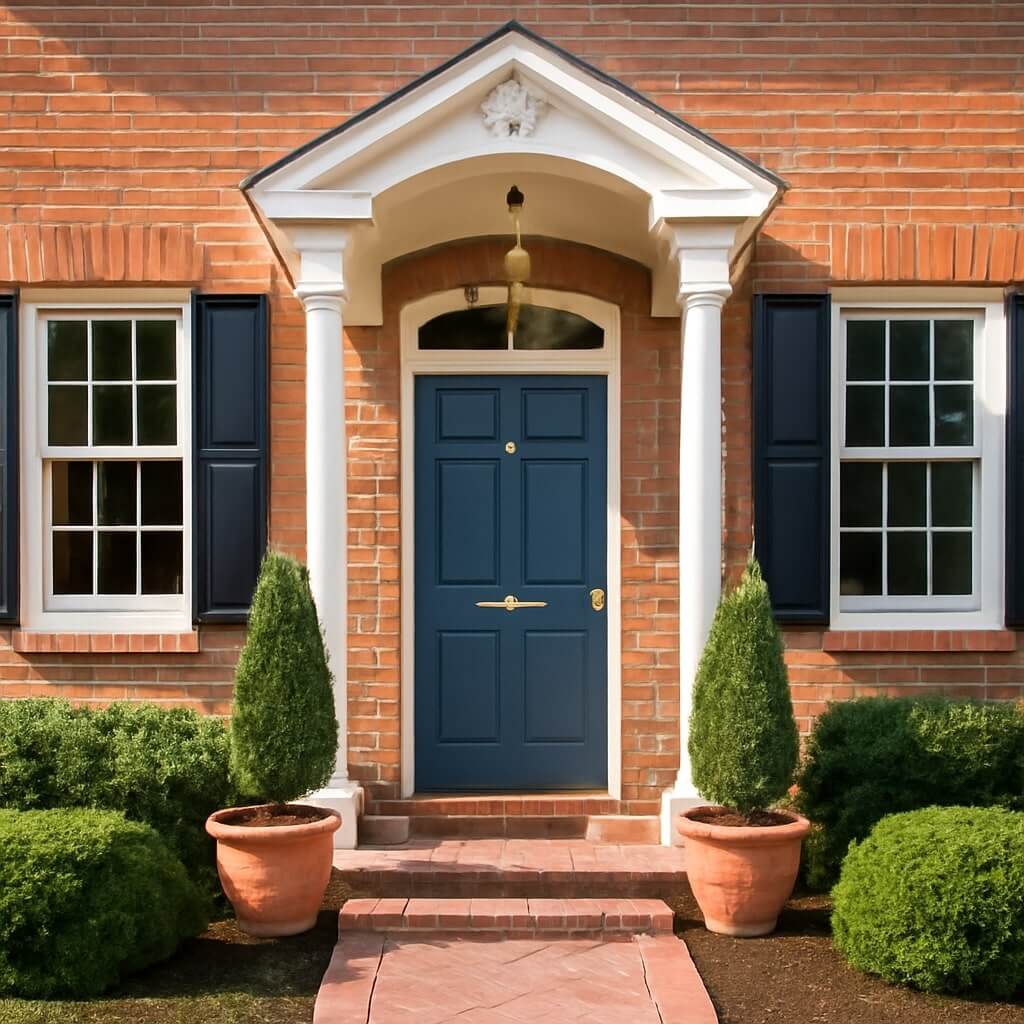
Stylish Entryways
As you step into your log home, the entryway serves as the first impression, so it’s essential to create a stylish and welcoming space.
Consider these three elements to enhance your entryway:
- Unique Doorways: Choose a striking door that reflects your personal style, be it rustic wood or modern glass accents.
- Welcoming Mats: Place a cozy mat that invites guests in while capturing dirt and moisture.
- Decorative Accents: Incorporate artwork or plants that resonate with your home’s aesthetic, creating a warm atmosphere.
These touches will make your entryway not just functional, but truly inviting.
Beautiful Landscaping
While you may focus on the interior of your log home, beautiful landscaping plays an essential role in enhancing its overall charm and appeal.
Incorporating native plants not only supports local ecosystems but also guarantees low-maintenance beauty year-round. Select a variety of seasonal blooms to create vibrant bursts of color, transforming your yard into a mesmerizing visual experience.
Consider adding pathways lined with wildflowers or shrubs that complement your log home’s rustic aesthetics. A well-thought-out landscape design invites nature’s beauty, creating a serene atmosphere that harmonizes with your log home, making it a perfect retreat for relaxation and enjoyment.
Conclusion
By incorporating these ten essential additions, you can truly elevate your log home into a cozy and modern sanctuary. Imagine curling up by a warm fireplace, enjoying the seamless blend of indoor and outdoor living, and relishing the natural light streaming through energy-efficient windows. With smart technology and stylish entryways, your home will not only be functional but also a reflection of your unique taste. Embrace these enhancements, and create a haven that’s warm, inviting, and effortlessly beautiful.
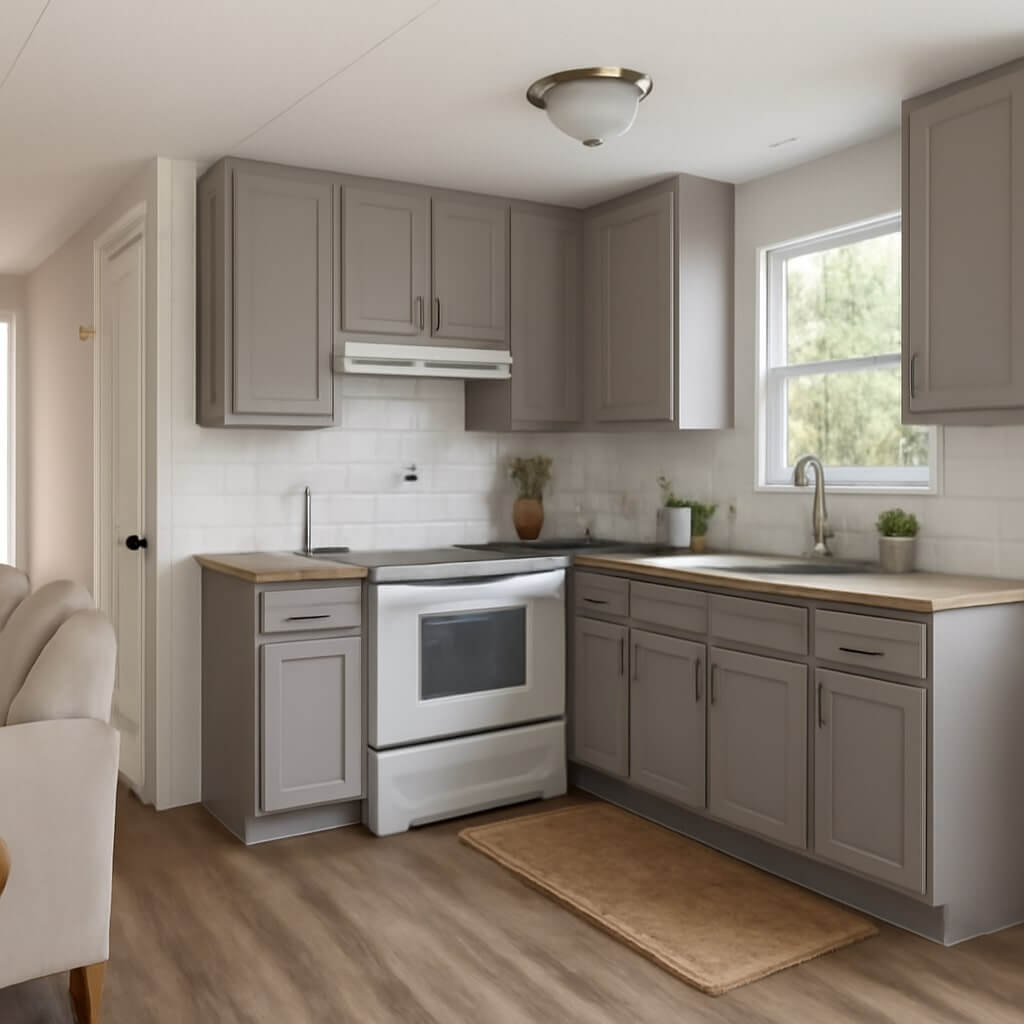
10 Affordable Additions for Quick Upgrades in Mobile Homes
Upgrading your mobile home doesn’t have to be costly or overwhelming. With just a few affordable additions, you can enhance both style and functionality. Simple changes, like a fresh coat of paint or new lighting fixtures, can make a big difference. If you’re looking to create a more inviting atmosphere, there are plenty of options to contemplate. Let’s explore some practical upgrades that can transform your space without stretching your budget.
Key Takeaways
- Apply a fresh coat of paint in light shades to create an illusion of larger spaces and add personality to your mobile home.
- Upgrade lighting fixtures with energy-efficient options to enhance ambiance, functionality, and reduce energy costs.
- Install new cabinet hardware for a quick revitalization of kitchen or bathroom spaces, complementing existing decor.
- Add a peel-and-stick backsplash for an affordable and stylish upgrade that enhances kitchen aesthetics without extensive renovations.
- Create a gallery wall to express your personality and style while optimizing space in your mobile home.
Fresh Coat of Paint
A fresh coat of paint can transform your mobile home, breathing new life into its interior and exterior spaces.
Choosing the right paint color is essential; light shades can make rooms feel larger, while bold colors add personality.
When you get started, explore various painting techniques like sponging or stenciling to create unique effects.
Before painting, make sure to prep your surfaces; clean them thoroughly and apply primer where needed.
With a little effort and creativity, you can achieve a professional-looking finish that enhances your mobile home’s appeal and increases its value.
Upgrade Lighting Fixtures
Upgrading your lighting fixtures can transform the atmosphere of your mobile home while saving you money on energy costs.
By choosing energy-efficient bulbs and modern light fixtures, you not only enhance your space but also boost its value.
Let’s explore how these simple changes can make a big difference in both style and savings.
Choose Energy-Efficient Bulbs
Have you considered how much energy-efficient bulbs can transform your mobile home’s lighting while saving you money?
These bulbs not only enhance your space but also offer significant energy savings and light longevity.
Here are four benefits of switching to energy-efficient bulbs:
- Lower Utility Bills: Enjoy reduced energy costs each month.
- Longer Lifespan: These bulbs last up to 25 times longer than traditional options.
- Environmentally Friendly: Reduce your carbon footprint with less energy consumption.
- Better Quality Light: Experience brighter, more consistent lighting for your home.
Make the switch today for a brighter and more economical future!
Install Modern Light Fixtures
When you choose to install modern light fixtures, you not only elevate the aesthetic of your mobile home but also enhance its functionality.
Consider various fixture styles, such as pendant lights, sconces, or recessed lighting, to match your decor.
Think about lighting placement too; strategically placing lights can create ambiance and improve visibility in key areas.
For example, use bright fixtures in workspaces and softer options in relaxation areas.
Upgrading your lighting doesn’t have to break the bank—shop for affordable options that provide both style and efficiency, and watch your mobile home transform into a more inviting space.
Install New Cabinet Hardware
If you’re looking to breathe new life into your mobile home’s kitchen or bathroom, installing new cabinet hardware can make a remarkable difference.
Here are some simple installation tips to get started:
- Choose the Right Cabinet Styles: Opt for hardware that complements your existing decor.
- Measure Carefully: Verify you know the spacing for handles and knobs before purchasing.
- Use a Template: Create a drilling template for consistent placement.
- Secure with Care: Tighten screws firmly, but avoid overtightening to prevent damage.
With a few changes, your cabinets will look fresh and inviting, enhancing your space beautifully!
Add Peel-and-Stick Backsplash
After updating your cabinet hardware, consider adding a peel-and-stick backsplash for an instant style upgrade. These peel and stick options are not only affordable but also easy to install, making them perfect for your mobile home. With various backsplash styles available, you can effortlessly enhance your kitchen’s aesthetic.
| Backsplash Style | Material | Color Options |
|---|---|---|
| Subway Tile | Vinyl | White, Gray, Black |
| Mosaic | Glass | Multicolor, Clear |
| Wood Plank | PVC | Brown, Natural |
| Marble Effect | Vinyl | White, Cream |
Choose your favorite and transform your space!
Incorporate Area Rugs
To create a cozy and inviting atmosphere in your mobile home, incorporating area rugs is a simple yet effective solution. Area rugs can enhance your space, add warmth, and define different areas.
Here are some tips to contemplate:
- Choose diverse rug styles: Mix textures, colors, and sizes for added interest.
- Experiment with pattern mixing: Don’t shy away from combining geometric and floral designs.
- Consider functionality: Use rugs in high-traffic areas for durability.
- Layer rugs: Place smaller rugs atop larger ones to create depth.
With these ideas, you’ll transform your mobile home into a stylish retreat!
Create a Gallery Wall
Creating a gallery wall is a fantastic way to express your personality and style in your mobile home.
Start by choosing a theme that resonates with you, then select affordable artwork that fits that vision.
Finally, arrange the pieces for maximum impact, turning your wall into a stunning focal point.
Choose Your Theme
Have you ever considered how a well-chosen theme can transform your mobile home’s atmosphere?
Selecting a cohesive theme helps unify your space and enhances its charm. Here are four steps to guide you in choosing the perfect theme:
- Define Your Design Style: Identify if you prefer modern, rustic, or bohemian aesthetics.
- Select Color Palettes: Pick colors that resonate with your personality and evoke desired emotions.
- Incorporate Textures: Mix materials like wood, metal, and fabric for added depth.
- Add Personal Touches: Include items that reflect your interests and experiences.
Start planning your gallery wall today!
Select Affordable Artwork
You’ll find that selecting affordable artwork can be both enjoyable and rewarding, especially when it comes to designing a stunning gallery wall.
Start by exploring local artists for unique pieces that reflect your style. Many offer affordable prints, making it easy to support the community while beautifying your space.
Mix different sizes and styles to create visual interest. Don’t hesitate to frame your prints creatively—think thrift store finds or DIY options. This personal touch adds character and warmth to your home.
With a little effort, your gallery wall can showcase your personality without breaking the bank. Enjoy the process!
Arrange for Impact
A well-arranged gallery wall can transform any space, turning blank walls into stunning focal points.
In mobile home layouts, effective space optimization is key. Here’s how to create an enchanting gallery wall:
- Choose a Theme: Decide on a cohesive theme that reflects your personality.
- Mix Frame Styles: Combine different frame styles and colors for visual interest.
- Arrange Layouts: Lay out your pieces on the floor before hanging them to find the best configuration.
- Consider Height: Hang artwork at eye level for maximum impact.
With these tips, you’ll create a gallery wall that elevates your mobile home’s charm!
Enhance Curb Appeal With Landscaping
While enhancing your mobile home’s curb appeal might seem challenging, strategic landscaping can make a significant impact without breaking the bank.
Start by evaluating your landscape design; simple changes like adding colorful flowers, shrubs, or decorative rocks can transform the look of your yard.
Consider creating defined garden beds or using mulch to give a clean appearance. Adding a few potted plants near your entrance also invites warmth.
Finally, don’t underestimate the power of a well-maintained lawn. Regular mowing and edging will elevate your home’s overall curb appeal, making it inviting and visually appealing to both you and your visitors.
Replace Old Window Treatments
Updating your window treatments can dramatically refresh your mobile home’s look and feel.
By choosing modern fabrics, you not only enhance style but can also select options that boost energy efficiency.
This simple change can make your space more comfortable while cutting down on utility bills.
Choose Modern Fabrics
Choosing modern fabrics for your window treatments can dramatically transform the look and feel of your mobile home.
By replacing outdated designs with fresh styles, you can create a stylish ambiance.
Consider these tips:
- Modern Patterns: Opt for bold geometric designs or subtle florals that bring life to your space.
- Fabric Textures: Experiment with linen, velvet, or sheer materials for added depth.
- Color Schemes: Choose colors that complement your existing decor for a cohesive look.
- Layering Options: Mix and match fabrics for a dynamic visual effect while enhancing privacy and light control.
Upgrade your windows and elevate your home’s charm!
Opt for Energy Efficiency
Modern window treatments not only enhance your home’s aesthetic but can also considerably improve energy efficiency.
By replacing old window coverings with energy-efficient options like cellular shades or thermal curtains, you can reduce heating and cooling costs. These treatments provide added insulation, working alongside insulation upgrades in your mobile home.
If you’re considering solar panels, don’t forget about your windows—better coverings can maximize your energy savings. You’ll enjoy a more comfortable living space while reducing your utility bills.
Investing in modern window treatments is a smart and affordable way to boost your home’s energy efficiency.
Install Energy-Efficient Appliances
Installing energy-efficient appliances in your mobile home can considerably reduce your utility bills and environmental footprint. By choosing appliances with energy-saving features, you’ll not only save money but also enhance your living space.
Here are four considerations to keep in mind:
- Look for Energy Star ratings to guarantee peak efficiency.
- Prioritize appliances with smart technology for better energy management.
- Regular appliance maintenance extends lifespan and efficiency.
- Consider the size of appliances to avoid energy waste.
Investing in these upgrades pays off in the long run, making your home more sustainable and cost-effective.
Add Outdoor Living Space
Creating a comfortable outdoor living space can greatly enhance your mobile home experience, especially after upgrading to energy-efficient appliances that help you save on bills.
Start by investing in quality outdoor furniture, like a cozy seating area or a dining set, to enjoy meals outside.
Add some colorful patio decor, such as string lights or potted plants, to create a welcoming atmosphere.
Don’t forget a sturdy umbrella for shade during sunny days.
With these simple additions, you’ll transform your outdoor area into a relaxing retreat, perfect for gatherings or quiet evenings, making your mobile home feel even more inviting.
Conclusion
Upgrading your mobile home doesn’t have to be expensive or overwhelming. By implementing these ten affordable additions, you can create a more inviting and comfortable space that reflects your style. Whether you’re painting walls, updating fixtures, or enhancing your outdoor area, each change can make a big difference. So, roll up your sleeves and start transforming your mobile home today—small improvements can lead to a more enjoyable living experience that you’ll love coming home to!

What to Know About Anti Gel Additives in Home Heating Oil?
When it comes to home heating oil, understanding anti gel additives is essential for ensuring peak performance during winter months. These additives play an important role in preventing fuel gelling, which can disrupt your heating system. Knowing how they work and the types available can help you make informed choices. However, many misconceptions exist about their use and effectiveness. What should you really consider before adding these agents to your heating oil?
Key Takeaways
- Anti gel additives prevent fuel gelling in heating oil, ensuring smooth flow and efficient combustion in low temperatures.
- These additives modify wax crystals, enhancing heating system performance and preventing clogged filters and system failures.
- Different types of additives exist, including alcohol-based and ether-based, each with unique benefits for improving fuel characteristics.
- When selecting an additive, check compatibility with your heating oil and consider seasonal temperature variations for optimal effectiveness.
- Regular maintenance and proper storage techniques are essential for maximizing heating oil performance and preventing issues during winter months.
Understanding Heating Oil and Its Properties
While you may not think much about heating oil, understanding its properties is vital for efficient home heating.
Heating oil primarily consists of hydrocarbons, and its fuel viscosity plays an important role in determining how well it flows and burns in your heating system. Low viscosity fuels flow easily, guaranteeing proper combustion and heat generation, while high viscosity fuels can lead to operational issues.
Additionally, heating oil’s properties affect its performance in cold temperatures, where viscosity can increase, potentially hindering fuel delivery.
The Importance of Preventing Fuel Gelling
Preventing fuel gelling is essential for ensuring the reliability and efficiency of your home heating oil system, especially during the colder months. Gelling can lead to clogs, reduced fuel efficiency, and increased emissions, negatively impacting both your system and the environment. By addressing gelling, you maintain peak performance and minimize the environmental impact of your heating oil.
| Consequence | Fuel Efficiency | Environmental Impact |
|---|---|---|
| Clogs | Decreased | Increased emissions |
| System failure | Low efficiency | Harmful pollutants |
| Increased costs | Wasteful | Greater carbon footprint |
| Unreliable heat | Ineffective | Strain on resources |
What Are Anti Gel Additives?
Anti gel additives are essential chemical agents designed to prevent fuel gelling in home heating oil.
These substances are formulated to enhance the flow characteristics of the fuel, guaranteeing that it remains fluid even in low temperatures.
By utilizing anti gel formulations, you can considerably reduce the risk of gelling prevention, which can lead to clogged filters and heating system failures.
Utilizing anti gel formulations significantly minimizes the risk of gelling, preventing clogged filters and heating system failures.
They work by modifying the wax crystals that form in cold conditions, allowing for smoother operation of your heating system.
Incorporating these additives into your heating oil can guarantee reliable performance throughout the winter months.
How Anti Gel Additives Work
Anti gel additives work by altering the chemical composition of heating oil to prevent wax crystallization at low temperatures.
This modification enhances performance in cold weather, ensuring efficient fuel flow.
Understanding the proper application and usage guidelines is essential for maximizing their effectiveness.
Chemical Composition Explained
Understanding the chemical composition of anti-gel additives illuminates how they function to guarantee home heating oil remains fluid in cold temperatures.
These additives primarily consist of pour point depressants, which modify the molecular structure of wax crystals that form in low temperatures. By altering the intermolecular forces, they prevent the wax from clumping together, thereby reducing the potential for blockages.
As a result of these chemical reactions, the oil maintains its desired viscosity. This assures that your heating system operates efficiently, even in frigid conditions, providing reliability and comfort throughout the winter months.
Temperature Performance Enhancement
When temperatures drop, the effectiveness of home heating oil can be compromised by the formation of wax crystals.
Anti gel additives enhance temperature stability and promote viscosity reduction, ensuring smooth fuel flow. These additives work by modifying the wax crystals, preventing them from clumping together.
- They lower the pour point of the oil.
- They improve fuel efficiency in cold conditions.
- They maintain peak performance in extreme temperatures.
Application and Usage Guidelines
To maintain ideal performance of home heating oil in cold weather, it’s important to apply anti gel additives correctly.
Start by determining the appropriate dosage based on the oil volume in your tank. Use precise application techniques, such as pouring the additive directly into the tank before refueling to guarantee thorough mixing. Always follow manufacturer guidelines for best results.
Additionally, observe usage precautions: store additives in a cool, dry place and avoid exposure to direct sunlight.
Regularly check the oil temperature to ensure the additive remains effective, especially during extreme cold spells, to prevent gel formation and maintain heating efficiency.
Different Types of Anti Gel Additives
When considering anti gel additives, you’ll find that their chemical compositions vary considerably.
These differences influence their effectiveness in cold weather conditions, impacting how well they prevent fuel from gelling.
Understanding these variations can help you choose the right additive for your heating oil needs.
Chemical Composition Differences
Although various anti-gel additives serve the same primary purpose of preventing fuel oil from gelling in cold temperatures, their chemical compositions differ greatly.
Understanding these differences is essential for effective application.
- Alcohol-based additives: They alter the chemical structure of paraffin wax, reducing gelling.
- Ether-based additives: These enhance molecular interactions, lowering the pour point of the oil.
- Surfactants: They modify the surface tension, helping disperse wax crystals.
Each type’s unique chemical structure plays an important role in its effectiveness, ensuring that you choose the right additive for your heating oil needs.
Effectiveness in Cold Weather
As temperatures drop, the effectiveness of anti-gel additives becomes vital for maintaining the performance of home heating oil.
Different types of additives tackle cold weather challenges in various ways. Some act by lowering the pour point, while others modify the wax crystal structure to prevent blockage.
Performance testing is essential to determine how well these additives function under extreme conditions. You’ll want to choose a product that has been rigorously evaluated to guarantee it meets your heating needs.
Benefits of Using Anti Gel Additives
Using anti gel additives in home heating oil offers significant advantages, especially during cold weather.
These additives enhance your winter preparedness and improve fuel efficiency, ensuring your heating system runs smoothly.
- Prevents fuel gelling, maintaining ideal flow in low temperatures
- Reduces the likelihood of costly heating system repairs
- Enhances overall performance, maximizing energy use
How to Properly Use Anti Gel Additives
To guarantee ideal performance of anti gel additives in home heating oil, it’s crucial to follow the manufacturer’s instructions closely.
Start by determining the appropriate dosage recommendations based on your tank size and the current temperature. Typically, you’ll need to mix the additive with fuel before filling your tank.
For best results, use the proper application methods, such as pouring the additive directly into the tank or mixing it with oil in a separate container.
Ascertain the additive is well distributed by running your heating system for a short period. This will help prevent gel formation and maintain peak heating efficiency.
Potential Concerns and Misconceptions
While many homeowners rely on anti gel additives to prevent fuel gelling in cold weather, misconceptions about their effectiveness and usage can lead to improper application.
Understanding these common myths is essential to managing gelling risks effectively:
- Anti gel additives aren’t a one-size-fits-all solution; their effectiveness varies by formulation.
- Using too much additive can create adverse reactions, potentially worsening gelling.
- Some believe additives eliminate gelling entirely, but they only reduce the risk under specific conditions.
Choosing the Right Additive for Your Heating System
How do you choose the right anti gel additive for your heating system? Start by checking for additive compatibility with your specific heating oil. Not all additives work with every type of oil, so consult your system’s manual or a professional.
Next, consider seasonal considerations; colder temperatures may require a different formulation than warmer months. Look for additives that are effective in the temperature ranges you typically experience.
Additionally, assess the manufacturer’s recommendations and any product reviews to guarantee reliability. Selecting the appropriate additive can greatly enhance your heating system’s performance during winter months.
Tips for Winterizing Your Home Heating Oil System
To winterize your home heating oil system effectively, you need to prioritize the use of anti-gel additives to prevent fuel line issues.
Implement proper storage techniques to maintain oil quality and guarantee your tank is clean and free of contaminants.
Regular system maintenance is essential for peak performance during colder months, so don’t overlook routine checks and servicing.
Importance of Anti Gel Additives
As winter approaches, it’s crucial to contemplate the role of anti gel additives in your home heating oil system.
These additives enhance anti gel effectiveness, ensuring consistent fuel flow even in frigid temperatures. Without them, your system risks clogs and inefficiencies.
- Prevents fuel gel formation in cold temperatures
- Maintains ideal fuel flow to your heating system
- Reduces the risk of costly breakdowns and repairs
Proper Storage Techniques
Proper storage techniques for your home heating oil system can greatly enhance the effectiveness of anti gel additives during winter months.
First, ascertain you use a proper container that’s specifically designed for heating oil, as this minimizes contamination and deterioration.
Next, maintain temperature control by storing the container in a cool, dry place, away from direct sunlight or extreme cold. This helps prevent the oil from thickening and reduces the risk of gel formation.
Additionally, keep the container sealed to avoid moisture ingress, which can adversely affect the oil’s quality.
Implementing these techniques will optimize your heating oil system’s performance.
Regular System Maintenance
Although you may think your home heating oil system is ready for winter, regular system maintenance is essential to confirm peak performance and prevent issues like gel formation.
Prioritizing these maintenance tasks can enhance system efficiency and maintain fuel quality:
- Schedule an annual professional inspection to identify potential problems.
- Replace fuel filters regularly to guarantee ideal flow and prevent clogs.
- Monitor and adjust the thermostat settings for consistent heating performance.
Conclusion
Incorporating anti gel additives into your home heating oil is essential for peak performance during cold weather. By preventing fuel gelling, these additives guarantee smooth flow and reliable combustion, ultimately reducing repair costs and system failures. When selecting the right additive, consider compatibility with your heating oil and seasonal temperature variations. Regular maintenance and the proper use of these additives can keep your heating system efficient and dependable throughout winter, safeguarding your home against the chill.
5 Essential Tips for Planning Bi-Level Home Additions
When you’re considering a bi-level home addition, it’s essential to start with a clear vision of your space needs and lifestyle goals. This foundational step sets the tone for your project, guiding every decision from design to budget. But before you get too far ahead, there are other important factors to keep in mind. Let’s explore what you need to know to guarantee your addition not only meets your expectations but also harmonizes with your home.
Key Takeaways
- Assess space requirements to determine the purpose of the addition, ensuring it fits your lifestyle and enhances daily living.
- Research local zoning regulations to ensure compliance with permits, setbacks, and height restrictions before starting your project.
- Design the addition to use similar materials and architectural details for a cohesive look that blends with the existing structure.
- Create a detailed budget that includes a contingency fund of 10-20% to cover unexpected costs during construction.
- Choose a qualified contractor with positive reviews and maintain clear communication throughout the project to ensure effective collaboration.
Assess Your Needs and Goals
Before diving into a bi-level home addition project, it’s essential to assess your needs and goals.
Start by evaluating your space requirements; consider how many additional rooms you need and their intended purpose. Are you welcoming a growing family, or maybe setting up a home office?
Think about your lifestyle changes too. Do you envision hosting gatherings or needing a quiet retreat?
By clearly defining these elements, you’ll create a blueprint that not only enhances your home but also enriches your daily life.
Clearly outlining your needs will help you design a space that elevates both your home and your everyday experience.
This careful assessment guarantees you invest wisely in your space, making it truly functional and enjoyable.
Understand Zoning Regulations and Permits
Have you checked the zoning regulations and permits for your bi-level home addition? Understanding zoning laws is vital before you start. Research local regulations to guarantee your project complies, as violations could lead to costly fines or project delays. You’ll need to submit permit applications, which often require detailed plans. Here’s a quick overview:
| Zoning Aspect | Requirements | Permit Application Steps |
|---|---|---|
| Setback Regulations | Minimum distance from property lines | Gather necessary documents |
| Height Restrictions | Maximum building height | Submit application to local authority |
| Land Use Designation | Residential, commercial, etc. | Pay applicable fees |
| Environmental Impact | Assess potential effects | Await approval |
Stay informed to avoid surprises!
Design for Cohesion With Existing Structure
To guarantee your bi-level home addition feels like a natural extension of your existing structure, focus on design elements that harmonize with the original architecture.
Consider using similar materials, colors, and textures to create aesthetic continuity. Pay attention to rooflines and window styles, ensuring they complement your home’s existing features.
Incorporate architectural details, like trim and molding, that reflect the original design for structural harmony.
Budget Wisely and Plan for Contingencies
Successfully integrating your bi-level addition with the original structure doesn’t just rely on design; it also hinges on smart budgeting and planning for unforeseen expenses.
Start by outlining your budget, ensuring you account for all aspects, from materials to permits. Implement cost-saving strategies like sourcing local materials or opting for energy-efficient designs.
Outline your budget carefully, considering every detail from materials to permits, and explore cost-saving strategies like local sourcing and energy efficiency.
Always set aside a contingency fund—ideally 10-20% of your total budget—to tackle unexpected expenses that may arise during construction.
This way, you’ll keep your project on track without the stress of financial surprises, allowing you to focus on creating the perfect space for your family.
Choose the Right Contractor and Collaborate Effectively
Choosing the right contractor is essential, as a skilled professional can make or break your bi-level home addition project.
Look for contractor qualifications like experience, licenses, and positive reviews. Once you’ve selected your contractor, establish clear communication from the start.
Use collaboration techniques such as regular check-ins and shared project management tools to keep everyone on the same page. Encourage feedback and be open to their suggestions, as they bring valuable expertise to the table.
Conclusion
By focusing on these five essential tips, you’ll be well on your way to a successful bi-level home addition. Assess your needs, navigate zoning regulations, and guarantee your design seamlessly blends with your home’s character. Budget wisely, and don’t forget that a contingency fund can save you from unexpected hiccups. Finally, choosing the right contractor and fostering open communication will bring your vision to life. Embrace the journey, and soon you’ll enjoy a beautifully enhanced living space!
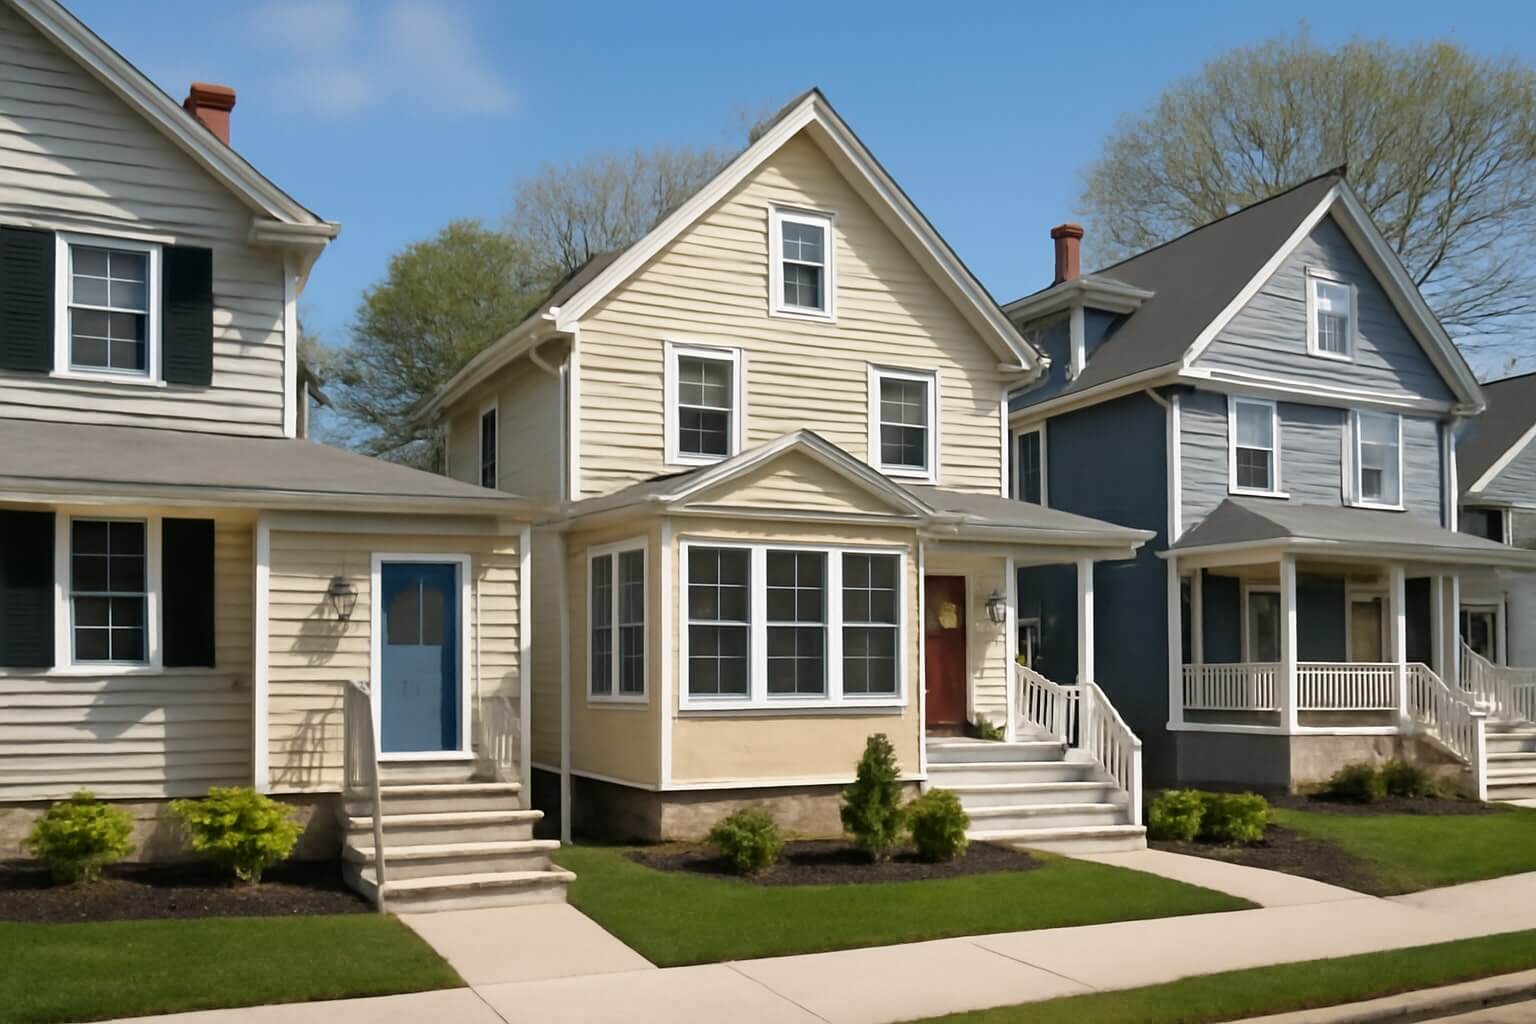
3 Popular Boston Home Addition Styles
When considering home additions in Boston, it’s crucial to understand the distinct styles that define the city’s architectural landscape. Colonial expansions maintain the historical charm with their symmetrical designs, while modern farmhouse additions offer a blend of rustic and contemporary elements. Alternatively, contemporary urban extensions push boundaries with innovative materials and layouts. Each style presents unique benefits and challenges that can greatly influence your home’s functionality and aesthetic. What factors should you prioritize in your decision?
Key Takeaways
- Colonial expansions prioritize architectural integrity and historical preservation while enhancing functionality with classic features and materials.
- Modern farmhouse additions blend rustic charm with contemporary aesthetics, emphasizing open spaces and natural light through large windows and outdoor living areas.
- Contemporary urban extensions focus on innovative solutions for limited space, promoting seamless indoor-outdoor flow with materials like glass and steel.
- Each style aims to preserve original architectural elements while integrating thoughtful design for increased property value and functionality.
- Aesthetic integration involves balancing traditional and modern elements, using neutral colors and stylish fixtures to create inviting environments.
Colonial Expansions
When you consider expanding a Colonial-style home, it’s essential to maintain the architectural integrity while enhancing functionality.
Focus on preserving the defining features of colonial architecture, such as symmetrical facades and classic rooflines. Use materials that align with historical preservation standards to guarantee your addition complements the existing structure.
Consider integrating elements like transom windows or detailed moldings that reflect the original design.
Thoughtful placement of your expansion can maximize space without disrupting the home’s historical narrative.
Modern Farmhouse Additions
As you plan a Modern Farmhouse addition, it’s essential to blend contemporary aesthetics with rustic charm to maintain the home’s cohesive style.
Focus on creating open spaces that enhance functionality while reflecting the warmth of farmhouse design.
Consider incorporating the following elements:
- Exposed wooden beams for a rustic touch
- Large windows to invite natural light
- A neutral color palette for a calming effect
- Sleek, modern fixtures to balance traditional elements
- Outdoor living areas that extend your space
This thoughtful integration will guarantee your Modern Farmhouse addition feels both inviting and stylish, complementing the existing architecture seamlessly.
Contemporary Urban Extensions
While urban living often demands innovative solutions to space challenges, contemporary urban extensions offer a way to enhance your home without sacrificing style.
These extensions typically feature open floor plans, maximizing natural light and creating a seamless flow between indoor and outdoor spaces. You’ll find that materials like glass and steel are commonly used, aligning with urban aesthetics while ensuring durability.
Thoughtful design elements, such as green roofs or vertical gardens, can further integrate nature into your urban environment.
Ultimately, these extensions not only increase your living space but also elevate the overall value and appeal of your property.
Conclusion
In Boston, your choice of home addition style can greatly impact your living space and property value. Colonial expansions maintain historical charm while modern farmhouse additions offer a blend of rustic and contemporary appeal. On the other hand, contemporary urban extensions maximize space with innovative designs. Evaluating your needs and preferences will help you decide which style aligns best with your vision, ensuring that your home not only meets your lifestyle requirements but also enhances the neighborhood’s architectural landscape.
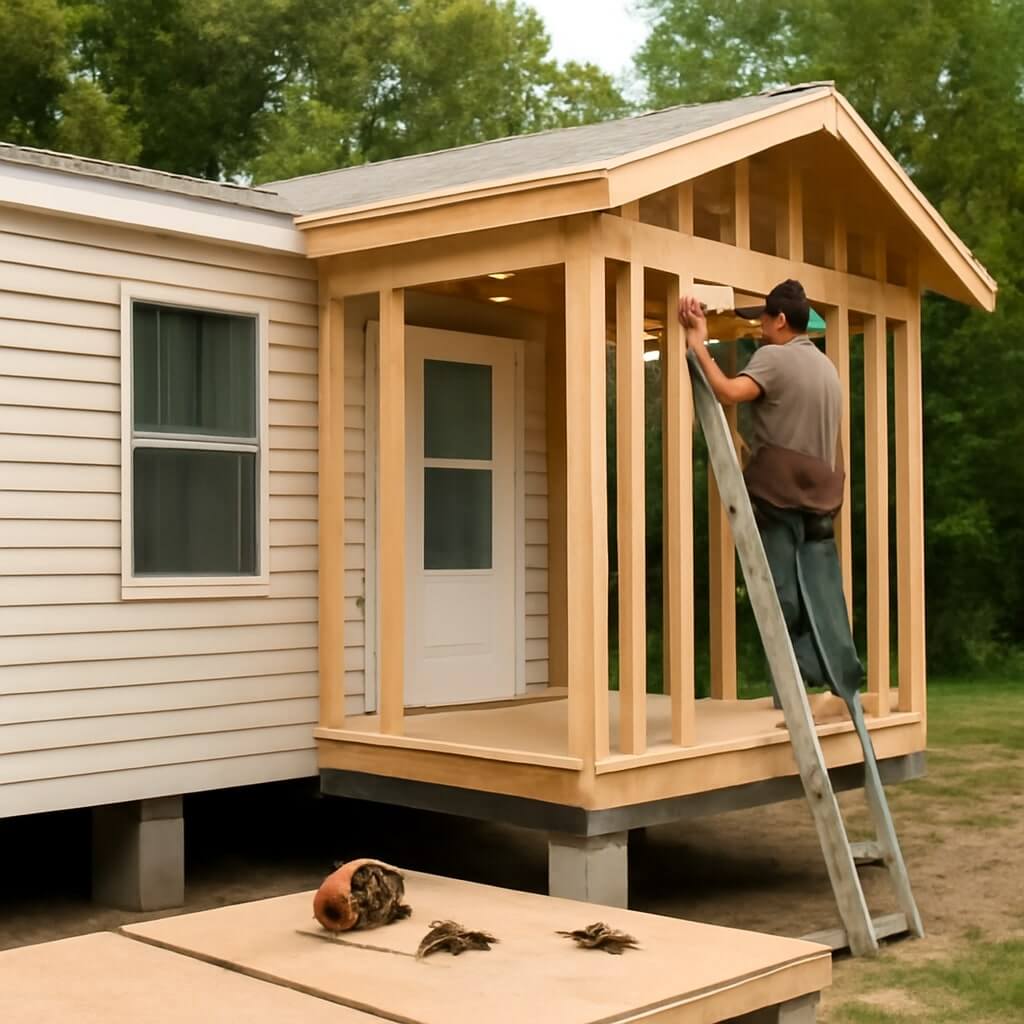
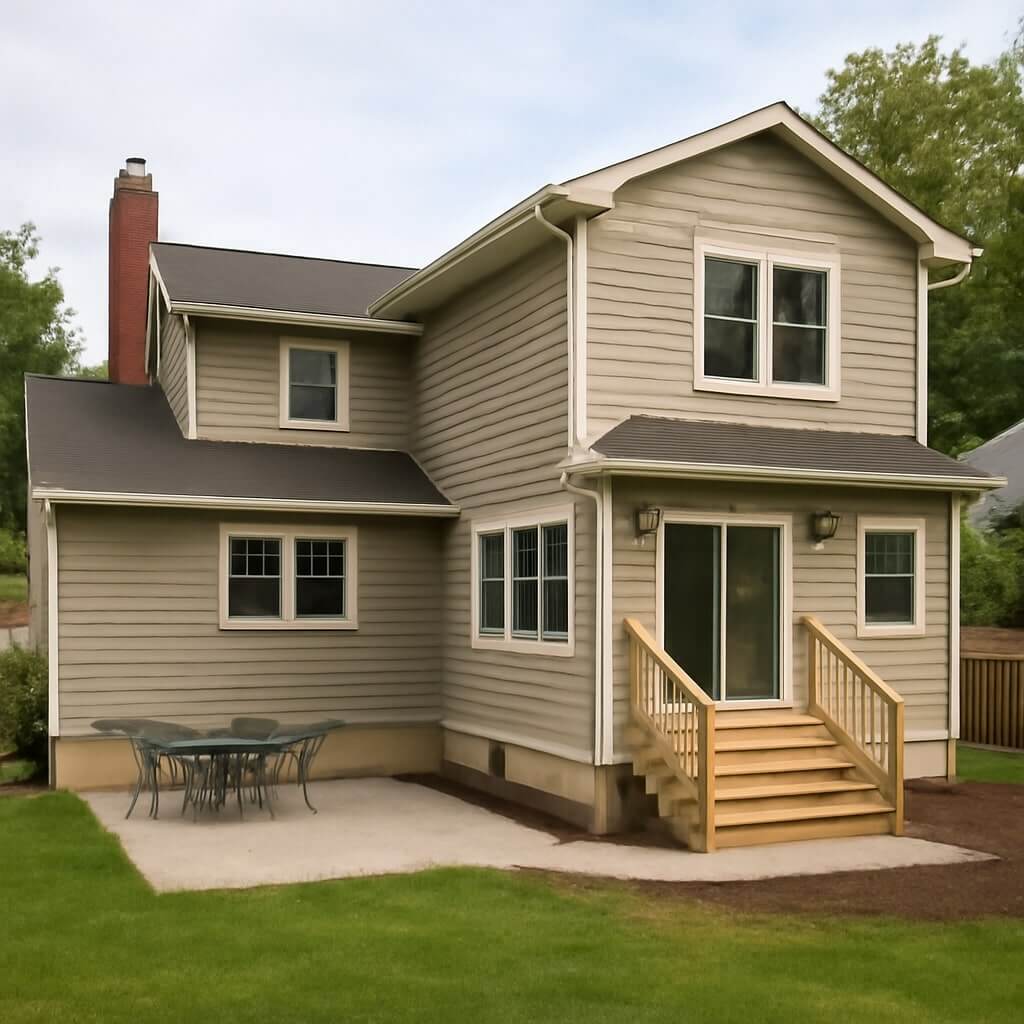
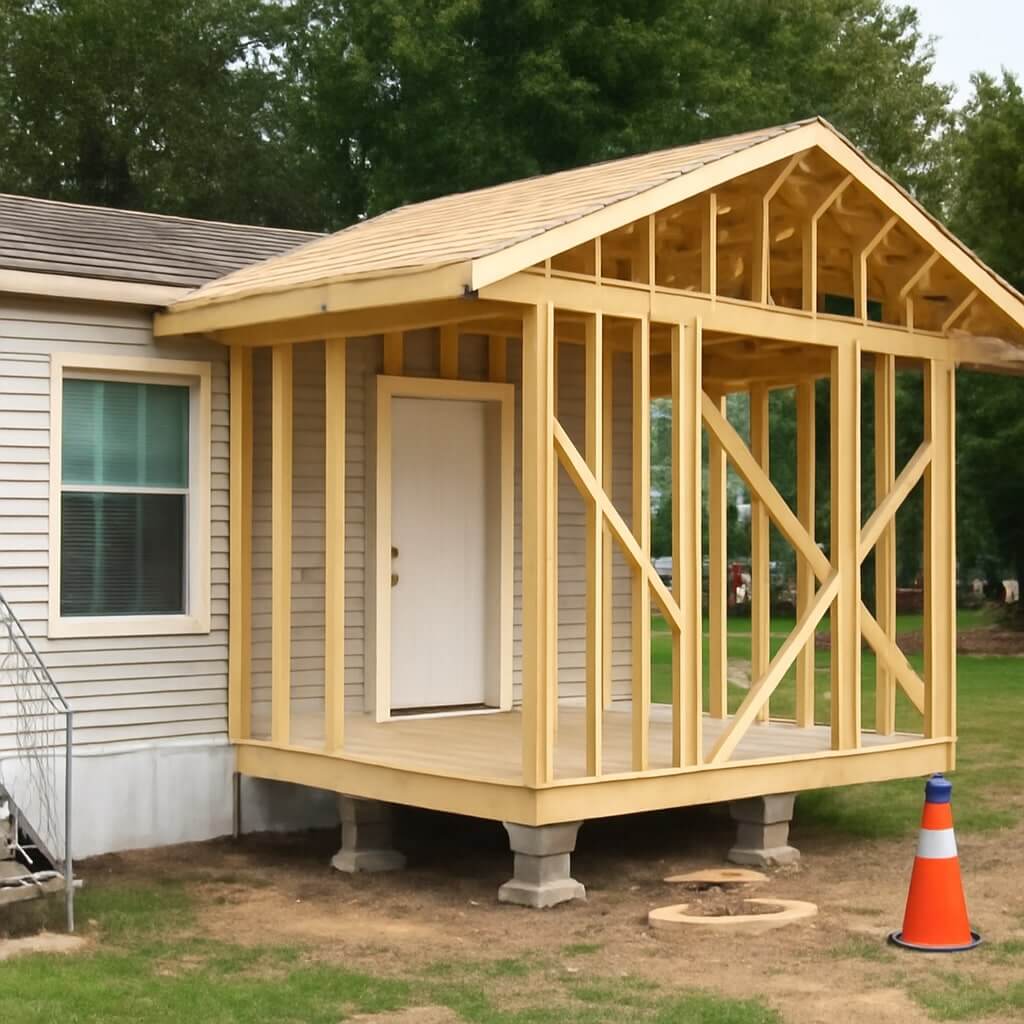
How to Successfully Build an Addition to Your Mobile Home
Building an addition to your mobile home can enhance its functionality and value. To start, you’ll need to assess your specific needs, such as extra living space or a home office. Understanding local building codes is essential, as it guarantees your project complies with regulations. As you plan, consider the layout and aesthetics to create a seamless shift with your existing structure. Next, let’s explore how to budget effectively for this endeavor.
Key Takeaways
- Assess your space needs, budget, and timeline to define your project’s scope before starting construction.
- Research local building codes and obtain necessary permits to ensure compliance throughout the project.
- Design a cohesive layout that integrates with your mobile home and maximizes natural light and ventilation.
- Plan for utility connections and factor in costs for materials, labor, and potential financing options.
- Schedule regular inspections during and after construction to maintain the integrity and safety of your addition.
Assessing Your Needs and Goals
When considering an addition to your mobile home, what specific needs and goals do you have in mind? Conducting a thorough needs assessment is crucial.
Identify how much extra space you require and what purpose it will serve—be it a bedroom, office, or storage area.
Next, engage in goal setting by outlining your desired timeline and budget constraints. This clarity helps prioritize features and guarantees the project aligns with your lifestyle.
Understanding Local Building Codes and Regulations
Before starting your addition, it’s essential to research local building codes and regulations that apply to mobile homes.
Understanding these guidelines will help you navigate the permit application process smoothly. Ensuring compliance not only avoids potential fines but also guarantees your project’s safety and longevity.
Research Local Regulations
Understanding local building codes and regulations is essential for a successful addition to your mobile home, as failing to comply can lead to costly setbacks.
Here are key aspects to research:
- Local zoning laws affecting your property
- Required building permits for construction
- Setback requirements from property lines
- Height restrictions on new structures
- Safety standards for electrical and plumbing work
Permit Application Process
Maneuvering through the permit application process is crucial to guarantee your addition is compliant with local building codes and regulations.
Start by identifying the necessary permit types, which may include building, electrical, or plumbing permits. Each type has specific requirements, so be thorough in your research.
Next, prepare your application, making certain all documents are complete and accurate. The application timeline can vary, so submit early and follow up regularly to avoid delays.
Don’t forget to check for any additional inspections that may be necessary. By staying organized and informed, you’ll streamline the process and guarantee a successful addition to your mobile home.
Designing Your Addition: Layout and Aesthetics
When designing your addition, focus on creating a functional layout that maximizes space and flow.
Consider how the new area will integrate with your existing mobile home and guarantee it meets your daily needs.
Additionally, incorporate aesthetic design elements that complement your home’s style, enhancing both its visual appeal and market value.
Functional Layout Considerations
Creating a functional layout for your mobile home addition requires careful planning and consideration of how the new space will interact with your existing structure.
Focus on space optimization and guarantee smooth traffic flow. Here are key points to keep in mind:
- Assess existing room dimensions
- Determine the purpose of the addition
- Plan for furniture placement and movement
- Ensure natural light and ventilation
- Consider access points and pathways
Aesthetic Design Elements
While designing the aesthetic elements of your mobile home addition, it’s essential to guarantee that the new space harmonizes with the existing structure.
Focus on modern aesthetics by incorporating clean lines and functional designs that complement your home’s style. Choose a cohesive color palette that reflects your personal taste while blending seamlessly with the original colors.
Consider materials that not only enhance visual appeal but also maintain durability. Incorporate natural light through windows or skylights to create an inviting atmosphere.
Finally, pay attention to landscaping, as it can greatly enhance the overall look and feel of your mobile home addition.
Budgeting for Your Project: Costs and Financing
How can you effectively manage your budget when adding an addition to your mobile home? Start by conducting a thorough cost estimation to understand all potential expenses.
Consider these key aspects:
- Material costs and availability
- Labor costs and contractor fees
- Utility connections and upgrades
- Landscaping and exterior work
- Unexpected contingencies
Next, explore financing options that suit your needs, like personal loans, home equity lines of credit, or government programs.
Securing Necessary Permits
Before you can start building your addition, obtaining the necessary permits is essential to guarantee compliance with local regulations.
You’ll need to identify relevant permit types, such as building, electrical, and plumbing permits, depending on your project’s scope.
Research your local government’s website or contact them directly for specific requirements. Application timelines can vary greatly, so submit your applications early to avoid delays.
Confirm all documentation is complete to facilitate a smooth approval process.
Once you secure the permits, you can confidently proceed with your addition, knowing you’re following the legal guidelines set by your municipality.
Choosing the Right Materials and Tools
Choosing the right materials and tools is essential for the success and durability of your mobile home addition. Proper material selection guarantees your addition withstands the elements, while tool compatibility helps streamline the construction process.
Consider the following:
- Pressure-treated lumber for structural integrity
- Insulation materials suited for your climate
- Durable siding options to enhance aesthetics
- Weatherproof roofing materials for longevity
- High-quality fasteners to guarantee stability
Hiring Contractors vs. DIY
After selecting the right materials and tools for your mobile home addition, you’ll need to decide whether to hire contractors or take on the project yourself.
If you opt for DIY, assess your own skills and experience; strong DIY skills can save you money but may require a steep learning curve.
Alternatively, hiring a contractor with the right qualifications can guarantee a professional finish and adherence to building codes.
Consider your timeline, budget, and comfort level with complex tasks.
Ultimately, weighing the pros and cons of both options will help you make the best decision for your addition project.
Construction Process: Step-by-Step
Initiating the construction of your mobile home addition involves several critical steps that secure a successful outcome.
Begin with thorough foundation preparation to ascertain stability. Next, employ effective framing techniques, which provide the structure for your addition.
Follow these steps:
- Obtain necessary permits
- Excavate and prepare the site
- Pour the concrete foundation
- Construct the frame using quality materials
- Confirm all work meets local building codes
Interior Finishing and Decor
Once the framing and structural components of your mobile home addition are complete, the focus shifts to interior finishing and decor. Selecting the right color schemes, wall treatments, and furniture can transform the space. Consider your lighting options to enhance the ambiance.
| Element | Suggestions | Tips |
|---|---|---|
| Color Schemes | Neutral tones, bold accents | Test samples before deciding |
| Furniture Selection | Multi-functional, space-saving | Measure before purchase |
| Lighting Options | Recessed, pendant, floor lamps | Layer lighting for effect |
| Wall Treatments | Paint, wallpaper, paneling | Choose durable materials |
| Accessories | Rugs, artwork, plants | Personalize to your style |
Maintenance Tips for Your New Addition
To keep your new addition in top shape, regular inspections and prompt repairs are essential.
Check for any signs of wear or damage, especially in the weatherproofing and insulation.
Staying proactive will help you maintain a comfortable and energy-efficient space.
Regular Inspections and Repairs
While you might be excited about your new addition, regular inspections and repairs are essential to maintaining its integrity and ensuring your comfort.
Establishing routine checks and adhering to repair schedules will help you catch potential issues early. Here are some maintenance tips to contemplate:
- Inspect the roof for leaks or damage
- Check windows and doors for proper sealing
- Examine foundation and support beams for cracks
- Assess plumbing and electrical systems regularly
- Look for signs of pests or moisture damage
Weatherproofing and Insulation Maintenance
As you commence on the journey of maintaining your new addition, effective weatherproofing and insulation are essential for energy efficiency and comfort.
Start by employing weatherproofing techniques like sealing gaps and applying weatherstripping around doors and windows. Regularly inspect caulking for deterioration and replace it as needed.
Additionally, consider insulation types such as fiberglass batts or foam boards, ensuring they’re properly installed to maximize thermal performance.
Don’t forget to check for moisture buildup, which can compromise insulation effectiveness.
Conclusion
Building an addition to your mobile home can enhance your living space considerably. By evaluating your needs, understanding local regulations, and designing a cohesive layout, you set a solid foundation for your project. Budgeting wisely and securing necessary permits are vital steps. Whether you choose to hire contractors or tackle the work yourself, following the construction process diligently guarantees a successful outcome. With proper maintenance, your new addition will provide comfort and functionality for years to come.
What Regulations Apply When You Put an Addition on a Manufactured Home?
When considering an addition to your manufactured home, it’s vital to navigate a complex web of regulations. Zoning laws, building codes, and setback requirements can greatly impact your project. Each aspect demands careful scrutiny to guarantee compliance and avoid costly setbacks. Understanding these regulations is essential, as neglecting them could lead to complications. What specific steps should you take to make sure everything aligns with local requirements?
Key Takeaways
- Verify zoning classifications to ensure the addition complies with local land use regulations for manufactured homes.
- Obtain the necessary building permits to adhere to local building codes governing safety and design.
- Check foundation requirements specific to manufactured homes, including soil stability and load-bearing capacity assessments.
- Assess existing utility infrastructure to confirm adequate support for the new addition, including water and electricity.
- Review Homeowners Association guidelines to ensure compliance with aesthetic and structural standards before construction begins.
Understanding Zoning Laws
When considering home additions, understanding zoning laws is vital, as these regulations dictate what you can and can’t do with your property.
Zoning classifications play a significant role in determining allowable land use, including residential, commercial, or mixed-use designations. You’ll need to verify your property’s zoning classification to guarantee your intended addition conforms to local regulations.
Zoning classifications are crucial for ensuring your home addition aligns with local regulations and land use designations.
Additionally, these laws may impose restrictions on the size, height, and placement of your addition, affecting your design options.
Familiarizing yourself with these regulations guarantees compliance and helps you avoid costly delays or potential legal issues during your home improvement project.
Building Codes and Permits
When planning a home addition, understanding local building codes is vital to guarantee compliance and safety.
You’ll also need to secure the appropriate permits before beginning construction, as these documents are critical for legal approval.
Familiarizing yourself with these regulations helps prevent costly delays and modifications down the line.
Local Building Codes
Understanding local building codes is essential for anyone considering a home addition, as these regulations dictate what’s permissible regarding design, structure, and safety.
Local enforcement agencies guarantee that your project complies with these codes, preventing potential compliance issues that could arise during or after construction.
Familiarizing yourself with specific requirements, such as setbacks, height restrictions, and material standards, helps facilitate a smoother building process.
Ignoring these codes may lead to significant fines or mandated corrections, jeopardizing your investment.
Always consult with local authorities and professionals to guarantee your addition adheres to all relevant regulations before breaking ground.
Permit Requirements
Local building codes not only govern design and safety but also dictate the necessary permits for any home addition.
When considering various addition types for your manufactured home, you must first determine which permits apply. Typically, you’ll need a building permit, but zoning permits or special use permits may also be required, depending on local regulations.
Each jurisdiction has specific criteria, so it’s essential to consult your local building authority before commencing any work. Failing to secure the appropriate permits can result in fines or complications during inspections, potentially jeopardizing your addition’s approval and overall quality.
Foundation Requirements
When planning your home addition, understanding foundation requirements is essential.
You’ll need to take into account local building codes, assess soil stability, and navigate the permitting process.
Each of these factors plays a significant role in ensuring your addition is structurally sound and compliant with regulations.
Local Building Codes
Before starting on home additions, it’s vital to recognize that foundation requirements are governed by specific building codes that vary by jurisdiction.
Compliance with these local regulations is essential to guarantee your project meets regional standards. Typically, these codes outline specifications for foundation depth, materials, and anchoring methods, which directly affect the stability and safety of your manufactured home addition.
To avoid potential delays or fines, consult your local building department for precise guidelines.
Soil Stability Assessment
Understanding soil stability is essential for ensuring a safe and durable foundation for your home addition. Conducting thorough soil testing is vital to assess the soil’s load-bearing capacity and composition.
This evaluation allows you to identify any potential issues that could compromise your foundation integrity. Factors such as moisture content, compaction, and soil type play significant roles in determining how well your foundation will perform over time.
Permitting Process Overview
Steering through the permitting process for your home addition requires careful attention to foundation requirements, as these guidelines guarantee the safety and compliance of your project.
Begin by submitting your application, which typically involves paying application fees specific to your locality. Be mindful of permitting timelines, as they may vary based on the complexity of your addition and local regulations.
You’ll need to provide detailed plans that demonstrate your foundation meets code standards. Engaging with local authorities early can streamline this process, ensuring that your home addition adheres to necessary regulations while minimizing delays and additional costs.
Setback Regulations
Setback regulations play an important role in determining how close you can build to property lines, guaranteeing both aesthetic cohesion and safety within residential areas.
To comply with these regulations, you should consider the following factors:
- Setback distances may vary by zoning type.
- Boundary lines must be clearly defined and respected.
- Local ordinances often dictate specific measurements.
- It’s vital to consult with local authorities for compliance.
Understanding these elements will help you avoid potential fines and guarantee your addition integrates seamlessly into the neighborhood’s layout.
Always prioritize adherence to setback regulations before starting your project.
Utility Connections
Before you begin your home addition, it’s essential to address utility connections, as they greatly impact the feasibility and functionality of your project.
You’ll need to assess the existing utility infrastructure to determine if it can support your addition. This involves checking capacity for water, electricity, and sewage services.
Be prepared for potential connection fees, which can vary by location and utility provider. It’s vital to communicate with local utility companies early in the process to guarantee compliance with regulations and to avoid unexpected costs.
Proper planning here can streamline your project and prevent delays during construction.
Design and Aesthetic Considerations
While planning your home addition, it’s crucial to evaluate design and aesthetic elements that not only enhance the overall appearance but also guarantee harmony with the existing structure.
To achieve aesthetic harmony and design consistency, consider the following:
Consider architectural style, materials, color palette, and scale to ensure a harmonious and cohesive home addition.
- Architectural Style: Match the addition’s style with your manufactured home’s existing design.
- Materials: Use similar materials and finishes to maintain a cohesive look.
- Color Palette: Select colors that complement the original structure, avoiding stark contrasts.
- Scale and Proportion: Verify the addition’s size respects the home’s dimensions for visual balance.
These considerations will contribute to a unified and appealing home environment.
Impact on Property Taxes
When considering a home addition, it’s vital to understand how it may impact your property taxes.
A property assessment will likely occur after the addition is completed, resulting in a revised valuation of your home. This increased value can lead to higher property taxes, so it’s important to evaluate the potential tax implications before proceeding.
Be aware that local regulations may dictate how much your taxes can increase. Consulting with a tax professional can provide clarity on how your specific situation might affect your financial obligations, ensuring you’re prepared for any changes in your property tax responsibilities.
Homeowners Association Guidelines
Understanding property tax implications is only one aspect of planning a home addition; homeowners also need to contemplate the guidelines set forth by their Homeowners Association (HOA).
Adhering to these guidelines not only protects your homeowner rights but also maintains community standards. Before proceeding, consider the following:
- Architectural Review: Ascertain your design aligns with HOA-approved aesthetics.
- Setback Requirements: Verify minimum distance from property lines.
- Material Restrictions: Confirm allowable building materials with your HOA.
- Approval Process: Submit plans for HOA review and approval prior to construction.
Following these steps will facilitate a smoother addition process while respecting community norms.
Conclusion
In summary, adding an addition to your manufactured home requires careful consideration of various regulations. You must adhere to zoning laws, building codes, and setback requirements, ensuring structural safety and compliance with local ordinances. Additionally, don’t overlook utility connections, design aesthetics, and potential impacts on property taxes. If applicable, consult your Homeowners Association for specific guidelines. By thoroughly understanding these factors, you can navigate the process effectively and create a valuable enhancement to your home.
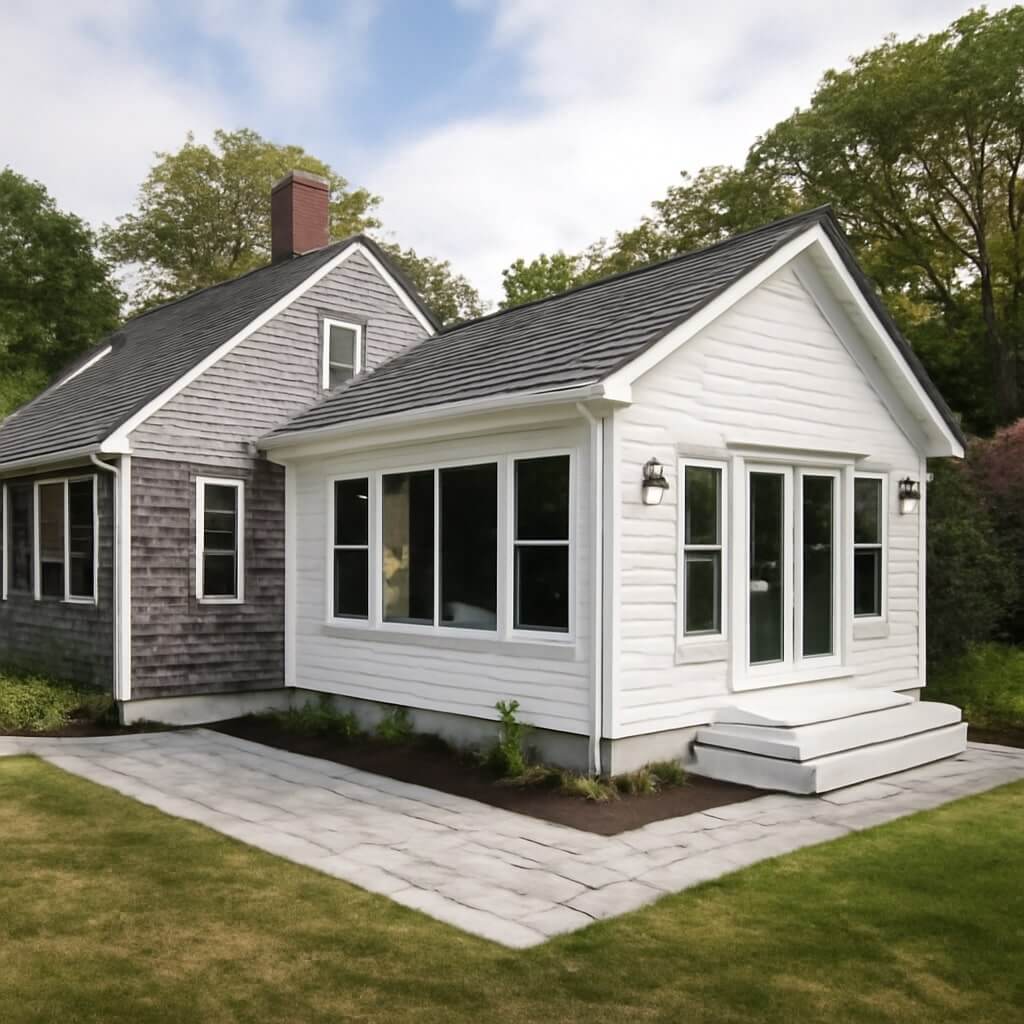
Practical Cape Cod Home Addition Ideas for Modern Living
If you’re looking to enhance your Cape Cod home, practical additions can transform your space while preserving its charm. Imagine expanding your kitchen for more culinary creativity or designing a cozy family room that invites gatherings. Each idea not only boosts functionality but also elevates your home’s appeal. Curious about how a serene master suite or a sunroom can change your lifestyle? Let’s explore some thoughtful options that blend modern living with classic Cape Cod style.
Key Takeaways
- Expand your kitchen with versatile storage solutions and increased counter space to enhance functionality and creativity in cooking.
- Design a cozy family room addition with comfortable furniture and personal touches to create a warm gathering space for loved ones.
- Create a serene master suite retreat by incorporating calming colors, plush bedding, and natural materials for a tranquil atmosphere.
- Add a functional mudroom with built-in storage and durable flooring to enhance organization and convenience in your home’s entryway.
- Consider a sunroom to enjoy panoramic views and natural light year-round, perfect for hosting gatherings or relaxing with a book.
Expanding the Kitchen for Culinary Creativity
If you’ve ever dreamed of hosting dinner parties or experimenting with new recipes, expanding your kitchen can turn that dream into reality.
A well-planned kitchen layout maximizes space and enhances functionality, allowing you to move seamlessly while cooking. Consider incorporating versatile storage solutions like pull-out drawers and vertical shelves to keep your essentials organized and easily accessible.
With more counter space, you can create culinary masterpieces without feeling cramped. Imagine the joy of gathering loved ones in a spacious kitchen, where creativity flows and flavors come alive.
Transform your kitchen into a hub of culinary inspiration, making every meal a memorable occasion.
Designing a Cozy Family Room Addition
As you envision your dream home, designing a cozy family room addition can create a warm gathering space that invites relaxation and connection.
Focus on family room aesthetics that reflect your personal style—think soothing colors, natural light, and inviting textures. Invest in cozy furniture like plush sofas and oversized armchairs, perfect for snuggling during movie nights.
Embrace your unique style with soothing colors, natural light, and cozy furniture for a warm family room retreat.
Incorporate soft throws and pillows for added comfort. Adding personal touches like family photos or artwork can enhance the space’s warmth.
With the right design elements, your family room will become a cherished retreat, fostering memorable moments with loved ones for years to come.
Creating a Serene Master Suite Retreat
Creating a serene master suite retreat transforms your bedroom into a personal sanctuary where you can unwind and recharge. To achieve a tranquil design, focus on master suite essentials like soft lighting, calming colors, and natural materials. Incorporate plush bedding, soothing artwork, and cozy seating to elevate the atmosphere.
| Essential Element | Purpose | Design Tip |
|---|---|---|
| Soft Bedding | Comfort & Warmth | Choose neutral tones |
| Ambient Lighting | Relaxation | Use dimmable fixtures |
| Natural Materials | Connection to Nature | Integrate wooden textures |
| Cozy Seating | Reading & Relaxation | Add a chaise lounge |
Embrace these ideas for your peaceful retreat!
Adding a Functional Mudroom
A well-designed mudroom can greatly enhance your home’s functionality and organization. It serves as an essential passage space, helping you manage the chaos of daily life.
Consider these elements to maximize mudroom storage and entryway organization:
- Built-in benches for easy shoe removal
- Hooks for coats, bags, and umbrellas
- Cabinets or shelves for seasonal gear
- A durable floor for easy cleanup
With these features, you’ll create a welcoming space that keeps your home tidy while providing practical storage solutions.
Transform your mudroom into a functional area that complements your Cape Cod lifestyle and makes coming home a breeze.
Incorporating a Sunroom for Year-Round Enjoyment
Imagine sipping your morning coffee in a sunroom that floods with natural light, no matter the season.
This versatile space not only enhances your home’s aesthetic but also boosts its value and your comfort year-round.
Let’s explore the benefits, design considerations, and clever ways to make the most of your sunroom throughout the changing seasons.
Benefits of Sunrooms
When you incorporate a sunroom into your Cape Cod home, you’re not just adding square footage; you’re enhancing your lifestyle.
Sunrooms provide incredible sunroom benefits, offering a perfect blend of indoor comfort and outdoor beauty for year-round enjoyment.
Imagine sipping your morning coffee while basking in natural light.
- Enjoy panoramic views of your garden.
- Host gatherings in a bright, inviting space.
- Create a cozy reading nook surrounded by nature.
- Increase your home’s value with this desirable feature.
With a sunroom, you’ll embrace the beauty of every season, making your home an oasis of tranquility and joy.
Design Considerations
While planning your sunroom, it’s essential to contemplate how it will blend with your existing home and lifestyle.
Consider architectural harmony; choose materials and colors that complement your Cape Cod aesthetic.
Think about space optimization—design your sunroom to maximize natural light, creating an inviting atmosphere without overwhelming your yard.
Incorporate large windows or sliding doors for seamless connections between indoor and outdoor spaces.
Don’t forget about furnishings; select pieces that enhance comfort while maintaining an open feel.
Ultimately, a well-designed sunroom can become your favorite retreat, offering year-round enjoyment and enhancing your home’s overall appeal.
Seasonal Usage Tips
A well-designed sunroom not only enhances your home’s aesthetic but also offers versatile usage throughout the seasons.
To make the most of your space, consider these seasonal decor ideas while keeping climate considerations in mind:
- Winter Wonderland: Adorn with cozy blankets and soft lighting for a warm retreat.
- Spring Bloom: Fill with vibrant flowers and pastel accents to celebrate renewal.
- Summer Oasis: Use light fabrics and ceiling fans to create a breezy escape.
- Autumn Harvest: Incorporate earthy tones and seasonal foliage for a cozy, inviting atmosphere.
With thoughtful decor and climate adjustments, your sunroom can be a year-round haven!
Building a Deck or Outdoor Living Space
Building a deck or outdoor living space can transform your Cape Cod home into a serene retreat where you can soak up the coastal charm. Choose durable deck materials like composite or treated wood that withstands the elements. Pair your deck with stylish outdoor furniture to create an inviting atmosphere for relaxation and gatherings.
Here’s a quick comparison to help you decide:
| Deck Materials | Outdoor Furniture |
|---|---|
| Composite Decking | Weather-resistant chairs |
| Treated Wood | Wicker lounge sets |
| PVC Decking | Teak dining tables |
A well-designed deck enhances your outdoor experience.
Conclusion
By embracing these practical Cape Cod home addition ideas, you can seamlessly blend modern living with classic charm. Whether you expand your kitchen for culinary adventures, design a cozy family room, or create a tranquil master suite, each addition enhances your home’s functionality and appeal. Don’t forget the mudroom for organization and the sunroom for year-round enjoyment. With a deck or outdoor living space, you’ll transform your home into a welcoming retreat that captures the essence of coastal living.
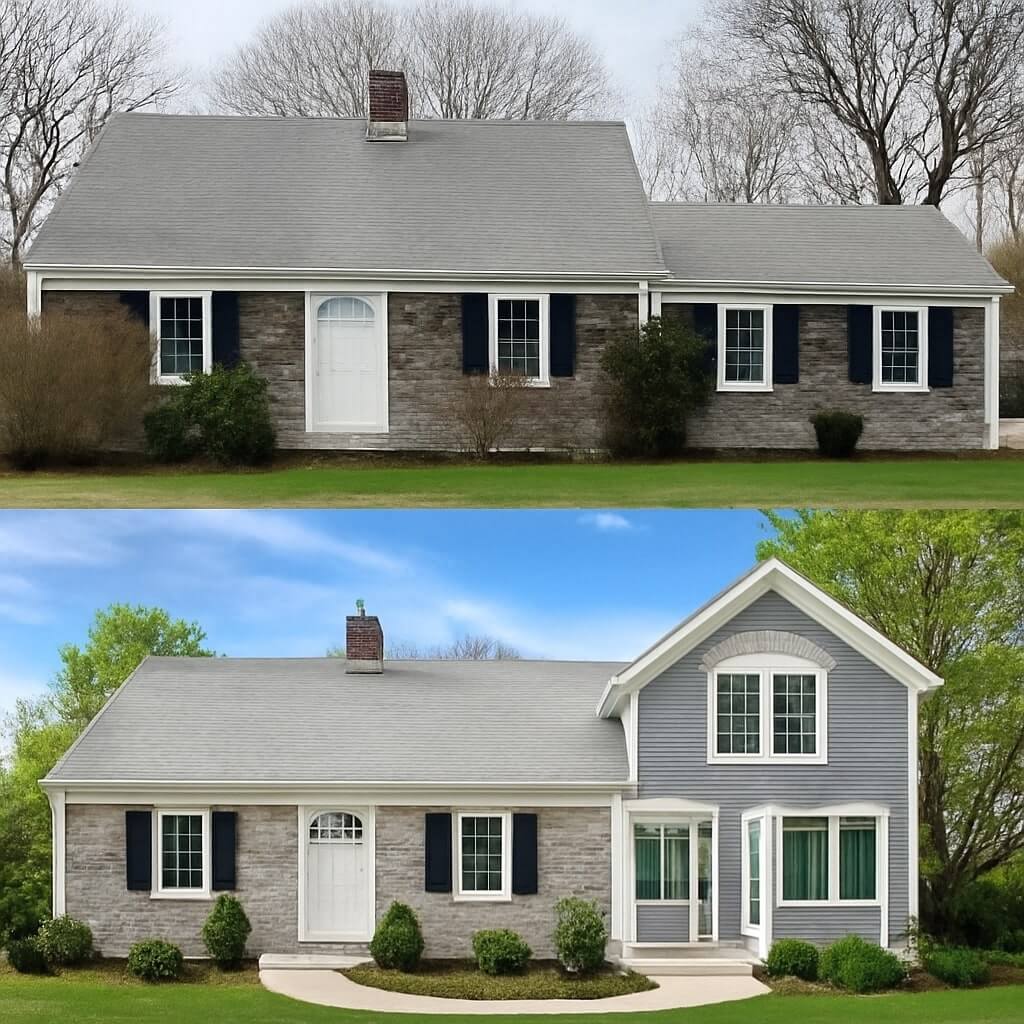
Transform Your Space With Cape Cod Home Additions Before and After
Transforming your space with Cape Cod home additions can redefine your living experience. Picture cozy guest suites replacing underutilized nooks and sunrooms that invite natural light while connecting you to the outdoors. Each architectural detail enhances your home’s charm, and modern amenities blend seamlessly with traditional design. Imagine the difference these changes can make. Are you ready to explore how these additions can elevate your home to a new level of comfort and style?
Key Takeaways
- Cape Cod home additions create open floorplans that enhance natural light and improve the flow of living spaces.
- Transforming neglected areas into cozy guest suites offers inviting retreats for visitors with essential amenities.
- Sunrooms bridge indoor and outdoor living, flooding spaces with natural light and serving as relaxing gathering spots.
- Enhancing curb appeal with architectural details creates a striking first impression and elevates the home’s overall charm.
- Modern amenities blend tradition with innovation, integrating smart technology for comfort while preserving the home’s character.
Expanding Living Spaces: A Seamless Addition
When you consider expanding your home on Cape Cod, a seamless addition can transform your living space into a more functional and inviting area.
Imagine creating open floorplans that enhance natural light and flow, making your home feel more spacious. With thoughtful design, you can incorporate multipurpose rooms, allowing you to adapt spaces for various needs—whether it’s a home office, play area, or cozy reading nook.
This flexibility not only maximizes your square footage but also enriches your lifestyle. By merging indoor and outdoor elements, your addition can reflect Cape Cod’s charm while elevating your everyday living experience.
Creating Cozy Guest Suites: Transforming Unused Areas
Transforming unused areas of your Cape Cod home into cozy guest suites can create a warm, welcoming atmosphere for friends and family.
With thoughtful guest suite design and space optimization, you can turn neglected corners into inviting retreats.
- A comfy queen bed adorned with soft linens
- Ambient lighting to set a relaxing mood
- A small kitchenette for convenience
Sunrooms That Shine: Bringing the Outdoors In
A stunning sunroom can effortlessly bridge the gap between your indoor living space and the beautiful Cape Cod landscape outside.
Imagine soaking in the warm embrace of natural light while enjoying a cup of coffee. With large windows and glass doors, your sunroom invites the outdoors in, creating a serene retreat.
You can furnish it with comfortable outdoor furniture, perfect for lounging or entertaining guests. Incorporating vibrant plants not only enhances the ambiance but also brings a touch of nature inside.
Whether it’s a cozy reading nook or a lively gathering space, your sunroom will become the heart of your home.
Enhancing Curb Appeal: Architectural Details That Wow
How can you elevate your home’s charm and make a lasting first impression? Focus on architectural details that captivate, especially when it comes to your front porch.
- Add decorative trim to windows and doors for a polished look.
- Incorporate stylish railings and posts that enhance your porch’s character.
- Choose vibrant colors or complementary hues to create a striking visual impact.
These elements not only enhance curb appeal but also invite guests to experience your home’s warmth.
Modern Amenities: Blending Tradition With Innovation
While you cherish the timeless charm of your Cape Cod home, integrating modern amenities can elevate both comfort and functionality without sacrificing its classic appeal. Consider incorporating smart technology and energy-efficient appliances to enhance daily living.
| Feature | Benefit |
|---|---|
| Smart Thermostats | Controls temperature remotely |
| LED Lighting | Reduces energy consumption |
| Smart Security Systems | Enhances safety and peace of mind |
These modern upgrades not only preserve your home’s character but also create a harmonious blend of tradition and innovation, making your Cape Cod residence a true reflection of contemporary convenience.
Conclusion
Incorporating Cape Cod home additions can truly redefine your living space, merging timeless elegance with modern comforts. Whether you’re expanding your home to create cozy guest suites or inviting sunrooms, each transformation breathes new life into your environment. Architectural enhancements uplift your home’s exterior, while smart technologies bring convenience right to your fingertips. Embrace the potential of your home, and turn it into an inspiring retreat that reflects your unique style and enhances everyday living.

3 Unique Cape Cod Homes With Expansive Additions
Imagine stepping into a Cape Cod home that seamlessly marries traditional charm with modern design. These unique residences feature expansive additions that invite natural light and blur the lines between inside and out. With energy-efficient solutions and reclaimed materials, they honor the region’s heritage while enhancing everyday comfort. Curious about how these homes achieve such a perfect balance of style and function? You’ll find the answers as we explore their enchanting designs.
Key Takeaways
- The first home features a modern addition with large glass doors that seamlessly connect the indoor living area to an outdoor kitchen and patio.
- A second unique Cape Cod residence showcases reclaimed wood elements, enhancing both sustainability and heritage while expanding the living space with natural light.
- The third property emphasizes innovative design with vertical gardens in its expansive outdoor area, promoting relaxation and air purification.
- Each home maintains traditional architectural styles while offering contemporary comforts, creating cozy gathering spots with fire pits and sheltered outdoor spaces.
- These homes exemplify the fusion of modern aesthetics and Cape Cod charm, ensuring timeless appeal for future generations.
Coastal Contemporary: A Modern Twist on Tradition
As you step into a Coastal Contemporary home, you’ll immediately notice how it seamlessly blends modern aesthetics with traditional Cape Cod charm.
The use of modern materials like reclaimed wood and sleek metals creates a striking contrast that feels both fresh and inviting. Large windows flood the space with natural light, enhancing the airy feel.
Sustainable design principles guide every choice, from energy-efficient appliances to eco-friendly insulation, ensuring your home respects the environment.
With open layouts and thoughtful finishes, these homes not only honor their heritage but also embrace a progressive lifestyle, making them perfect for today’s conscientious homeowner.
Expansive Elegance: Blending Indoor and Outdoor Living
Imagine stepping into a space where the boundaries between indoor and outdoor living dissolve, creating a harmonious sanctuary that invites the beauty of nature inside. Expansive elegance is achieved through a seamless shift, fostering an outdoor oasis that feels like a natural extension of your home. Large glass doors, open patios, and lush landscaping blur those lines, encouraging relaxation and connection with the environment.
| Feature | Description | Benefit |
|---|---|---|
| Large Windows | Floods the space with natural light | Enhances mood and warmth |
| Outdoor Kitchens | Perfect for entertaining | Expands living space |
| Covered Patios | Provides shelter from elements | Enjoy outdoors year-round |
| Vertical Gardens | Adds greenery and beauty | Purifies air and aesthetics |
| Fire Pits | Creates cozy gathering spots | Extends outdoor enjoyment |
Timeless Charm: Preserving Heritage With Innovative Design
Blending the beauty of modern design with the rich history of Cape Cod homes creates a unique charm that resonates deeply with both residents and visitors.
You’ll find that heritage preservation is at the forefront of many renovations, as homeowners skillfully integrate innovative materials like reclaimed wood and energy-efficient glass.
These choices not only honor the original architectural styles but also enhance functionality.
Picture large, sunlit spaces that maintain the cozy essence of traditional Cape Cod living, where every detail reflects a commitment to both legacy and progress.
This fusion guarantees that the timeless appeal of Cape Cod homes endures for generations to come.
Conclusion
In these unique Cape Cod homes, you’ve discovered how traditional charm can harmoniously blend with modern innovation. Each residence showcases impressive design elements that invite the outdoors in, while energy-efficient solutions and reclaimed materials breathe new life into the region’s rich heritage. Whether you’re seeking a serene retreat or a family-friendly space, these homes offer a perfect balance of comfort and connection with nature, making them truly special places to call home.