
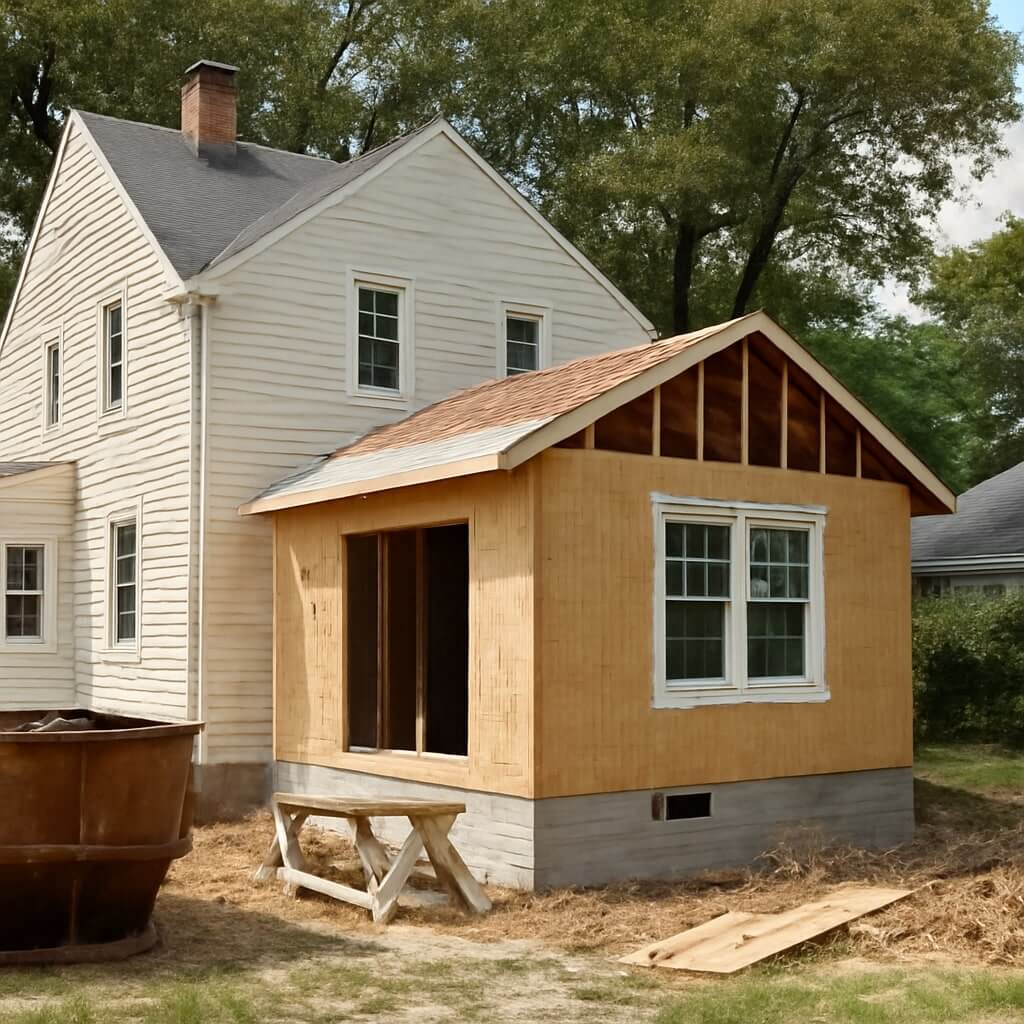
Costs of Home Additions in Norfolk?
When considering a home addition in Norfolk, you’re likely to encounter a variety of costs that can impact your budget. From essential permits to design fees and labor expenses, each element plays an important role in the overall price tag. Understanding these factors is essential for making informed decisions. However, there’s more to the equation than just initial estimates—unexpected costs can arise, influencing your project’s feasibility and scope. What should you really be prepared for?
Key Takeaways
- Home addition costs in Norfolk vary based on size, design, and materials, typically ranging from $100 to $300 per square foot.
- Required permits and fees in Norfolk can add significant expenses; check local regulations to budget accordingly.
- Design and architectural fees for home additions can account for 15-20% of the total project cost in Norfolk.
- Labor costs in Norfolk typically range from $30 to $70 per hour, depending on the contractor’s experience and demand.
- Always budget for unexpected expenses, which can arise during construction, potentially impacting your overall project budget.
Understanding the Basics of Home Addition Costs
When considering a home addition, it’s essential to understand the various costs involved, as they can greatly impact your budget and overall project outcome.
First, evaluate how the addition will affect your home value; a well-planned project can markedly increase your property’s worth.
Next, consider the project timeline—delays can inflate costs and disrupt your life.
Be realistic about labor, materials, and unforeseen expenses.
By grasping these fundamentals, you’ll not only stay within budget but also guarantee a smoother process, maximizing both your investment and the enjoyment of your new space.
Prioritize planning to achieve the best results.
Permits and Fees: What You Need to Know
Before diving into your home addition project, it’s vital to understand that obtaining the necessary permits and paying associated fees can greatly influence your overall costs.
You’ll need to complete a permit application that outlines your project details and adheres to local building codes. Familiarizing yourself with the fee structure is important, as it varies by municipality and can include costs for inspections and processing.
Failing to secure the right permits can lead to costly fines or delays. So, make certain you factor these expenses into your budget to guarantee a smooth and legally compliant construction process.
Design and Architectural Fees
Once you’ve secured the necessary permits and fees, it’s time to contemplate design and architectural fees, which can greatly influence your overall budget.
Hiring a skilled architect guarantees your home’s addition aligns with current design trends and desired architectural styles. Their expertise not only enhances aesthetic appeal but also maximizes functionality, potentially increasing your home’s value.
While these fees may seem intimidating upfront, investing in quality design pays off in the long run.
Investing in quality design may seem daunting, but it significantly enhances your home’s value over time.
Consider collaborating with professionals who understand your vision, as their insights can refine your project and help you avoid costly mistakes down the road.
Construction Costs: Labor and Materials
As you plunge into the nitty-gritty of your home addition project, understanding construction costs—both labor and materials—becomes essential for maintaining your budget. With fluctuations in the labor market and rising material prices, it’s vital to gather accurate estimates. Here’s a quick overview to help you navigate these costs effectively:
| Cost Component | Estimated Cost per Unit | Factors Influencing Cost |
|---|---|---|
| Labor (per hour) | $30 – $70 | Skill level, availability |
| Lumber (per board) | $3 – $7 | Supply chain, demand |
| Drywall (per sheet) | $10 – $15 | Quality, brand |
| Concrete (per yard) | $100 – $150 | Location, market conditions |
| Roofing (per sq. ft.) | $5 – $10 | Material type, installation complexity |
Additional Expenses to Consider
While you may have budgeted for the primary construction costs, it’s crucial to take into account additional expenses that can greatly influence your overall investment in a home addition.
Unexpected expenses, like permit fees or structural adjustments, can arise during the process. You should also consider the costs for landscaping, interior finishes, or even temporary accommodations if you need to vacate your home during construction.
Exploring financing options can help manage these unforeseen costs, ensuring you’re prepared for any surprises. By factoring in these additional expenses, you can better align your budget with the true cost of your home addition project.
Budgeting for Your Home Addition Project
When budgeting for your home addition project, it’s essential to start by determining your overall budget.
Don’t forget to factor in the costs of permits, which can vary greatly depending on your location.
Finally, get a clear estimate of construction costs to guarantee your project stays within financial limits.
Determine Your Budget
Before you plunge into your home addition project, it’s essential to determine a realistic budget that aligns with your financial situation and goals. Start by evaluating homeowner expectations and project timelines to avoid surprises later. Here’s a simple breakdown to guide your budgeting:
| Expense Category | Estimated Cost |
|---|---|
| Design & Planning | $2,000 – $5,000 |
| Construction Costs | $100 – $200/sq ft |
| Finishing Touches | $10,000 – $30,000 |
Factor in Permits
In your budgeting process, it’s important to factor in the costs for permits required for your home addition. Different permit types, such as building, electrical, and plumbing permits, can greatly impact your overall expenses.
Each permit comes with its own fee structures, which can vary based on your location and the scope of your project. Ignoring these costs could lead to unexpected financial strain.
By researching and understanding the specific permits needed for your addition, you can guarantee your budget is thorough, preventing delays and additional fees down the line.
Plan accordingly to keep your project on track and within budget.
Estimate Construction Costs
Estimating construction costs is essential for a successful home addition project, as it directly influences your overall budget and timeline.
Accurate cost estimation helps you manage your project effectively, preventing unexpected expenses.
Here are key factors to take into account:
- Labor costs and contractor fees
- Material selection and quality
- Design complexity and permits
- Contingency budget for unforeseen issues
Conclusion
When planning your home addition in Norfolk, it’s essential to take into account all potential costs, from permits to labor and materials. By understanding these expenses and budgeting for the unexpected, you can avoid financial surprises and guarantee a successful project. Investing in quality design and skilled labor will pay off in the long run, enhancing both your home’s functionality and value. So, take the time to plan carefully and make informed decisions for a worthwhile addition experience.
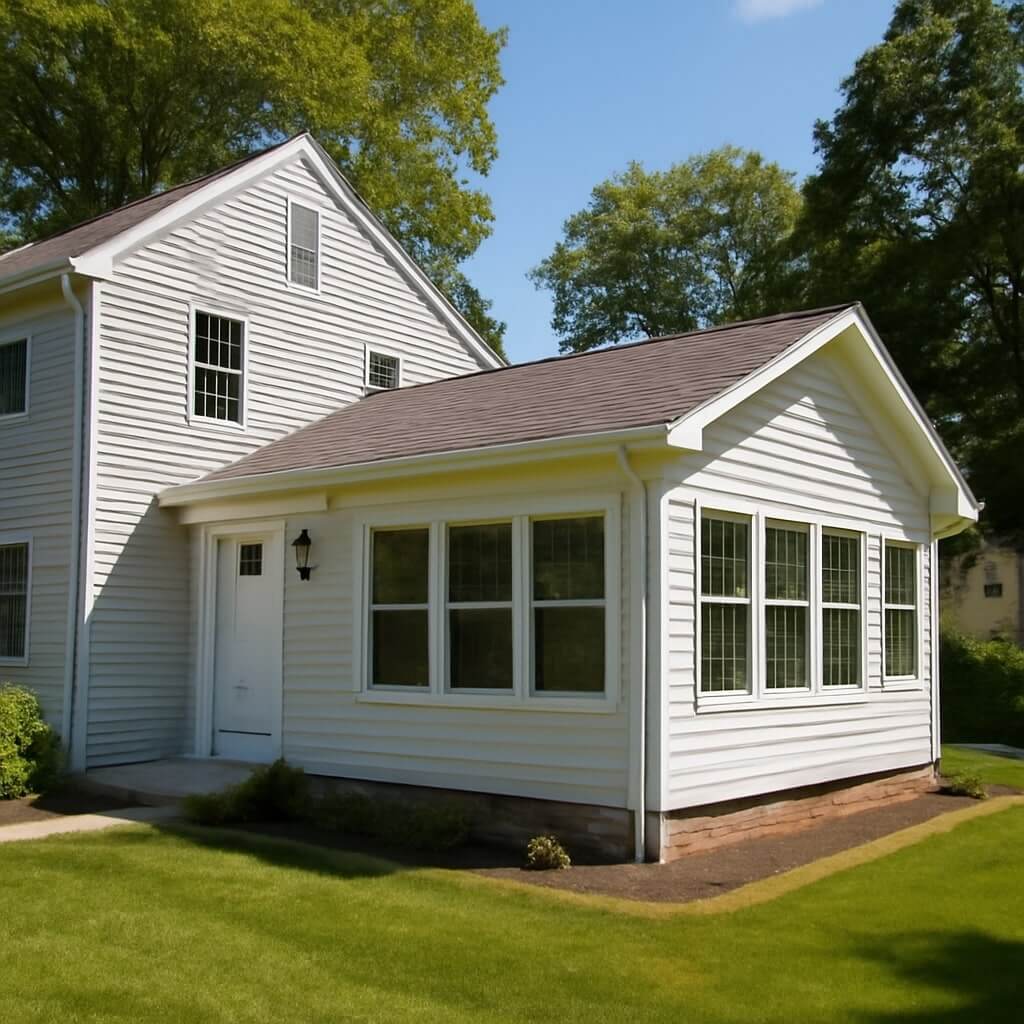
10 Essential Tips for Home Additions in Simsbury
Considering a home addition in Simsbury? You’ve got a lot to think about. It’s vital to assess your family’s current and future needs before jumping in. Understanding local building codes can save you from compliance headaches later. Plus, budgeting realistically is key to managing costs effectively. But there’s more to it than just the basics. Let’s explore essential tips that will set you on the right path for a successful project.
Key Takeaways
- Assess your family’s current and future needs to prioritize must-have features for your home addition.
- Research local zoning regulations and building codes in Simsbury to ensure compliance before starting your project.
- Create a detailed budget that includes potential unexpected expenses and gather quotes from qualified contractors.
- Communicate with neighbors about your plans to foster goodwill and address any concerns regarding construction disruptions.
- Incorporate energy-efficient materials and systems to enhance sustainability and reduce future maintenance costs.
Assess Your Needs and Goals
When considering a home addition, how do you determine what you truly need and want?
Start by evaluating your family needs and any recent lifestyle changes. Are you welcoming a new baby, or maybe a teenager needs their own space?
Consider how your daily routines may shift with an addition. Make a list of must-haves versus nice-to-haves; prioritize according to your family’s current and future needs.
Think about functionality—will the new space serve multiple purposes?
Research Local Building Codes and Regulations
Before diving into your home addition project, it’s crucial to familiarize yourself with local building codes and regulations, as these rules can greatly impact your plans.
Start by researching local building standards to guarantee your project meets safety and design requirements. Check with your town’s planning department for zoning regulations, which dictate how much you can build and where.
Understanding setback requirements, height restrictions, and permitted uses will help you avoid costly mistakes. Also, inquire about necessary permits to keep your project compliant.
Set a Realistic Budget
Setting a realistic budget is essential before starting your home addition project.
You’ll need to determine project costs, accounting for materials and labor, while also considering unexpected expenses that might arise.
Prioritizing must-have features will help you allocate your funds effectively and avoid overspending.
Determine Project Costs
Budgeting for a home addition can be a complex process, but it’s essential to start with a clear understanding of your financial landscape.
Begin with cost estimation by gathering quotes from contractors and suppliers. Consider materials, labor, permits, and any design fees.
Conduct a thorough budget analysis to identify your current expenses and savings potential. This will help you set a realistic budget that aligns with your goals.
Remember, knowing the total project costs upfront will allow you to make informed decisions and prevent financial strain later.
Stay organized and focused to keep your home addition on track and within budget.
Consider Unexpected Expenses
While you may have a solid budget in mind for your home addition, it’s crucial to account for unexpected expenses that can arise during the project.
Hidden costs and unexpected delays can quickly throw your budget off balance. Here are a few common areas where expenses might escalate:
- Permitting and inspection fees
- Unforeseen structural issues
- Changes in material costs
Prioritize Must-Have Features
To guarantee your home addition project stays on track, it’s essential to prioritize must-have features that align with your vision and budget.
Start by identifying key elements that enhance space utilization and create a functional layout. Consider how you’ll use the new space—whether it’s for a family room, office, or guest suite.
Make a list of these features, ranking them in order of importance. This approach helps prevent overspending on less critical aspects while ensuring the addition meets your needs.
Hire the Right Contractor
Choosing the right contractor can make or break your home addition project, so it’s crucial to invest time in the selection process.
Look for professionals with strong contractor qualifications and relevant project experience. Here are a few tips to help you find the best fit:
- Check online reviews and ask for referrals from friends or family.
- Verify licenses and insurance to guarantee compliance with local regulations.
- Request detailed quotes and timelines to compare different contractors effectively.
Consider Design and Aesthetics
When planning your home addition, it’s crucial to match the new structure with your existing architecture to create a cohesive look.
Choosing complementary materials can enhance the overall aesthetic and guarantee your addition feels like a natural part of your home.
Paying attention to these design elements won’t only boost your home’s appeal but also its value.
Match Existing Architecture
One key aspect of successful home additions is guaranteeing that the new structure harmonizes with the existing architecture.
Achieving architectural harmony and design continuity can elevate your home’s aesthetic appeal.
Consider these elements during your planning:
- Style: Match the architectural style of your home, whether it’s colonial, modern, or craftsman.
- Proportions: Confirm the addition’s size and scale complement the existing structure.
- Details: Incorporate similar design details, like windows, rooflines, and trim, to create a seamless shift.
Choose Complementary Materials
Achieving architectural harmony doesn’t stop with matching styles and proportions; selecting the right materials is equally important.
To guarantee material harmony, choose materials that complement your home’s existing aesthetics. Think about durability, color, and texture when selecting siding, roofing, and trim.
Consider how these choices will affect design integration with both the old and new sections of your home. For instance, if your home features brick, you might opt for a similar-toned stone or fiber cement that mimics its appearance.
Thoughtful material selection not only enhances visual appeal but also guarantees a cohesive look throughout your home addition.
Plan for Disruption and Timeline
Since home additions can considerably disrupt your daily routine, it’s crucial to plan for both the timeline and the potential inconveniences that come with construction.
Effective disruption management will help minimize stress. Set realistic timeline expectations to keep your project on track.
Consider the following:
- Identify peak construction times to prepare your family.
- Create a temporary living space, if necessary, to maintain comfort.
- Communicate regularly with your contractor for updates and adjustments.
Obtain Necessary Permits
Before starting your home addition, you’ll need to obtain the necessary permits to comply with local regulations.
Researching these rules early can save you time and headaches later, so make certain to submit your application promptly.
Consulting with professionals can also help guarantee that you meet all requirements and avoid costly mistakes.
Research Local Regulations
When you’re planning a home addition, understanding local regulations is essential to ensuring your project runs smoothly.
Before you begin, make sure you research:
- Zoning restrictions that may affect your design
- Required building permits for construction
- Local codes that dictate safety and aesthetic standards
These regulations can vary considerably, so it’s vital to familiarize yourself with the specific requirements in Simsbury.
Ignoring these guidelines can lead to costly delays or even the need to remove completed work.
Take the time to gather this information upfront, and you’ll pave the way for a successful and compliant home addition.
Submit Application Timely
As you move forward with your home addition project, submitting your application for permits in a timely manner is essential to avoiding unnecessary delays.
Familiarize yourself with the application process and keep track of submission deadlines. Delays in submitting your application can lead to extended wait times for approval, impacting your project timeline and budget.
Make sure you gather all required documentation and double-check that everything is complete before submission.
Consult With Professionals
Consulting with professionals is an essential step in the home addition process, especially if you want to guarantee all necessary permits are obtained without hassle.
By consulting local experts, you can navigate the complexities of regulations and ascertain compliance.
- Gain insight into local zoning laws
- Explore design options tailored to your home
- Streamline the permit application process
These professionals not only help you understand the requirements but also assist in avoiding costly mistakes.
Don’t overlook their expertise; it’ll save you time and frustration, allowing you to focus on creating the perfect space for your family.
Communicate With Neighbors
How can open communication with your neighbors improve your home addition project?
Establishing strong neighbor relations is essential. Before starting construction, take the time to discuss your plans with nearby residents. This not only shows respect but also invites valuable community feedback.
Neighbors may have insights about local regulations or potential issues that could arise during the project. Keeping them informed helps to mitigate concerns, reducing the likelihood of disputes.
Neighbors can offer valuable insights into local regulations and potential project issues, helping to reduce concerns and prevent disputes.
Additionally, showing consideration can foster goodwill, making it easier to navigate any challenges that arise. Open communication sets a positive tone, ultimately enhancing your project’s success and your neighborhood’s harmony.
Incorporate Energy Efficiency Features
Incorporating energy efficiency features into your home addition not only reduces energy costs but also enhances your home’s overall comfort and sustainability.
By making informed choices, you can create a space that’s both functional and eco-friendly. Consider the following upgrades:
- Install solar panels to harness renewable energy and lower utility bills.
- Choose energy efficient windows to improve insulation and reduce heating and cooling costs.
- Use energy-efficient appliances that consume less power without sacrificing performance.
These features not only add value to your home but also contribute to a greener future.
Embrace energy efficiency and enjoy long-term benefits in your living space.
Prepare for Future Maintenance and Upgrades
As you begin your home addition project, it’s essential to think ahead about maintenance and potential upgrades.
Start by selecting durable materials that require less upkeep, like fiber cement siding or energy-efficient windows. This choice not only eases maintenance but also supports future upgrades.
Incorporate accessible electrical and plumbing systems to simplify modifications later on. During the design phase, consider utility access points for easy repairs.
Conclusion
To sum up, planning your home addition in Simsbury requires careful consideration of your family’s needs, budget, and local regulations. By hiring a qualified contractor and maintaining open communication with your neighbors, you’ll minimize disruptions and foster goodwill. Don’t forget to incorporate energy-efficient features and durable materials for long-term sustainability and ease of maintenance. With these essential tips, you’re well on your way to creating a functional and valuable addition that enhances your living space.
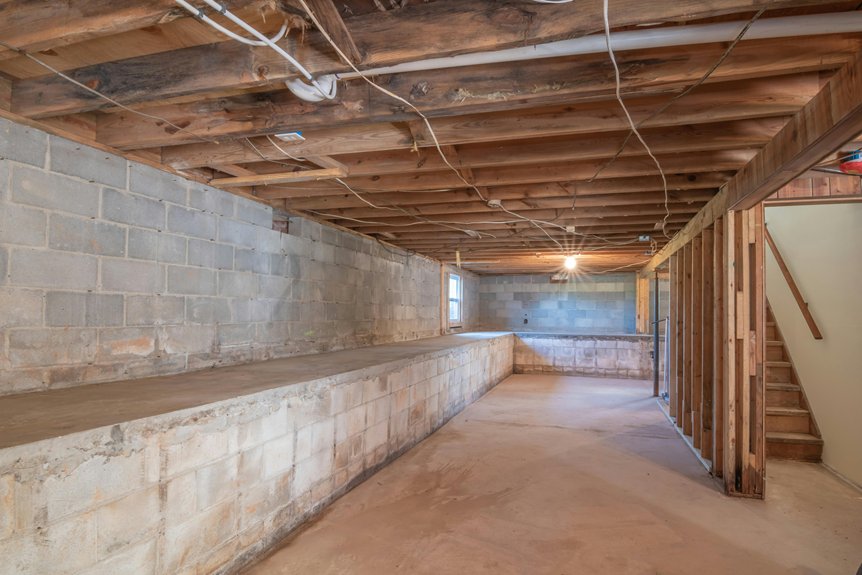
Ultimate Guide to Inside Basement Foundation Waterproofing
When it comes to basement waterproofing, understanding moisture intrusion is key. You might notice signs like musty odors or condensation, indicating potential issues. Identifying the underlying causes—such as foundation cracks or poor drainage—is crucial before implementing solutions. This guide outlines effective interior waterproofing methods and maintenance strategies to guarantee your basement remains dry and protected. The right approach can make all the difference in safeguarding your home from water damage. Are you ready to explore these solutions?
Key Takeaways
- Evaluate and repair foundation cracks to prevent water seepage during heavy rains and address potential structural damage.
- Install an interior drainage system, such as a sump pump, to efficiently manage water accumulation in the basement.
- Use quality sealants and coatings on walls and floors to create an effective barrier against moisture intrusion.
- Ensure proper ventilation to reduce humidity levels and prevent condensation and mold growth in the basement.
- Regularly inspect and maintain waterproofing systems, including drainage and sealants, to ensure long-lasting protection against water damage.
Understanding Moisture Intrusion in Basements
When it comes to basements, understanding moisture intrusion is essential, as it can lead to significant structural damage and health issues.
You need to identify moisture sources like groundwater, rain infiltration, and condensation, which contribute to elevated basement humidity. High humidity levels can promote mold growth and compromise air quality, impacting your health.
Effective moisture management involves implementing proper drainage systems and vapor barriers to mitigate these risks. Regular monitoring of humidity levels and addressing any leaks promptly is important for maintaining a dry basement environment.
Common Causes of Basement Water Problems
Although you may not realize it, several factors can contribute to water problems in your basement. Understanding these issues is essential for effective waterproofing.
Here are three common causes:
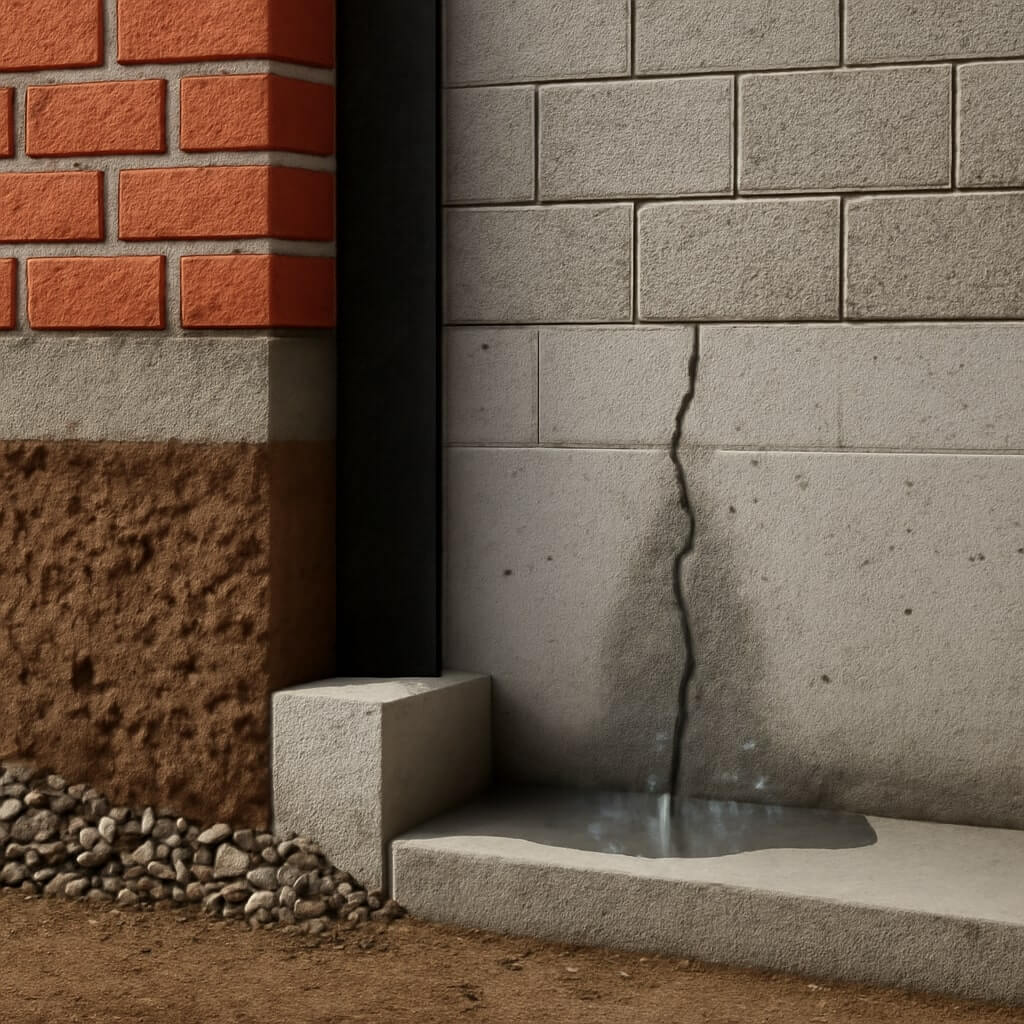
- Foundation Cracks: Even minor cracks can allow water to seep in, especially during heavy rain.
- High Humidity: Excess moisture in the air can condense on cool basement surfaces, leading to dampness and mold.
- Poor Drainage: Inadequate grading or blocked gutters can cause water to pool around your foundation, increasing the risk of infiltration.
Addressing these causes can help prevent significant water damage in your basement.
Signs of Water Damage in Your Basement
You may notice unpleasant odors in your basement, which often indicate trapped moisture.
Visible mold growth is another critical sign, as it can compromise air quality and structural integrity.
Recognizing these signs early is essential for effective waterproofing and damage prevention.
Unpleasant Odors Present
Unpleasant odors in your basement often indicate underlying water damage that requires immediate attention.
Addressing these smells not only improves air quality but also prevents further structural issues.
Here are three key steps to take:
- Identify the Source: Investigate areas with moisture accumulation, as this can lead to persistent odors.
- Enhance Air Circulation: Use fans or dehumidifiers to improve airflow, which aids in moisture reduction and odor removal.
- Seal Cracks: Inspect and seal any foundation cracks to prevent water intrusion, minimizing future odor problems.
Taking these actions is essential for maintaining a healthy basement environment.
Visible Mold Growth
When visible mold growth appears in your basement, it often signals a serious water damage issue that demands immediate intervention.
Mold thrives in damp environments, indicating excessive moisture and inadequate air circulation. You must address the underlying water problem to prevent further growth.
Implementing effective mold remediation techniques, such as removing contaminated materials and using appropriate cleaning agents, is essential. Additionally, enhancing air circulation will help dry out the area and discourage mold recurrence.
Regularly monitor humidity levels and inspect for leaks to maintain a healthy basement environment. Ignoring mold growth can lead to structural damage and health risks.
Interior Waterproofing Methods
To effectively manage water intrusion in your basement, you should consider various interior waterproofing methods.
These include applying interior sealants and coatings, installing a sump pump, and understanding how exterior drainage systems can complement your efforts.
Each method plays a critical role in preventing moisture buildup and protecting your foundation.
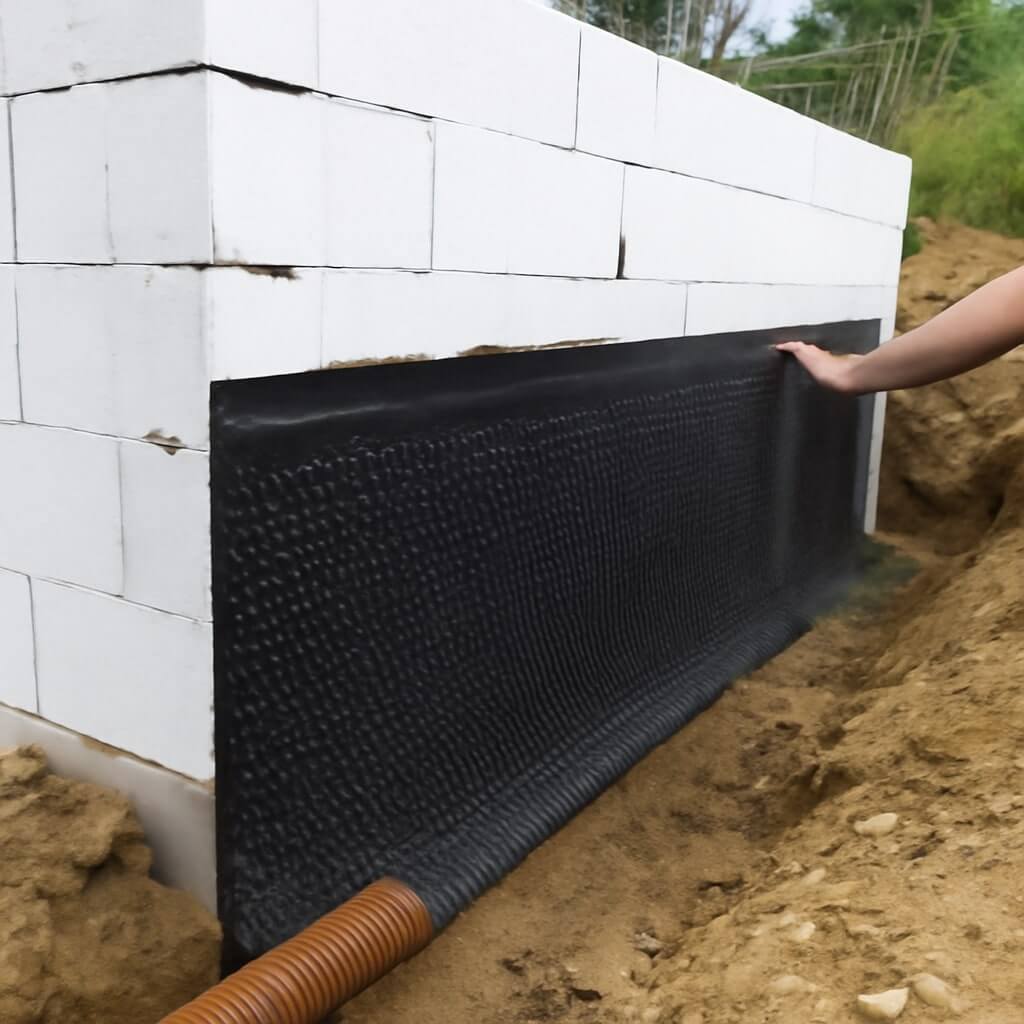
Exterior Drainage Systems
While interior waterproofing methods focus on sealing off the basement from moisture intrusion, exterior drainage systems offer a proactive approach by managing water before it reaches your foundation.
Implementing effective drainage systems guarantees proper water diversion away from your home, minimizing potential damage.
- Gutters and Downspouts: Direct rainwater away from your foundation.
- French Drains: Channel groundwater away from the basement perimeter.
- Sump Pumps: Actively remove water accumulating around your foundation.
Interior Sealants and Coatings
Interior sealants and coatings serve as vital barriers against moisture intrusion, guaranteeing your basement remains dry and structurally sound.
You’ll find various sealant types, including polyurethane, epoxy, and silicone, each offering unique properties for different applications. For instance, epoxy sealants provide strong adhesion and durability, while silicone offers flexibility for dynamic cracks.
When applying coatings, surface preparation is essential; clean and dry surfaces guarantee ideal bonding.
Consider waterproofing paints as well, which can enhance aesthetics while providing moisture resistance.
Sump Pump Installation
A sump pump is an essential component of an effective interior waterproofing system, especially in areas prone to flooding or high groundwater levels.
Selecting the right sump pump types is vital for peak performance. Consider these factors during installation:
- Type: Choose between submersible or pedestal sump pumps based on your space and needs.
- Location: Install the pump in the lowest part of your basement for maximum efficiency.
- Maintenance: Regularly check the pump, clean the pit, and test the system to guarantee reliable operation.
Proper sump pump maintenance extends its lifespan and enhances your basement’s waterproofing efficacy.
Recommended Products for Basement Waterproofing
When it comes to guaranteeing a dry and secure basement, selecting the right waterproofing products is essential.
Start with high-quality basement sealants, which effectively create a barrier against moisture penetration. Look for products containing polyurethane or silicone for superior adhesion and flexibility.
Additionally, consider liquid-applied membranes that provide thorough coverage on walls and floors. For added protection, incorporate drainage systems or sump pumps to manage excess water.
Always evaluate product specifications and manufacturer recommendations to guarantee compatibility with your basement’s unique conditions.
Investing in reliable waterproofing products will safeguard your basement against moisture issues for years to come.
Maintenance Tips for a Dry Basement
To maintain a dry basement, regular inspections and proactive measures are essential.
Focus on these key areas:
- Check Basement Ventilation: Guarantee vents are clear and functioning to promote airflow, preventing moisture buildup.
- Monitor Humidity Levels: Use a hygrometer to keep humidity below 60%. If levels are high, consider a dehumidifier.
- Inspect for Leaks: Regularly check walls and floors for cracks or signs of water intrusion. Seal any gaps immediately.
Conclusion
To summarize, effectively waterproofing your basement requires a proactive approach to identify and address moisture intrusion. By understanding common causes and recognizing signs of water damage, you can implement appropriate interior waterproofing methods and utilize recommended products. Regular maintenance is essential in keeping your basement dry and healthy. Stay vigilant about monitoring humidity levels and inspecting for leaks, ensuring long-term protection against water damage and preserving your home’s structural integrity.
Waterproofing Old Stone Basement Walls to Keep Your Space Dry
Waterproofing old stone basement walls is essential if you want to maintain a dry and healthy living space. Moisture can lead to structural damage and mold growth, so addressing the issue promptly is key. Start by inspecting your walls for any cracks or stains. With the right tools and materials, you can effectively protect your basement. But what steps should you take to guarantee long-lasting results? Let’s explore the process further.
Key Takeaways
- Inspect and repair any visible cracks in stone walls using a concrete patching compound to prevent water infiltration.
- Apply water-resistant sealants to the interior of stone walls for added protection against moisture.
- Utilize a dehumidifier to maintain optimal humidity levels, reducing condensation and mold growth.
- Ensure proper drainage by regularly checking and maintaining gutters and downspouts to direct water away from the foundation.
- Conduct moisture testing using methods like calcium chloride tests or moisture meters to assess wall dampness effectively.
Understanding the Causes of Moisture in Stone Basements
When you’re dealing with moisture in stone basements, understanding the root causes is vital for effective waterproofing.
Common moisture sources include groundwater infiltration, condensation from high humidity levels, and leaks from plumbing. Without proper humidity control, the air in your basement can hold excess moisture, leading to dampness and mold growth.
It’s important to identify these sources early on. Check for cracks in walls, verify proper drainage around your home, and consider using a dehumidifier to maintain ideal humidity levels.
Assessing the Condition of Your Basement Walls
To effectively waterproof your stone basement walls, you first need to assess their current condition.
Start with a visual inspection to identify any cracks or damage, then employ moisture testing methods to gauge humidity levels.
Finally, evaluate the structural integrity to guarantee your walls can withstand any potential water pressure.
Visual Inspection Techniques
Before you plunge into waterproofing your stone basement walls, it’s essential to assess their current condition through effective visual inspection techniques.
Start by examining the walls for cracks, stains, or efflorescence, which may indicate moisture issues. Look for discoloration or peeling paint, signaling potential leaks. Pay attention to the foundation and corners, as these areas are often vulnerable.
Use a flashlight to inspect dark spots where mold could thrive. Document any signs of damage for future reference.
This visual inspection will help you pinpoint problem areas and guide you in your moisture identification efforts before moving forward with waterproofing solutions.
Moisture Testing Methods
Regularly testing for moisture in your stone basement walls is essential to identify hidden problems that visual inspections might miss.
Understanding potential moisture sources and employing effective testing techniques can help you maintain a dry environment. Here are some methods you can use:
- Calcium Chloride Test: Measures moisture vapor emissions.
- Moisture Meter: Provides instant readings of wall moisture levels.
- Infrared Camera: Detects temperature variations indicating moisture presence.
- Dampness Indicators: Simple tools that change color when moisture is present.
- Hydrometer: Assesses humidity levels in the air.
Using these techniques, you can proactively manage your basement’s moisture issues.
Structural Integrity Evaluation
Evaluating the structural integrity of your basement walls is vital for maintaining a safe and functional space.
Start by looking for cracks, bulges, or signs of water damage, as these can indicate serious issues. Assess the foundation stability by checking for uneven floors or doors that stick, which may signify shifting walls.
Use a moisture meter to identify potential areas of weakness in wall integrity. If you notice significant damage, it’s important to consult a professional.
Addressing these concerns early can prevent costly repairs and guarantee your basement remains dry and secure for years to come.
Essential Tools and Materials for Waterproofing
To effectively waterproof your stone basement walls, you’ll need a few essential tools and materials that streamline the process.
Gathering the right items guarantees a successful project and a dry environment. Here’s what you should have on hand:
- Water resistant sealants
- A high-quality paintbrush or roller
- A concrete patching compound
- A sturdy trowel
- Drainage systems components
With these tools and materials, you’re set to tackle the waterproofing effectively.
Each item plays a vital role in sealing and protecting your stone walls, ultimately keeping your basement dry and functional.
Step-by-Step Guide to Waterproofing Stone Walls
Once you’ve gathered your essential tools and materials, you can begin the waterproofing process for your stone basement walls. Follow these steps for effective stone wall treatments:
| Step | Action |
|---|---|
| 1 | Clean the walls with a wire brush. |
| 2 | Repair cracks using a suitable filler. |
| 3 | Apply a waterproofing sealant evenly. |
| 4 | Use a masonry waterproofing paint. |
| 5 | Allow it to cure fully before testing. |
Preventative Measures to Maintain a Dry Basement
After successfully waterproofing your stone basement walls, it’s important to implement preventative measures to maintain a dry environment.
To ensure lasting dryness in your stone basement, prioritize preventative measures after waterproofing.
Here are some effective strategies:
- Regularly check drainage systems for blockages.
- Install a dehumidifier to manage humidity control.
- Guarantee gutters and downspouts direct water away from your foundation.
- Inspect and repair any cracks in walls or floors promptly.
- Keep the area around your home clear of debris to promote drainage.
When to Seek Professional Help for Waterproofing
If you notice signs of severe damage, like cracks or mold growth, it’s time to contemplate professional help for waterproofing your stone basement walls.
Complex issues often require specialized solutions that you mightn’t be equipped to handle alone.
Additionally, if you’re short on time or lack the expertise, hiring a professional can save you both stress and potential costs down the line.
Signs of Severe Damage
Water damage in your stone basement can be a silent menace, often revealing itself through subtle signs that indicate severe issues.
It’s essential to act swiftly if you notice any of the following:
- Visible cracks in the walls
- Persistent wall discoloration
- Musty odors or mold growth
- Water pooling or excessive dampness
- Increased humidity levels
These symptoms warrant a thorough cracks assessment.
If you see any of these signs, don’t hesitate to seek professional help for waterproofing. Ignoring them can lead to more extensive damage and costly repairs down the line.
Stay proactive and protect your basement!
Complex Waterproofing Solutions
While some minor waterproofing tasks can be tackled on your own, complex solutions often require professional expertise.
If your basement has significant moisture issues, consider calling in the pros. They can implement advanced sealing techniques that go beyond basic methods, ensuring a more effective barrier against water intrusion.
Additionally, professionals can design and install tailored drainage solutions to redirect water away from your foundation.
Attempting these complex tasks without the right knowledge can lead to costly mistakes. Trusting experts won’t only save you time but also provide peace of mind, knowing your basement will be properly waterproofed.
Time Constraints and Expertise
When faced with waterproofing challenges and tight schedules, knowing when to call in professionals can make all the difference.
Consider seeking expert help if:
- You lack experience in waterproofing techniques.
- Time management is critical for your project.
- The problem is extensive or complex.
- You need specialized equipment for effective solutions.
- Your skill assessment reveals gaps in knowledge.
Conclusion
By taking proactive steps to waterproof your old stone basement walls, you can effectively prevent moisture and mold issues. Regular inspections, repairs, and the use of quality sealants are vital. Don’t forget to manage humidity levels with a dehumidifier and guarantee proper drainage around your foundation. If you encounter significant damage or feel overwhelmed, don’t hesitate to seek professional help. Keeping your basement dry not only enhances your living space but also protects your home’s overall integrity.

Process for Installing Interior Basement Waterproofing Systems?
When it comes to installing an interior basement waterproofing system, you need to follow a systematic approach. Start by evaluating your basement’s specific waterproofing needs and selecting the right system for your situation. After preparing the area, you’ll need to install the drainage system correctly. Understanding each step is essential to guarantee long-term effectiveness. Let’s break down the installation process to make sure your basement stays dry and protected.
Key Takeaways
- Measure humidity levels and inspect for cracks or leaks to assess moisture issues before installation.
- Clear debris and address existing moisture problems to prepare the basement for installation.
- Plan the layout for the interior drainage system and mark the perimeter for pipe installation.
- Dig a trench for the drainage pipe, ensuring it is deep enough and angled toward the sump pump.
- Seal walls and floors with waterproof materials, focusing on cracks and joints, and allow proper curing time.
Assessing Your Basement’s Waterproofing Needs
Before you can effectively waterproof your basement, you need to evaluate its specific needs.
Start by measuring the basement humidity levels; high humidity often indicates potential water issues. Identify water sources such as leaks, condensation, and groundwater seepage.
Inspect walls and floors for cracks, and check plumbing for leaks. Use a moisture meter to pinpoint damp spots, helping you understand where water intrusion occurs.
Document your findings to create a thorough overview. By thoroughly evaluating these factors, you’ll establish a solid foundation for addressing basement waterproofing, ensuring a more effective and targeted approach to prevent future moisture problems.
Choosing the Right Waterproofing System
When choosing a waterproofing system for your basement, it’s essential to understand the different types available, such as interior drainage systems and sealants.
You’ll need to take into account factors like the severity of moisture issues, your budget, and the specific characteristics of your basement.
Making an informed selection will guarantee effective protection against water intrusion.
Types of Waterproofing Systems
Choosing the right waterproofing system for your interior basement is essential to preventing moisture intrusion and ensuring the longevity of your home. Various systems utilize external drainage or specific waterproofing materials to create effective barriers. Here’s a quick comparison:
| Type | Description | Pros |
|---|---|---|
| Interior Drainage | Uses a French drain to collect water | Effective for high moisture |
| Sealants | Coating applied to walls | Cost-effective, easy to apply |
| Membranes | Barrier system installed on walls | Durable, reliable protection |
Evaluate these systems carefully to determine which best suits your basement’s unique needs. Your decision will greatly impact your home’s integrity.
Considerations for Selection
As you assess your options for an interior basement waterproofing system, it’s crucial to take into account factors like moisture levels, soil conditions, and the overall structure of your home.
Evaluate the cost considerations associated with each system; some may require higher initial investments but offer long-term savings through durability.
Explore various material options, such as fiberglass, polyethylene, or rubberized coatings, and determine which aligns best with your specific needs.
Additionally, consider installation complexity and maintenance requirements.
Preparing the Basement for Installation
Before installing your waterproofing system, you need to clear out any debris from the basement to create a clean work area.
Next, inspect the walls and floor for any damage that could compromise the waterproofing.
Finally, address existing moisture issues to guarantee a successful installation process.
Clear Out Debris
Start by clearing out any debris or clutter from your basement to create a clean, accessible workspace for the installation of your waterproofing system. Effective debris removal is essential for ensuring a smooth process. Use the following cleaning techniques:
| Step | Method | Tools Needed |
|---|---|---|
| Remove Items | Sort and Bag | Garbage Bags |
| Sweep Floor | Broom and Dustpan | Broom |
| Wipe Surfaces | Cloth and Cleaner | Cleaning Solution |
| Dispose of Waste | Trash Bin | Trash Bin |
Once you’ve cleared the space, you’ll be better prepared for the next steps in your waterproofing project.
Inspect for Damage
Once the debris is cleared, it’s crucial to inspect your basement for any signs of damage that could hinder the effectiveness of your waterproofing system.
Conduct a thorough damage assessment, focusing on cracks in walls, deteriorating foundations, and water stains. Check for any mold or rot that may compromise structural integrity.
Pay special attention to corners and joints, as these areas are often more susceptible to damage. Verify that beams and supports are intact and haven’t weakened over time.
Identifying these issues early allows you to address them before installing the waterproofing system, guaranteeing long-lasting protection for your basement.
Address Moisture Issues
After evaluating for damage, addressing moisture issues is essential for preparing your basement for waterproofing installation.
Begin by gauging humidity levels; use a hygrometer to determine if they exceed recommended ranges. Implement moisture control strategies, such as sealing cracks and gaps, to prevent water intrusion.
Consider installing a dehumidifier for effective humidity management, especially in high-moisture environments. Guarantee proper drainage around the exterior of your home to divert water away from the foundation.
Finally, inspect plumbing for leaks, as these can exacerbate moisture problems. Taking these steps will create a suitable environment for a successful waterproofing installation.
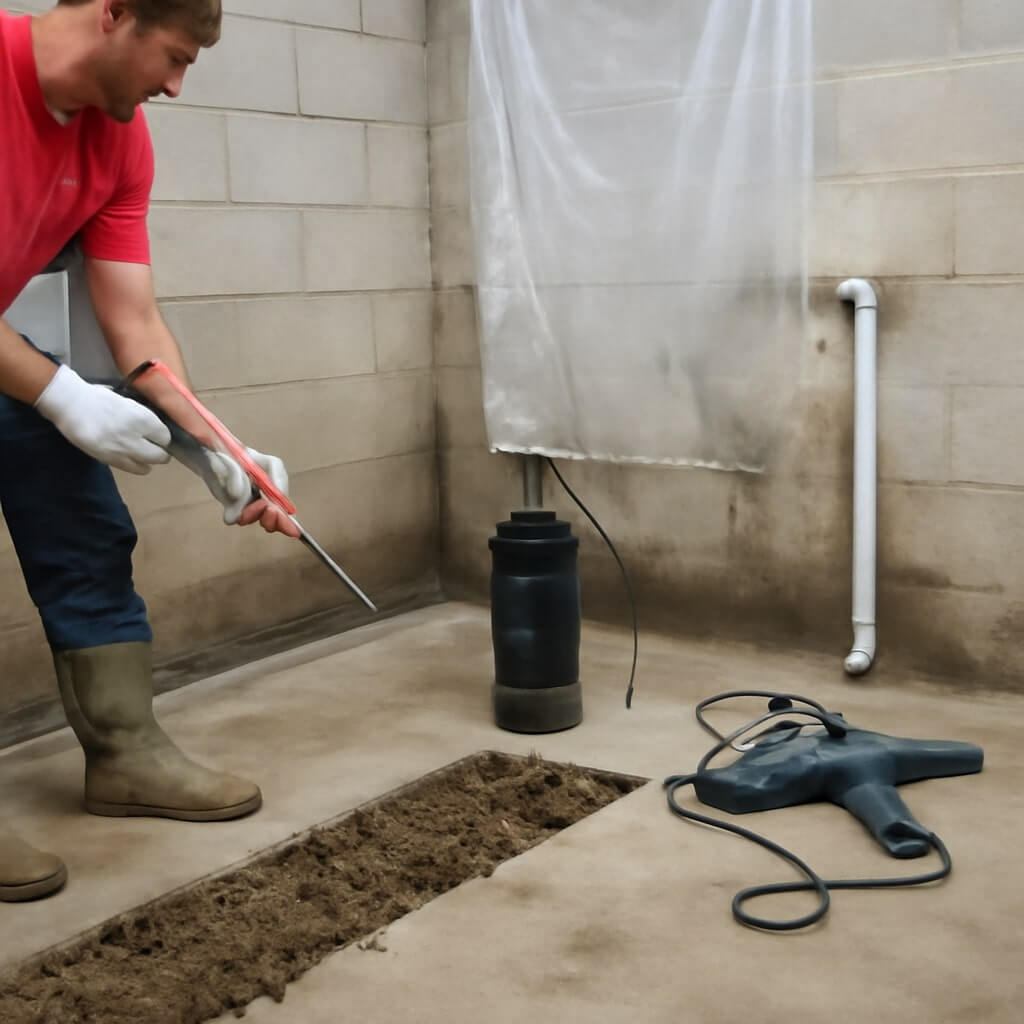
Installing the Interior Drainage System
When you decide to install an interior drainage system, it’s essential to carefully plan the layout to effectively manage water infiltration.
Start by marking the perimeter of the basement where the drainage pipe installation will occur. Dig a trench along this line, guaranteeing it’s deep enough for the drainage pipe.
Position the perforated pipe at the trench’s base, angled towards the sump pump setup, which should be located in a designated low point. Connect the drainage system to the sump pump, testing the flow to verify efficient water removal.
Finally, cover the trench with gravel and replace the floor material for a seamless finish.
Sealing Walls and Floors
With the interior drainage system in place, sealing the walls and floors is the next step to prevent moisture from penetrating your basement.
Begin by cleaning the surfaces thoroughly to remove any dirt or debris. Next, apply suitable waterproofing materials, such as epoxy or polyurethane sealants, using appropriate sealing techniques for maximum effectiveness.
Thoroughly clean surfaces and apply waterproof sealants for optimal protection against moisture intrusion.
Pay close attention to cracks or joints, ensuring these areas receive extra sealant. After application, allow the materials to cure as per manufacturer instructions.
This methodical approach will create a robust barrier against moisture, greatly enhancing your basement’s waterproofing system and protecting your home.
Finalizing and Testing the Waterproofing System
Finalizing your interior basement waterproofing system involves a few essential steps to guarantee its effectiveness.
Begin by inspecting all sealed areas to verify there are no leaks or gaps.
Next, conduct water testing by introducing water to various points in the basement, monitoring for any signs of moisture intrusion. This step is vital for evaluating system performance.
Allow sufficient time for the waterproofing materials to cure fully before testing.
If any issues arise, address them immediately by reinforcing seals or applying additional waterproofing products.
Successful completion of these steps guarantees your basement remains dry and protected from water damage.
Conclusion
In summary, successfully installing an interior basement waterproofing system requires careful assessment, selection, and preparation. By following the outlined steps—installing the drainage system, sealing walls and floors, and conducting thorough testing—you’ll create a reliable barrier against moisture. Regular maintenance will further enhance the system’s effectiveness, ensuring your basement remains dry and protected for years to come. Don’t overlook these details; they’re essential for achieving long-lasting waterproofing results.
What Common Mistakes to Avoid in ICF Basement Waterproofing?
When you’re considering ICF basement waterproofing, it’s vital to be aware of common pitfalls that can compromise your efforts. Ignoring proper site grading, for instance, can lead to significant water issues. Additionally, many overlook the importance of effective drainage systems, which are fundamental for long-term protection. Each mistake can have serious consequences, but knowing what to avoid can save you time and money. Let’s explore these key factors further.
Key Takeaways
- Ensure proper site grading to direct water away from the foundation, aiming for a slope of at least 1-2%.
- Implement effective drainage systems to prevent water accumulation and avoid long-term structural issues.
- Select and install appropriate waterproofing membranes, ensuring they create a seamless barrier against water intrusion.
- Seal all joints and penetrations thoroughly to prevent leaks and potential mold growth within the basement.
- Establish a regular maintenance schedule to inspect and maintain waterproofing systems and drainage performance.
Ignoring Proper Site Grading
When you overlook proper site grading, you set the stage for potential water intrusion issues in your ICF basement.
Ensuring the correct site slope is essential for directing water away from your foundation. Without appropriate grading, drainage patterns can become ineffective, causing water to pool around your basement walls.
This accumulation increases hydrostatic pressure, compromising your waterproofing efforts. You need to evaluate and adjust the landscape to achieve a slope of at least 1-2% away from the foundation.
Skipping Drainage Systems
Although it might seem tempting to cut costs by skipping drainage systems, this can lead to significant long-term issues in your ICF basement.
Proper drainage is essential for effective foundation water management, preventing water accumulation that can compromise structural integrity.
Neglecting this aspect may result in:
- Mold growth on walls
- Cracked foundation surfaces
- Rusted HVAC components
- Increased humidity levels
- Costly repair bills
Using Inadequate Waterproofing Membranes
When selecting waterproofing membranes for your ICF basement, it’s vital to understand the various types available and their specific applications.
You need to guarantee proper installation techniques are followed to maximize effectiveness and prevent future issues.
Additionally, consider the long-term durability of the membranes to protect your investment against moisture intrusion.
Types of Waterproofing Membranes
Choosing the right waterproofing membrane is essential for effective ICF basement waterproofing, as using inadequate membranes can lead to significant water damage.
You have two primary options: liquid membranes and sheet membranes. Each type offers distinct advantages, but their effectiveness hinges on proper selection.
- Liquid membranes create a seamless barrier
- Sheet membranes provide robust physical protection
- Liquid membranes can adapt to complex shapes
- Sheet membranes are often easier to install
- Both types require specific environmental conditions
Proper Installation Techniques
Proper installation techniques are essential for achieving effective waterproofing in ICF basements, especially when using inadequate membranes. To guarantee success, you must select high-quality installation materials and adhere to best practices.
Begin by properly preparing the surface, making sure it’s clean and free of debris. Install the membrane according to the manufacturer’s guidelines, paying close attention to seams and overlaps. Use compatible adhesives and sealants to enhance water resistance.
Avoid shortcuts, as improper installation can lead to leaks and costly repairs. Regularly inspect your work during the process to identify and rectify any potential issues before they escalate.
Long-Term Durability Considerations
While selecting the right waterproofing membrane is critical, using inadequate options can compromise the long-term durability of your ICF basement.
Poor material selection leads to failures, ultimately costing you more in repairs.
Consider these aspects for long-lasting solutions:
- Thickness: Thinner membranes may not withstand hydrostatic pressure.
- Material Composition: Incompatible materials can deteriorate over time.
- Installation Method: Improper application can lead to leaks.
- Resistance to Mold: Inadequate membranes may foster mold growth.
- Weather Resistance: Some membranes aren’t designed for extreme conditions.
Choose wisely to guarantee your basement remains dry and durable for years to come.
Neglecting to Seal Joints and Penetrations
When sealing joints and penetrations in ICF basement waterproofing, overlooking this crucial step can lead to significant issues down the line. Effective joint sealing and penetration protection are essential to prevent water intrusion. Failing to address these areas can compromise your entire waterproofing system.
| Issue | Consequence |
|---|---|
| Unsealed Joints | Water leaks and structural damage |
| Inadequate Penetration Protection | Mold growth and health hazards |
| Poor Application Techniques | Increased maintenance costs |
Ensure thorough sealing practices to maintain a dry, safe basement environment, ultimately safeguarding your investment.
Disregarding Ventilation Needs
Ignoring ventilation needs in ICF basement waterproofing can lead to serious moisture problems.
Proper air circulation is essential to maintain a dry environment, so conducting a ventilation assessment is vital. Without it, you risk:
Proper air circulation is crucial for a dry basement; neglecting ventilation assessments can lead to significant moisture issues.
- Stale air accumulating, fostering mold growth
- Persistent dampness causing structural damage
- Unpleasant odors permeating your living space
- Increased humidity levels affecting indoor air quality
- Higher energy costs from inefficient HVAC systems
Ensure your basement has adequate ventilation to mitigate these issues.
Failing to Address Soil Issues
Neglecting to address soil issues can greatly undermine the effectiveness of your ICF basement waterproofing efforts.
Without proper soil stabilization techniques, you risk soil movement, which can lead to cracks and leaks. Conducting thorough drainage analysis methods is essential to identify potential water flow paths around your foundation.
This analysis allows you to implement necessary drainage solutions, such as French drains or sump pumps, ensuring that water is redirected away from your basement.
By proactively addressing soil conditions, you enhance your waterproofing efforts and protect your investment from costly damage and repairs in the future.
Don’t overlook this critical step!
Overlooking Regular Maintenance
Regular maintenance is often an overlooked aspect of ICF basement waterproofing that can greatly impact its long-term effectiveness.
Regular maintenance is crucial for ensuring the long-term effectiveness of ICF basement waterproofing systems.
To guarantee your system functions at its best, establish a maintenance schedule that includes regular inspections.
- Check for cracks in walls or foundation
- Inspect drainage systems for clogs
- Assess sump pump functionality
- Examine gutters and downspouts
- Monitor soil grading around the foundation
Rushing the Installation Process
When you rush the installation process of ICF basement waterproofing, you compromise the integrity of the entire system. A hasty approach can lead to improper sealing, inadequate drainage, and ultimately, water intrusion.
To avoid this, develop a detailed installation timeline that allows ample time for each step. Ascertain thorough project planning to address potential challenges, allowing for adjustments without sacrificing quality.
By adhering to a well-structured timeline, you guarantee that every component is installed correctly, enhancing the effectiveness of the waterproofing system.
Conclusion
In conclusion, avoiding common mistakes in ICF basement waterproofing is vital for long-term success. Guarantee proper site grading to prevent water pooling, install effective drainage systems, and select high-quality waterproofing membranes. Don’t forget to seal joints and penetrations, address ventilation needs, and tackle soil issues. Regular maintenance is essential, as is taking your time during installation. By paying attention to these details, you can safeguard your basement against water damage and structural problems for years to come.
7 Crucial Factors Affecting Basement Waterproofing Prices
When it comes to basement waterproofing, several key factors can greatly impact your costs. Your home’s location, the type of waterproofing system you choose, and the severity of any existing water damage all play vital roles. Additionally, the size of your basement and its accessibility can further complicate expenses. Understanding these elements is important for effective budgeting. So, what should you prioritize to guarantee you make the best decision?
Key Takeaways
- The location’s climate significantly influences waterproofing costs due to varying rainfall and humidity levels.
- The type of waterproofing system selected, such as interior or exterior options, affects overall expenses and effectiveness.
- The severity of existing water damage determines the extent of repairs needed, impacting total waterproofing costs.
- The size and shape of the basement directly correlate with material and labor expenses for waterproofing projects.
- Accessibility challenges, including soil type and proximity to utilities, can complicate the installation process and increase costs.
Location of Your Home
When considering basement waterproofing prices, the location of your home plays a crucial role.
Your area’s climate impact can greatly affect both the severity of water issues and your waterproofing costs. For instance, homes in regions with heavy rainfall or high humidity may require more robust solutions, increasing expenses.
Additionally, regional regulations can dictate specific waterproofing methods and materials, which can vary in price. Understanding these local factors helps you budget accurately and choose the right approach.
Ultimately, knowing how your location influences waterproofing needs empowers you to make informed decisions for your home’s protection.
Type of Waterproofing System
The type of waterproofing system you choose can greatly impact your overall costs and effectiveness in keeping your basement dry.
Interior drainage systems, like sump pumps and French drains, effectively manage water buildup inside your home, but they may require regular maintenance.
On the other hand, exterior barriers, such as membrane coatings and drainage boards, prevent water from reaching your foundation, offering a more proactive approach.
Each option has its advantages, so consider factors like your budget and the specific moisture issues in your area.
Making the right choice can save you money and stress in the long run.
Severity of Water Damage
Although you might think all water damage is the same, the severity can vary considerably and directly affects your waterproofing needs.
A thorough water damage evaluation is essential to determine the extent of the issues you’re facing. Minor leaks might only require simple repair methods, while severe flooding could necessitate extensive renovations.
Understanding the severity helps you choose the right waterproofing solutions and budget accordingly. If you ignore the signs, you risk escalating problems that can lead to higher costs down the line.
Prioritize evaluating the damage to guarantee you select effective repair methods tailored to your specific situation.
Size of the Basement
When considering basement waterproofing, the size of your basement plays an essential role in the overall cost.
Larger square footage typically means more materials and labor, which can increase expenses.
Additionally, if your basement has high ceilings, that may also impact the complexity and price of the waterproofing project.
Basement Square Footage
Understanding your basement’s square footage is essential for accurate waterproofing estimates. The size of your basement directly impacts the cost and type of waterproofing materials you’ll need.
Here are three key considerations regarding basement dimensions:
- Total Area: Larger basements require more materials and labor, increasing costs.
- Shape: Irregularly shaped basements may complicate the waterproofing process, adding to expenses.
- Access: If your basement’s layout makes access difficult, it can lead to higher labor costs.
Take these factors into account to guarantee you’re prepared for the investment in effective basement waterproofing.
Ceiling Height Considerations
Ceiling height plays an essential role in your basement waterproofing project, as it can influence both the cost and the methods used. Height regulations may dictate your ceiling design, impacting how waterproofing solutions are applied. A higher ceiling often allows for more effective drainage systems, while lower ceilings may complicate installation and increase costs.
| Ceiling Height | Cost Impact | Installation Method |
|---|---|---|
| Under 7 ft | Higher costs | Limited options |
| 7-8 ft | Moderate costs | Standard methods |
| Over 8 ft | Lower costs | Advanced solutions |
Consider these factors to make informed decisions!
Accessibility of the Area
When considering basement waterproofing, the accessibility of the area plays an essential role in determining costs.
If the site has location challenges or tight spaces, maneuvering equipment can become complicated and time-consuming.
Additionally, the presence of underground utilities can further impact both the approach and the overall price of the project.
Site Location Challenges
While tackling basement waterproofing, you might encounter site location challenges that particularly affect accessibility.
These challenges can lead to increased costs and complications, especially regarding drainage issues and soil composition.
Here are three key factors to take into account:
- Proximity to Water Sources: Nearby rivers or lakes can complicate drainage solutions.
- Soil Composition: Clay-heavy soils retain water, making waterproofing more complex.
- Terrain Features: Steep slopes or rocky landscapes may hinder access for equipment and materials.
Equipment Maneuverability
Although you mightn’t think about it at first, equipment maneuverability plays an essential role in the success of your basement waterproofing project. The types of equipment used, such as pumps and excavators, can greatly impact efficiency.
If the workspace is cramped or has tight corners, maneuverability challenges arise, making it tough for crews to operate effectively. This can lead to increased labor costs and longer project timelines.
Ensuring your basement area is accessible for various equipment types will help minimize these challenges, ultimately contributing to a smoother process and potentially lowering your overall waterproofing expenses.
Underground Utilities Presence
Maneuvering equipment becomes even more complicated when underground utilities are present.
You have to take into account several factors to guarantee a safe and efficient waterproofing job:
- Utility Mapping: Before starting, it’s essential to identify the location of all underground utilities to avoid costly damages or delays.
- Excavation Techniques: Using proper techniques can minimize disruption and risk to existing utilities.
- Access Limitations: Tight spaces may restrict equipment movement, impacting both time and cost.
Being aware of these factors can help you navigate the challenges and keep your basement waterproofing project on track.
Material Costs
When it comes to basement waterproofing, understanding material costs is essential for budgeting your project effectively. The quality of materials you choose directly impacts both durability and performance. Higher-quality materials might come at a premium, but they often save you money in the long run by reducing future repairs. Additionally, the installation techniques you opt for can influence overall costs. Here’s a quick comparison of common materials:
| Material Type | Estimated Cost per Square Foot | Durability Rating |
|---|---|---|
| Asphalt Membrane | $2 – $4 | Moderate |
| Liquid Rubber | $3 – $6 | High |
| Drainage Board | $1 – $3 | Low |
Labor Expenses
Understanding labor expenses is essential for accurately estimating your basement waterproofing project’s total cost.
Labor rates can vary considerably based on experience and location. Additionally, the project duration impacts overall expenses. Here’s what to reflect on:
- Labor Rates: Skilled workers may charge higher rates, but they often complete tasks more efficiently.
- Project Duration: Longer jobs can increase costs due to extended labor time and potential delays.
- Complexity: More complicated projects require specialized labor, which can drive up rates.
Conclusion
In summary, when planning your basement waterproofing project, keep these seven factors in mind. Your home’s location, the waterproofing system you choose, the extent of water damage, the basement’s size, and accessibility all play vital roles in determining costs. By understanding material and labor expenses, you can better budget for your project. Taking the time to evaluate each aspect will help guarantee you make informed decisions and ultimately protect your home from water damage.
5 Common Mistakes in Expert Basement Waterproofing
When it comes to basement waterproofing, you might overlook some critical factors that could compromise the entire process. Ignoring proper drainage, for instance, can lead to serious issues down the line. Additionally, wall and floor cracks are often dismissed, creating vulnerabilities. These mistakes can escalate quickly, resulting in expensive repairs and structural damage. Understanding these common pitfalls is essential for safeguarding your basement effectively. Let’s explore these mistakes further.
Key Takeaways
- Ignoring proper drainage systems can cause water pooling and structural damage near foundations.
- Overlooking wall and floor cracks may lead to ineffective waterproofing; regular inspection is vital.
- Focusing solely on interior waterproofing neglects necessary exterior drainage and protection measures.
- Using inadequate sealants can result in persistent moisture problems; choose high-quality options like polyurethane or epoxy.
- Failing to maintain and inspect regularly allows small issues to escalate into costly repairs.
Ignoring the Importance of Proper Drainage
When it comes to basement waterproofing, neglecting proper drainage can lead to significant problems down the line. Effective drainage systems are essential for managing water flow around your home.
Without them, excess water can pool near your foundation, increasing the risk of leaks and structural damage. You should verify your gutters are cleaned regularly and that downspouts direct water away from your basement.
Additionally, installing a sump pump can help manage any groundwater that accumulates. By prioritizing these drainage solutions, you’ll protect your basement from future issues, saving you time and money in costly repairs.
Overlooking Wall and Floor Cracks
Many homeowners underestimate the impact of wall and floor cracks on basement waterproofing. A thorough crack assessment is crucial to identify vulnerabilities. Ignoring these cracks can lead to significant water intrusion.
Here are key considerations for effective repair techniques:
- Identify: Inspect your basement regularly for new or widening cracks.
- Evaluate: Determine the severity and type of cracks; not all require the same solutions.
- Repair: Use appropriate materials, like epoxy for minor cracks or professional help for larger issues.
Addressing these cracks promptly can save you from costly damage and guarantee your basement remains dry and secure.
Neglecting to Address Exterior Waterproofing
Although you might focus primarily on interior solutions, neglecting exterior waterproofing can lead to serious long-term issues for your basement.
Effective exterior drainage solutions, such as proper grading and well-placed downspouts, direct water away from your foundation. Utilize high-quality waterproofing materials like membranes and coatings to protect your walls from moisture intrusion.
Implementing effective exterior drainage solutions and using quality waterproofing materials are key to safeguarding your foundation from moisture.
Regularly inspect gutters and drains to guarantee they’re functioning correctly. If you overlook these external factors, water can accumulate, increasing hydrostatic pressure against your basement walls, ultimately compromising their integrity.
Prioritizing exterior waterproofing is essential for a thorough and lasting solution to basement moisture problems.
Using Inadequate Sealants
Using inadequate sealants can undermine your basement waterproofing efforts, leading to persistent moisture issues.
To guarantee effective sealing, consider these key points:
- Sealant Types: Choose appropriate sealants like polyurethane, silicone, or epoxy, depending on your basement’s specific conditions.
- Surface Preparation: Properly clean and dry surfaces before application to enhance adhesion and effectiveness.
- Application Techniques: Use caulking guns or brushes for uniform application and make sure you apply at the correct temperature for best curing.
Failing to Maintain and Inspect Regularly
Regular maintenance and inspection of your basement waterproofing system are essential for long-term effectiveness. By neglecting routine inspections, you risk overlooking early signs of water intrusion or damage.
Create a maintenance schedule that includes checking sealants, sump pumps, and drainage systems at least twice a year. During these inspections, look for cracks, mold, or standing water, which can indicate potential issues.
Addressing small problems promptly can prevent costly repairs down the line. Remember, a proactive approach guarantees your waterproofing system remains effective, protecting your basement from moisture-related damage and preserving your home’s structural integrity.
Conclusion
To guarantee effective basement waterproofing, it’s essential to avoid these common mistakes. Proper drainage must be prioritized, and you should routinely check for any wall or floor cracks. Don’t neglect exterior waterproofing solutions and confirm you’re using high-quality sealants. Finally, regular maintenance and inspections are key to catching small issues before they turn into costly repairs. By addressing these pitfalls, you’ll safeguard your basement against moisture and structural damage in the long run.

10 Effective Methods of Basement Waterproofing in Canton Ohio
If you own a home in Canton, Ohio, basement waterproofing is essential to prevent water damage and mold growth. You might be wondering which methods are the most effective for your situation. From installing interior drainage systems to ensuring proper gutter maintenance, there are several strategies to take into account. Let’s explore these effective methods that can protect your basement and keep your home safe from moisture issues.
Key Takeaways
- Install an interior drainage system to efficiently channel water away from the basement and reduce moisture buildup.
- Utilize sump pumps for effective flood protection, selecting the right type based on your basement’s size and water issues.
- Apply waterproof paint or sealant on walls and floors to create a moisture barrier and enhance the basement’s appearance.
- Implement exterior drainage systems, such as French drains, to direct surface water away from your home’s foundation.
- Regularly maintain gutters to ensure proper drainage and prevent water from accumulating near the foundation.
Install Interior Drainage Systems
When it comes to keeping your basement dry, installing an interior drainage system is one of the most effective solutions you can choose. This system channels water away from your basement, preventing moisture buildup and protecting your home from potential damage.
One of the key benefits of an interior drainage system is its ability to work seamlessly with your existing foundation, requiring minimal disruption during installation. You’ll also appreciate how it can enhance your home’s resale value by reducing the risk of mold and structural issues.
With an interior drainage system, you’re investing in long-term peace of mind for your basement.
Use a Sump Pump
An interior drainage system effectively channels water away from your basement, but to enhance your protection against flooding, incorporating a sump pump is a smart move.
Enhancing your basement’s flood protection with a sump pump is a wise decision for added safety.
There are various sump pump types, including submersible and pedestal pumps, each suited for different needs. Choosing the right one depends on your basement’s size and water issues.
Sump pump installation is straightforward, but consider hiring a professional for best results. They’ll make sure it’s positioned correctly to efficiently remove water.
With a reliable sump pump in place, you’ll greatly reduce the risk of water damage and keep your basement dry and safe.
Apply Waterproof Paint or Sealant
Waterproof paint or sealant can be a game-changer for keeping your basement dry. By applying waterproof coatings to your walls and floors, you create a barrier against moisture that helps reduce basement humidity.
Start with a clean surface, removing any dirt or loose paint. Once prepped, apply the sealant evenly, ensuring full coverage. This not only protects your basement from water intrusion but also enhances its appearance.
Improve Grading and Drainage Around the Foundation
To prevent water from pooling around your foundation, it’s essential to improve the grading and drainage around your home. Start by verifying your foundation slope directs water away. You can also reshape the landscape to create effective drainage patterns. Here’s a quick guide to help you:
| Action | Description |
|---|---|
| Check Slope | Confirm a 5-10% slope away |
| Clear Debris | Remove leaves and dirt |
| Install Swales | Create shallow channels |
| Add Soil | Raise areas near the foundation |
| Maintain Gutters | Keep them clear and functional |
These steps can greatly reduce water intrusion risks.
Install Exterior Drainage Systems
When it comes to keeping your basement dry, installing an exterior drainage system is key.
You’ll want to explore different types of systems, understand the installation process, and stay on top of maintenance and inspection.
Let’s break down these essential aspects to guarantee your home stays protected from water damage.
Types of Drainage Systems
Installing exterior drainage systems is a crucial step in protecting your basement from water intrusion. By utilizing the right drainage solutions, you can effectively direct water away from your foundation.
Here are some common types of drainage systems to take into account:
- French drains
- Surface drains
- Sump pumps
- Channel drains
- Downspout extensions
Each of these systems uses different drainage materials and methods to manage water flow. Choosing the right system for your property guarantees long-term protection against moisture issues, helping maintain a dry, safe environment in your basement.
Don’t underestimate the significance of proper drainage!
Installation Process Overview
After choosing the right drainage system for your property, it’s time to focus on the installation process. Start with foundation preparation by clearing the area of debris and ensuring proper grading. Gather your installation tools, including a shovel, level, and drainage pipe.
| Step | Action |
|---|---|
| 1 | Excavate around the foundation |
| 2 | Install gravel for drainage |
| 3 | Place drainage pipe |
| 4 | Backfill and compact soil |
Following these steps will help you effectively install an exterior drainage system, ensuring your basement stays dry and protected.
Maintenance and Inspection Tips
To keep your exterior drainage system functioning effectively, regular maintenance and inspection are essential.
Here are some tips to guarantee your system stays in top shape:
- Conduct regular inspections for clogs and damage.
- Clear debris from gutters and downspouts seasonally.
- Check for proper drainage slope around your foundation.
- Test sump pumps during heavy rain seasons.
- Repair any cracks or leaks promptly.
Utilize Vapor Barriers
When it comes to preventing moisture issues in your basement, utilizing vapor barriers is a smart choice. These barriers help keep humidity at bay, protecting your belongings and structure. Common vapor barrier materials include polyethylene sheets and foil-faced insulation. For effective results, you should focus on proper installation techniques: make certain the barrier covers the entire area, overlaps seams, and seals around pipes.
| Vapor Barrier Material | Advantages |
|---|---|
| Polyethylene Sheets | Cost-effective, durable |
| Foil-Faced Insulation | Reflects moisture, insulates |
| Spray Foam | Customizable, seals gaps |
| Liquid Membrane | Seamless, flexible |
Repair Foundation Cracks
When it comes to waterproofing your basement, addressing foundation cracks is essential.
You’ll first need to identify the types of cracks you’re dealing with, as different issues require different solutions.
Let’s explore effective repair techniques that can help keep your basement dry and secure.
Identify Crack Types
As you assess your foundation for cracks, it’s essential to differentiate between the various types that can occur.
Proper crack identification helps in implementing effective crack prevention strategies. Here are some common crack types to look for:
- Vertical cracks: Often harmless, but can indicate settling.
- Horizontal cracks: A sign of significant pressure, needing immediate attention.
- Diagonal cracks: May suggest uneven settling; monitor closely.
- Stair-step cracks: Typically found in masonry, indicating structural issues.
- Shrinkage cracks: Usually cosmetic, resulting from drying concrete.
Understanding these types will help you determine the right course of action for your foundation.
Repair Techniques Explained
To effectively address foundation cracks, it’s essential to choose the right repair technique based on the crack type and severity.
For minor cracks, consider using epoxy or polyurethane injections to seal them, preventing basement moisture from seeping in.
If you’re dealing with larger cracks, you might need to excavate the area and apply waterproofing materials like hydraulic cement or specialized sealants.
Always guarantee proper surface preparation for the best results.
Don’t forget to address drainage issues around your foundation to minimize future problems.
Ensure Proper Gutter Maintenance
While many homeowners focus on interior solutions for basement waterproofing, guaranteeing proper gutter maintenance is essential for preventing water damage. Neglecting your gutters can lead to costly repairs, so here are some key practices to follow:
- Schedule regular gutter cleaning to remove debris
- Check for clogs in downspouts and clear them
- Install downspout extensions to direct water away from your foundation
- Inspect gutters for leaks and repair as needed
- Verify gutters are properly sloped for ideal drainage
Consider Landscape Solutions
Proper gutter maintenance sets the stage for effective basement waterproofing, but landscape solutions can further enhance your home’s defenses against water intrusion.
Start by considering landscape grading; make sure your yard slopes away from your foundation. This simple adjustment helps direct water away from your basement.
Additionally, incorporate drainage plants—these are specifically chosen for their ability to absorb excess moisture. Not only do they beautify your landscape, but they also help manage water levels.
Consult With Professional Waterproofing Services
Consulting with professional waterproofing services can be a game changer when it comes to protecting your basement from water damage. Their expertise provides numerous waterproofing benefits that can save you time and money in the long run.
Professional waterproofing services can transform your basement protection, offering expertise that saves time and money.
Here’s what you gain from an expert consultation:
- Thorough assessment of your basement’s vulnerabilities
- Customized waterproofing solutions tailored to your needs
- High-quality materials and techniques for long-lasting results
- Regular maintenance plans to prevent future issues
- Peace of mind knowing your home is protected
Don’t underestimate the value of professional help—it’s an investment that pays off.
Conclusion
In Canton, Ohio, protecting your basement from water damage is essential. By implementing these effective waterproofing methods, you can keep your space dry and secure. Whether it’s installing drainage systems, using sump pumps, or maintaining your gutters, each step plays an important role. Don’t hesitate to consult with professionals for tailored solutions that suit your home. With the right strategies in place, you’ll enjoy peace of mind knowing your basement is safe from moisture issues.
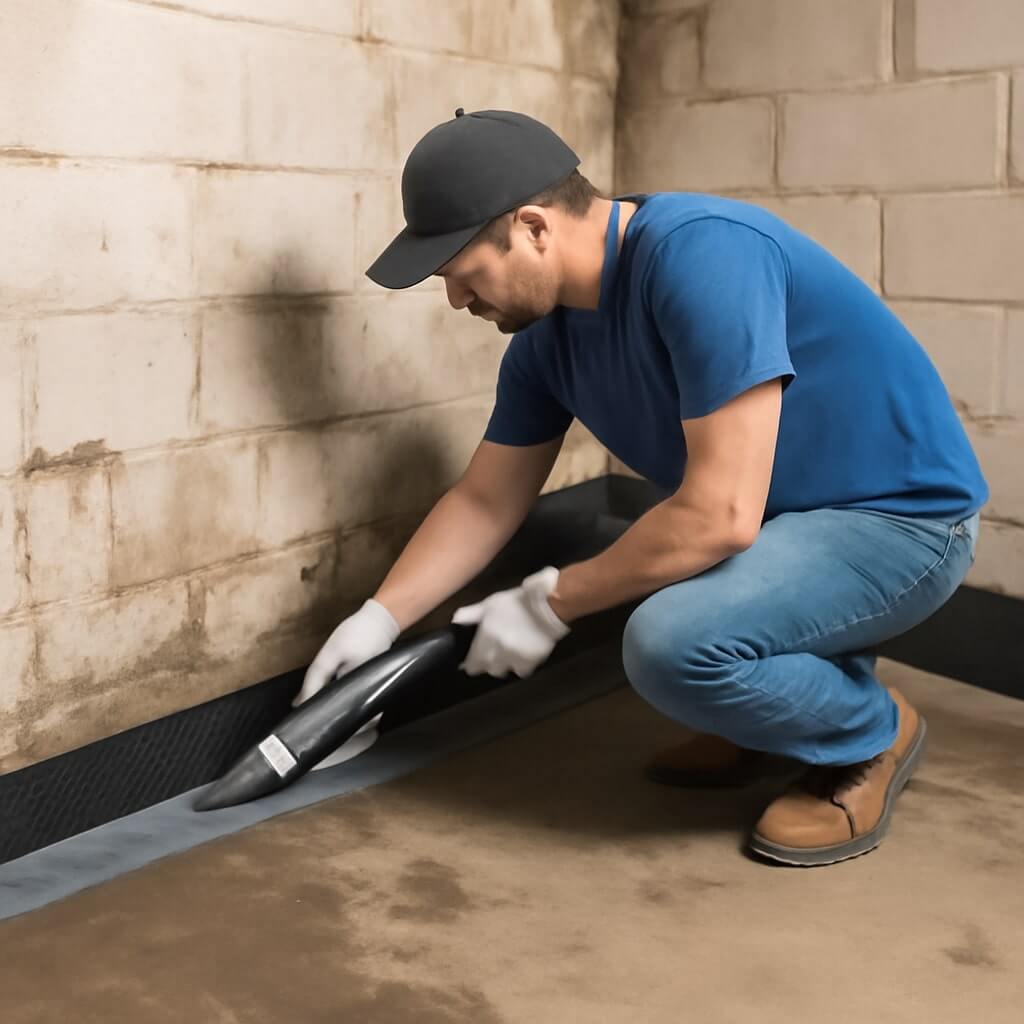
How to Seal Your Basement From Water Intrusion With Inside Waterproofing Techniques
Sealing your basement from water intrusion is essential for maintaining a safe and dry environment. You’ll need to understand the common causes of water issues and assess your space for any signs of damage. Implementing effective interior waterproofing methods can greatly reduce the risk of moisture problems. By addressing cracks, installing drainage systems, and using sealants, you can create a robust defense. But what specific techniques should you prioritize for ideal results?
Key Takeaways
- Inspect your basement for cracks and moisture, documenting any findings to prioritize repairs and waterproofing efforts.
- Use hydraulic cement to seal wall cracks, creating a strong barrier against water intrusion.
- Install an interior drainage system to effectively redirect water accumulation away from your foundation.
- Utilize dehumidifiers to manage humidity levels and prevent mold growth in your basement.
- Regularly maintain and inspect waterproofing systems, ensuring timely repairs and efficient sump pump functionality.
Understanding the Causes of Basement Water Intrusion
Water intrusion in basements often occurs due to a combination of factors, including poor drainage, inadequate waterproofing, and structural issues.
Effective rainwater management is essential; if your gutters and downspouts aren’t directing water away from the foundation, it can pool and seep in.
Additionally, foundation cracks can develop over time, allowing moisture to penetrate your basement.
Regularly inspect your foundation for these cracks and address them promptly.
Assessing Your Basement for Water Damage
Before you can effectively seal your basement from water intrusion, it’s essential to assess the space for any existing water damage.
Start with a thorough basement inspection to identify visible signs, such as stains, mold, or peeling paint. Pay close attention to corners, windows, and any cracks in the walls or floor.
Next, conduct a moisture evaluation using a moisture meter to detect hidden dampness. High readings indicate areas needing immediate attention.
Document your findings to prioritize repairs and waterproofing efforts, ensuring you address all potential entry points for water before implementing any sealing techniques.
Interior Waterproofing Methods to Consider
Having assessed your basement for any signs of water damage, it’s time to explore effective interior waterproofing methods that can prevent future issues.
Start by addressing wall cracks, which can allow water to seep in and increase interior moisture levels. You can use hydraulic cement to fill these gaps, creating a strong barrier.
Additionally, consider installing an interior drainage system to redirect any water accumulation away from your walls.
Finally, a dehumidifier can help manage humidity levels, reducing the chance of mold growth.
Implementing these methods guarantees your basement remains dry and protected from water intrusion.
Applying Sealants and Coatings
When applying sealants and coatings to your basement, it’s essential to choose the right type suited for your specific needs.
Various sealants, such as epoxy and polyurethane, offer different benefits depending on the level of moisture and surface conditions.
Understanding proper application techniques will guarantee maximum effectiveness and long-lasting protection against water intrusion.
Types of Sealants
There are several types of sealants available for protecting your basement from water intrusion, each designed to address specific needs and conditions.
Consider these options:
- Epoxy Sealants: Ideal for concrete surfaces, they create a strong, impermeable barrier against moisture.
- Polyurethane Coatings: Flexible and durable, these coatings adapt to surface movements while sealing against water.
- Acrylic Sealants: Water-based and easy to apply, they provide moderate protection and are suitable for interior walls.
- Silicone Sealants: Excellent for sealing joints and cracks, they offer waterproofing benefits and remain flexible over time.
Choose the right sealant to guarantee effective moisture protection.
Application Techniques
To effectively apply sealants and coatings in your basement, preparation is essential.
Start with thorough surface preparation; clean the walls to remove dirt, dust, and moisture. Use a wire brush or pressure washer for stubborn residues.
Once dry, inspect for cracks and fill them with appropriate sealant.
For application techniques, use a roller or brush for even coverage, ensuring you follow the manufacturer’s instructions.
Apply the sealant in thin layers, allowing each coat to dry before adding another. This method enhances adhesion and effectiveness, ensuring a durable barrier against water intrusion.
Consistency is key to achieving ideal results.
Installing Interior Drainage Systems
A reliable interior drainage system is essential for preventing water intrusion in your basement.
To guarantee effective drainage system design and successful sump pump installation, follow these steps:
- Assess your basement layout to determine the best drainage points.
- Excavate the perimeter of your basement floor to create a trench for the drainage system.
- Install drainage pipes in the trench, ensuring they slope towards the sump pump for ideal flow.
- Connect the sump pump, ensuring it’s properly wired and positioned to remove water efficiently.
Maintaining Your Waterproofing Solutions
While installing effective waterproofing solutions is vital, maintaining them is equally important to confirm long-term protection against water intrusion.
Conduct regular inspections of your waterproofing systems to identify any signs of wear or damage. Check for cracks, mold, or moisture, and address these issues promptly.
Regularly inspect your waterproofing systems for cracks, mold, or moisture to ensure prompt repairs and long-lasting protection.
Seasonal maintenance is essential; make sure that gutters and downspouts are clear of debris to prevent water buildup near your foundation.
Additionally, monitor your sump pump’s functionality and battery life.
Conclusion
By implementing these interior waterproofing techniques, you can effectively seal your basement against water intrusion. Address cracks with hydraulic cement, install a reliable drainage system, and maintain ideal humidity levels with dehumidifiers. Regular inspections will guarantee your waterproofing methods remain intact and functional. With these thorough strategies in place, you’ll greatly reduce the risk of water damage, protecting your basement and enhancing the overall integrity of your home. Stay proactive to keep your space dry and secure.